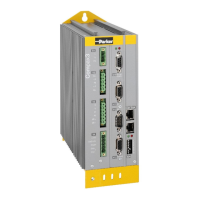
Parker EME
Compax3 device description
192-120114 N5 C3I22T11 June 2008 39
Required tools:
Allen key M5 for fixing the devices in the control cabinet.
Crosstip screwdriver M4 for connection rails of the DC rail modules.
Crosstip screwdriver M5 for grounding screw of the device.
Flat-bladed screwdriver 0.4x2.5 / 0.6x3.5 / 1.0x4.0 for wiring and mounting of the
phenix clamps.
Order of installation
Fixing the devices in the control cabinet.
Predrilling the mounting plate in the control cabinet according to the specifica-
tions. dimensions. Fit M5 screws loosely in the bores.
Fit device on the upper screws and place on lower screw. Tighten screws of all
devices. The tightening torque depends on the screw type (e.g. 5.9Nm for M5
screw DIN 912 8.8).
Connection of the internal supply voltage.
The Compax3M axis controllers are connected to the supply voltages via the rail
modules. Details (see page 42).
Deblocking the yellow protective cover with a flat-bladed screwdriver on the up-
per surface (click mechanism). Remove the closing devices (contact protection)
that are not required from between the devices.
Connecting the rail modules, beginning with the mains module.
For this, loosen crossheadscrews (5 screws at the right in the mains module, all
10 screws in the next axis controller), push the rails one after the other against
to the left and tighten screws. Proceed accordingly for all adjacent axis control-
lers in the combination.
Max. tightening torque: 1.5Nm.
Close all protective covers. The protective covers must latch audibly.
Please Note:
Insufficiently fixed screw connections of the DC power voltage rails may lead to the
destruction of the devices.
Protective covers
In order to secure the contact protection against the alive rails, it is absolutely neces-
sary to respect the following:
Insert the yellow plastic device at the left or right of the rails.
Make sure that the yellow plastic device is placed at the left of the first device and
at the right of the last device in the combination and have not been removed.
Setup of the devices only with closed protective covers.
Connect protective earth to mains module (M5 crossheadscrew on front of device
bottom).
Connecting the internal communication. Details (see page 61).
Connecting the signal and fieldbus connectors. Details (see page 65).
Connection of mains power supply Details (see page 45) ballast resistor Details
(see page 47) and motor Details (see p
age 48).
Connecting the configuration interface to the PC. Details (see page 61).

 Loading...