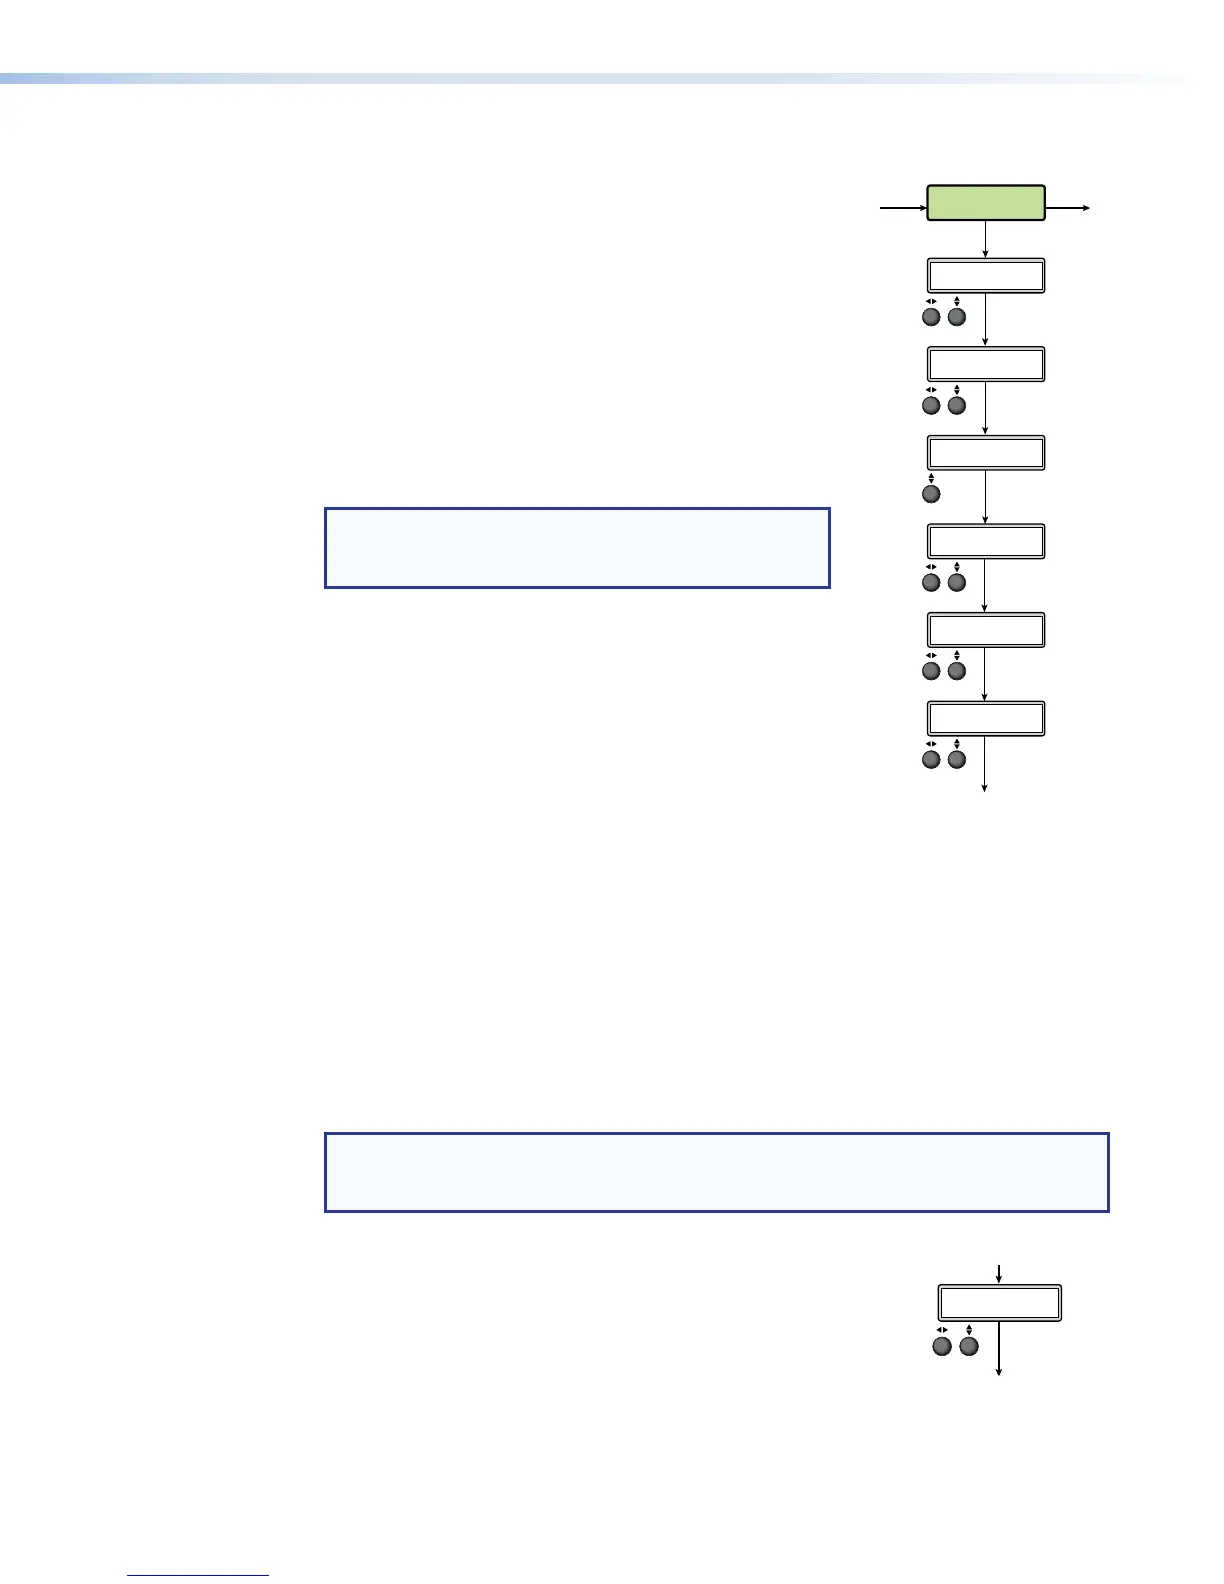
Advanced Configuration Menu
The following flowchart provides an overview of the
Advanced Configuration menu. Options include
Auto-Image (on or off), Auto Memory (on or off), HDMI preview
out resolution, test patterns, record drive location limiter,
device reboot, and factory reset to defaults.
Auto-Image
This mode is selectable per input and is used where a variety
of input sources are likely to be encountered. Auto-Image
automatically sizes and positions an incoming video signal to
fill the channel window when a new input signal is detected.
When Auto Memory is off, Auto-Image executes regardless of
whether the same input frequency has been detected before.
NOTE: Enabling Auto-Image when overscan is also
enabled recalls the default sampling settings for the
detected input rate.
Use the left ([) ADJUST knob to select the desired input. The
right ({) ADJUST knob toggles Auto-Image on or off (default).
When enabled and a new input frequency is detected,
an existing Auto Memory for the signal (if AUTO MEMORY
is enabled) is applied. If no entry exists, an automatic
Auto-Image is applied to the new signal. This sizes and
positions the incoming video signal to display properly within
the channel window, with respect to the current aspect ratio
setting.
The value is global to all analog inputs on the SMP351 and defines the minimum luminosity
that the Auto-Image routine defines as active video (default: 25%).
Auto-Image affects active pixel, active lines, H/V start, and phase configurations. All other
picture controls remain unchanged. If the aspect ratio is set to Fill, H/V position returns to
0, 0 and the H/V size is set to match the current output rate. Input sampling settings are
updated according to standard Auto-Image operation. If the aspect ratio is set to Follow or
Fit, the H/V position and H/V size are set to maintain the native aspect ratio of the input in
respect to the current output resolution. All input sampling settings are updated according
to standard Auto-Image operation. Image size and position are reset to default values after
auto imaging.
Press NEXT to select the input value and move to the next submenu.
NOTE: Aside from the standard Auto-Image SIS command, there are unique
commands to Auto-Image to fill the output and maintain input aspect ratio (see
Auto-Image and Memory on page171).
Preview HDMI output
Use either front panel ADJUST knob to select the refresh rate of
the preview HDMI output. It can be either 50Hz or 60Hz (default).
The resolution follows the archive output and cannot be changed.
Press NEXT to select the value and move to the next submenu.
MenuMenu
1H[W
1H[W
1H[W
1H[W
1H[W
1H[W
1H[W
ADVANCED
CONFIG
Rotate ] to toggle Auto
Memory On or Off.
Rotate either to select reboot or
to reset all advanced configur
Rotate either to select a
test pattern.
Rotate = to select input.
Rotate ] to toggle on or off.
Rotate either to select a
resolution.
Rotate either to select
the drive restriction.
IN<1> AUTO IMAGE
<OFF>
TEST PATTERN
<N/A>
RESET
<NONE>
AUTO MEMORY
<ON>
PREVIEW HDMI OUT
<1280X720@60Hz>
RECORD DRIVE LIMITER
<NOT RESTRICTED>
1H[W
1H[W
1H[W
1H[W
1H[W
1H[W
ADVANCED
CONFIG
Rotate ] to toggle Auto
Memory On or Off.
Rotate either to select reboot or
to reset all advanced configurations.
Rotate either to select a
test pattern.
Rotate = to select input.
Rotate ] to toggle on or off.
Rotate either to select a
resolution.
Rotate either to select
the drive restriction.
IN<1> AUTO IMAGE
<OFF>
TEST PATTERN
<N/A>
RESET
<NONE>
AUTO MEMORY
<ON>
PREVIEW HDMI OUT
<1280X720@60Hz>
RECORD DRIVE LIMITER
<NOT RESTRICTED>
SMP351 • Front Panel Operation 39