Doc #: L-2600-1023 Page 70 Rev. 02
5 JOB SETUPS
Touch the current Job display area in the Main
Screen (see “a” in Figure 8 on page 21) to select the
Job Setups screen shown in Figure 62. The
parameters consisting of die protection settings,
limit switch settings, part counters, scrap counters,
and other settings for the current job can be stored
for later use. In addition, the settings for a job
previously stored can be recalled into the current
job.
The jobs can be arranged on the display in either
alphabetical order by their description or in
numerical order by job number by touching the
Sort By Number / Sort By Descrip. softkey (this
softkey toggles between the two descriptions).
This screen allows selections to Recall a job setup, Store a job setup, or Erase a job setup as described in
the following sections.
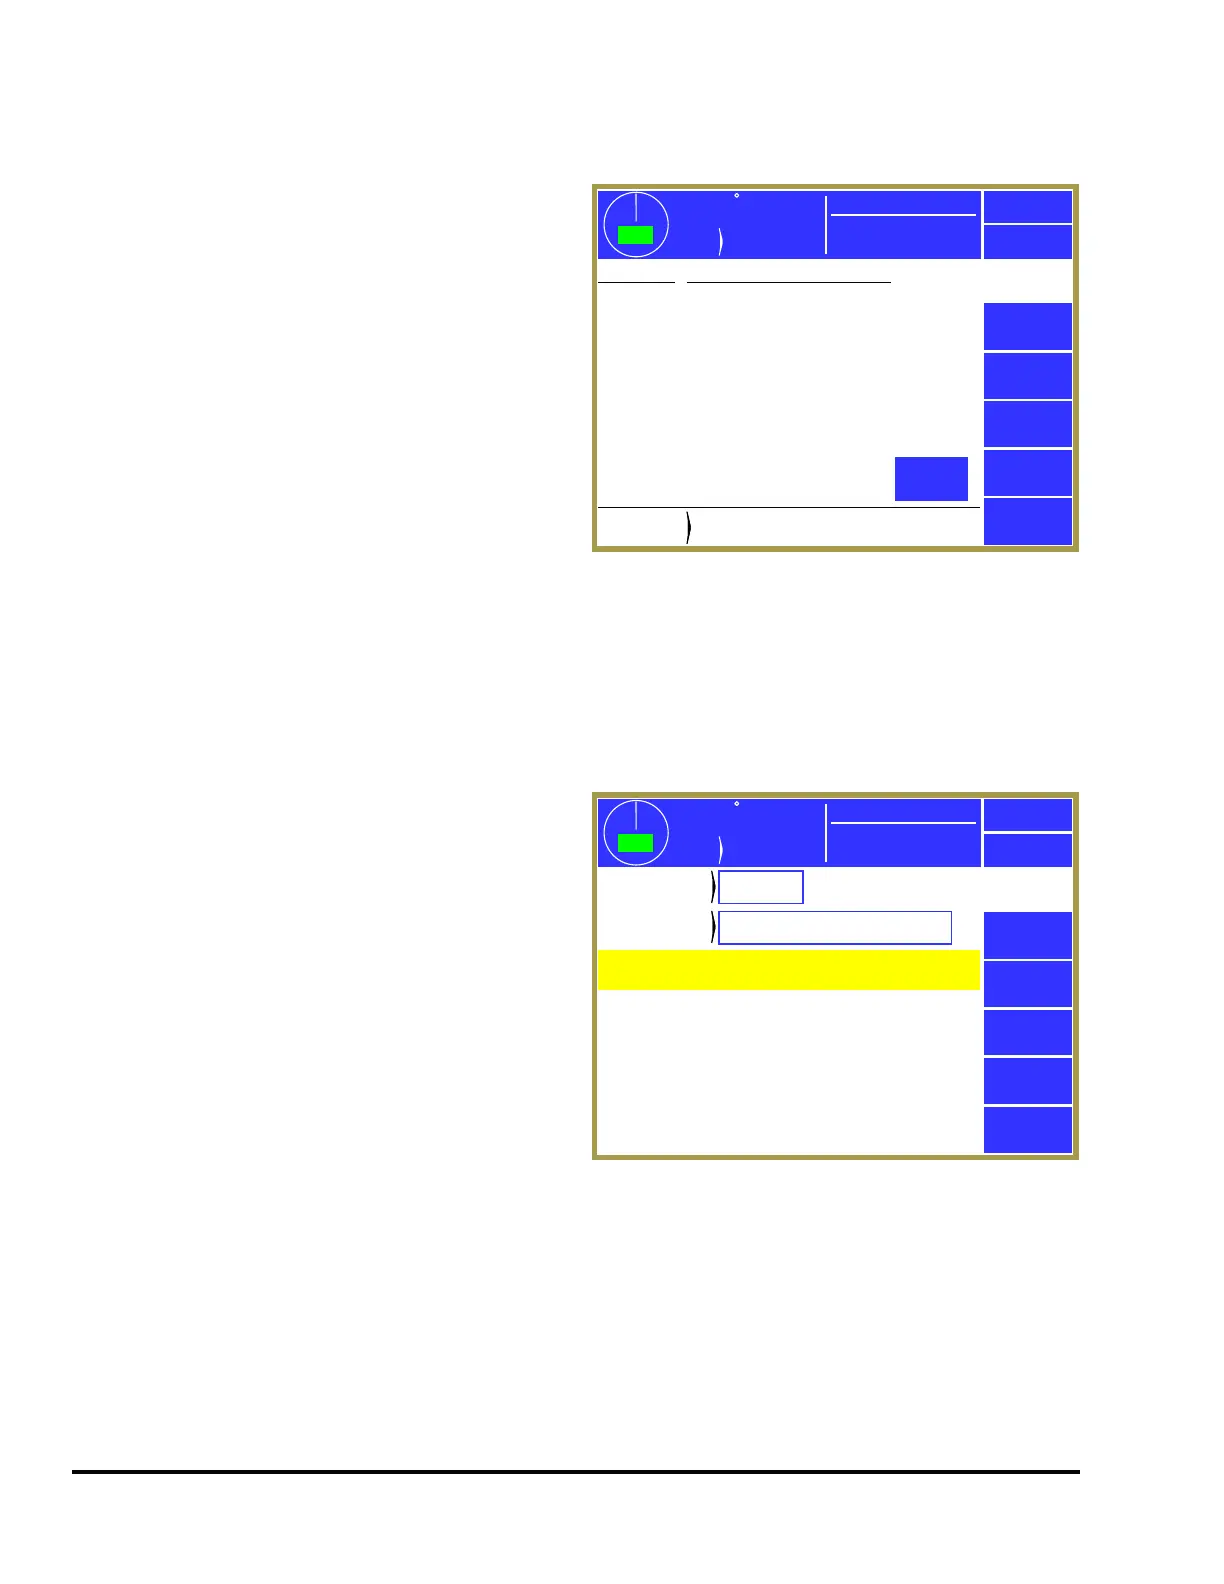
5.1 Store Setup
From the Jobs screen shown in Figure 62, touch the
Store Setup softkey to display the screen shown in
Figure 63. The Store Setup screen allows the user
to place all settings for the job currently in use into
the internal file storage area.
The user must have access control to change the
parameters on this screen or store the job. Access
control is described in section 3.1.7 on page 14. If
an access control mode is being used that requires a
password, a user must be configured to have the
“Store Jobs” permission to store a job.
The screen shown in Figure 63 allows the user to
enter a new number under which the job will be
stored by selecting the “Job Number” field. This number must be unique to store to a new job. Entering
a number already in use allows the current settings to replace the previous ones for that job number.
After entering a job number, the “Job Description” field can be selected to enter an alphanumeric
description. Press the Store Setup softkey in order to save the current job information in the internal file
system under the job number and job description displayed. The operator terminal automatically returns
to the Job Setups screen.
359
TOP
Stroke
Mode
Continuous
Stroke Speed
0
SPM
ACC
Espanol
Exit
359
TOP
Stroke
Mode
Continuous
Stroke Speed
0
SPM
ACC
Espanol
Exit
Job
Setups
Sort By
Descrip.
Recall
Setup
Store Setup
Erase
Setup
Job Description
1232
1233
1376
1377
2445
2478
3633
17854
25435
192827
289373
289450
Current
Job
Current
Job
1233
Lower Bracket
Upper Bracket
Lower Bracket
A-8236-KJ Upper Arm
A-8354-LO Lower Arm
Z-6353-AA Frame
B-8736-ZS Brake Shoe
C-8362-HY S. Bracket
C-3873-JF S. Pan
C-3763-UF S. Back
C-5733-YF S. Latch
F-8367-TD LF Pan
F-8546-GD RF Pan
Next
Page
359
TOP
Stroke
Mode
Continuous
Stroke Speed
0
SPM
ACC
Espanol
Exit
359
TOP
Stroke
Mode
Continuous
Stroke Speed
0
SPM
ACC
Espanol
Exit
WARNING!
Incorrect setups may cause damage and/or injury.
Store
Setup
Store Setup
1233
Job
Number
Job
Number
Job
Description
Job
Description
Lower Bracket
To store a job setup:
1) Program and verify all settings for this job setup.
2) Enter the job number for this setup.
3) Enter a job description for this setup.
Press “Store Setup” when ready.
Figure 63 Store Jobs Screen