System Overview 35
3.2.1 Front Panel Elements
On the front panel of the 1936/2936 Series there are the following elements:
A faceplate with an active color liquid crystal display
USB A connector
Power switch
Setup/Enter, and Esc keys
Rubberized horizontal (left/right) and vertical (up/down) arrow keys
Four rubberized blank keys below the display (referred to as “soft keys”
later in the manual, as their function depends on the text on the screen
above the key.)
Six rubberized buttons with dedicated functions – Range, Mode, Hold,
Filter, Lambda (λ), Zero.
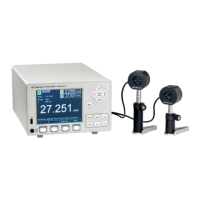
3.2.2 Understanding the Main Screen
The main screen is displayed after startup (Figure 15). The middle portion of
the main screen is a real-time display of power measured in last used units, and
the lower half of the main screen is a row of four labels for actions that the
keys below them will activate. The top of this screen has the channel settings
for the focus channel and a smaller reading for the non-focus channel (B in the
figure). Note that the screen will display “Saturated” message either when the
amount of power surpasses the detector saturation specification, or when the
detector spot size and/or detector saturation specifications are missing in the
calibration module.
When an annunciator label is visible, its function is enabled. If the
annunciator appears on the display as an unlabeled key, the function it
represents is currently disabled. Annunciators loosely correspond to keypad
keys, which are used either alone or in combination with the navigation and
selection keys to control annunciator functions.
3.3 Rear Panel Layout
3.3.1 Elements That Vary by Model (on back panel)
Single-channel power meters have the processing electronics installed on
CH A, while dual-channel power meters have both CH A and CH B installed.
Input Connectors
The input connectors are on the rear panel. 1936-R and 2936-R power meter
models support input from external detectors through DB15 detector
connectors. Input channels on dual-channel power meters are labeled “CH A”
and “CH B”.
A Trigger input offers the possibility of synchronizing the power meter
measurements with external events.
 Loading...