January 2010
4-103
Phaser 7760 Color Laser Printer
ADJ 9.10
Repairs and Adjustments
Revised
ADJ 9.10 RegiCon Adjustment
Procedure
For the following procedure, you must perform certain steps prior to, during, and after the tests
are run. The following information is vital to the process and must be followed in order for each
procedure to function properly.
• RegiCon fails if there are any print-quality problems. Diagnose and repair any print-quality
problems before running any RegiCon procedure. To resolve a print-quality problem, refer
to Print-Quality Problems Overview procedure (Section 3).
• To perform the test, enter the Hidden Service Menu: Printer Menu > Troubleshooting >
Service Tools > Printer Status Page > hold the Up and Down buttons simultaneously >
RegiCon Setup Cycle > OK.
• The procedures are listed in the order they need to be performed for optimal adjustments.
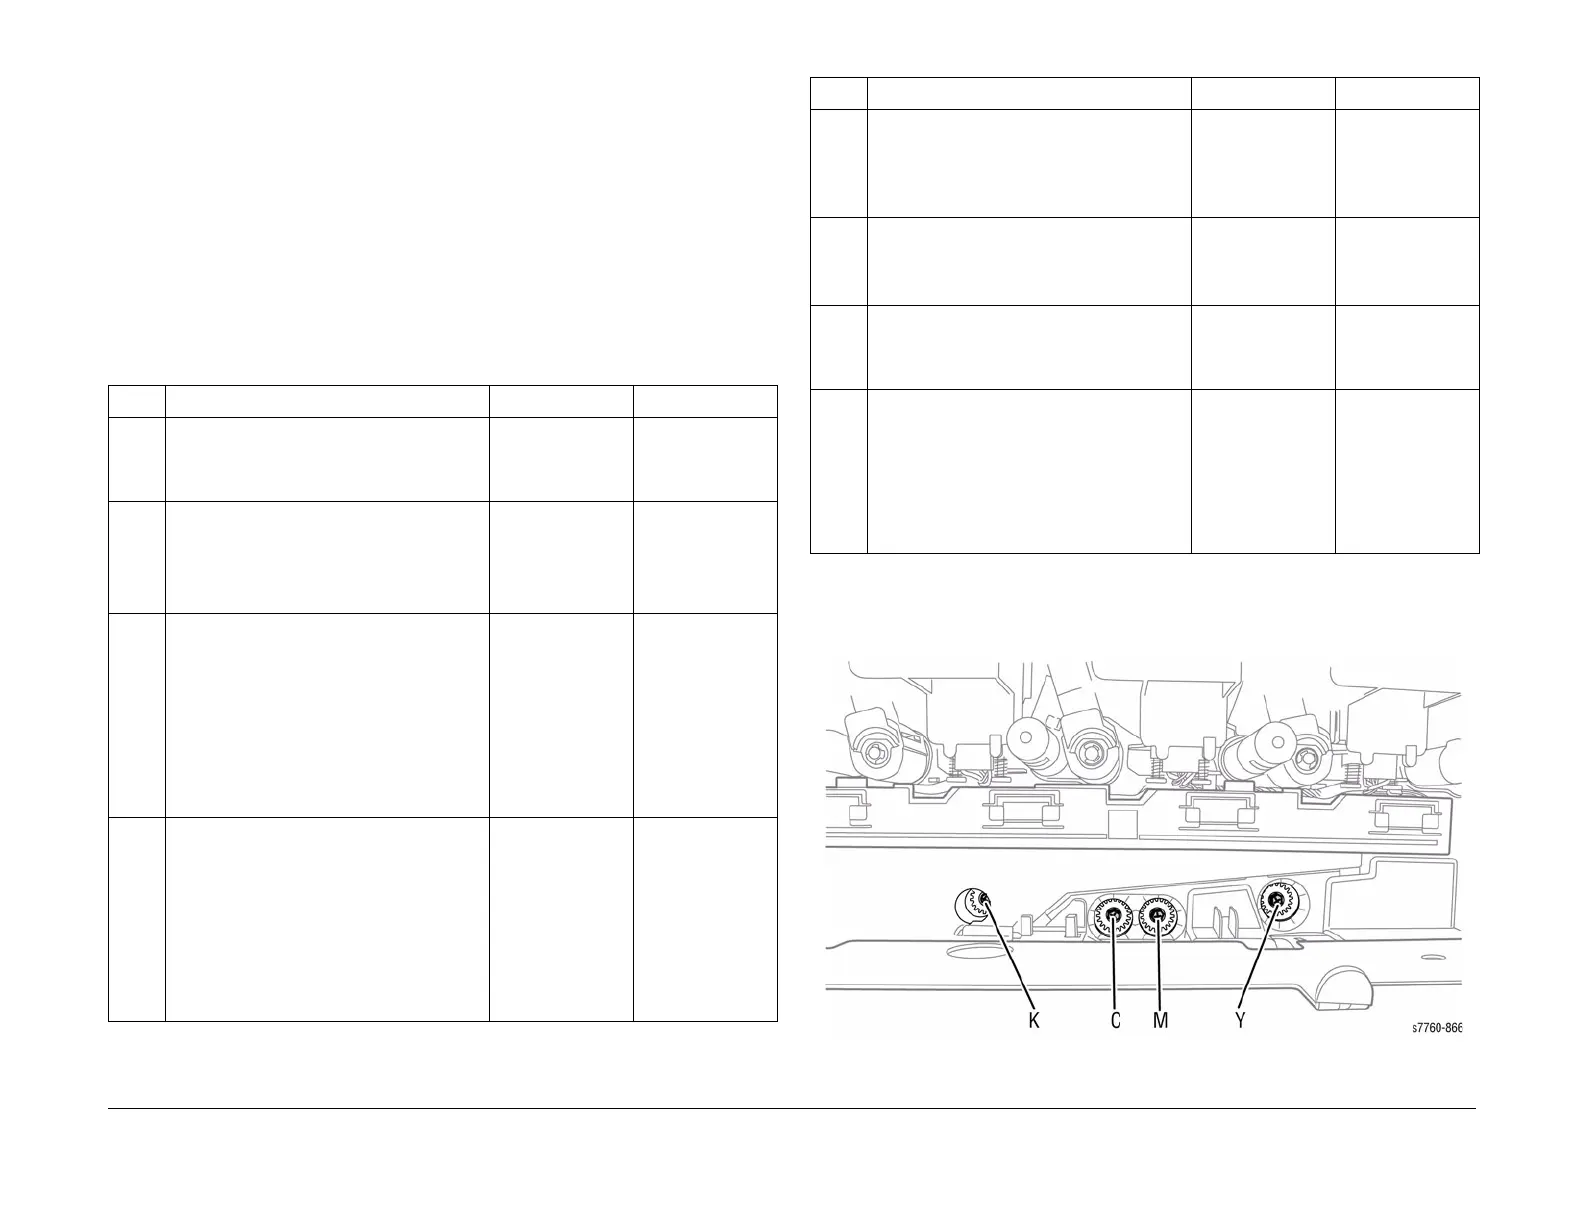
Adjustment screws are located behind the Waste Cartridge, which must be removed for
access. From left to right, the adjustment screws are: K, C, M, and Y.
Figure 1 Adjustment Screws
Table 1 Troubleshooting Procedures
Step Actions and Questions Yes No
1 1. Enter the Service Diagnostics Menu
and print the Grid 1-Dot test print.
2. Do all the colors align correctly?
Complete. Color
registration prob-
lem is not related
to RegiCon.
Go to step 2.
2 1. Perform the Resetting NVRAM proce-
dure (Section 6) using the original hard
drive that has been replaced.
2. Reprints the Grid 1-Dot test print.
3. Do all the colors align correctly now?
Complete. Go to step 3.
3 1. Perform the RegiCon #1 Fine Skew
Adjustment procedure, ADJ 9.11 (Sec-
tion 4).
2. Do the results indicate the test has
passed?
Perform skew cor-
rection adjust-
ments as indicated
in the second
panel data until
less than +/-5
clicks are required
for each color (Fig-
ure 1). Go to step
4.
Go to step 8.
4 1. Perform the RegiCon #2 In/Out Skew
Adjustment procedure, ADJ 9.12 (Sec-
tion 4).
2. Do the results indicate the test has
passed?
Perform skew cor-
rection adjust-
ments as indicated
in the Control
Panel data until
less than +/- 5
clicks are required
for each color (Fig-
ure 1).
Go to step 5.
Go to step 8.
5 1. Perform the RegiCon #3 Center Skew
Adjustment procedure, ADJ 9.13 (Sec-
tion 4).
2. Do the results indicate the test has
passed?
Go to step 7. Diagnose and
repair the MOB
Sensor.
6 1. Verify the MOB Sensor is correctly posi-
tioned in the center and repeat the
RegiCon #3 test.
2. Does the test pass now?
Go to step 7. Diagnose and
repair the MOB
Sensor.
7 1. Print the Grid 1-Dot test print.
2. Do the colors all align correctly?
Complete. Follow
the Store Engine
NVRAM proce-
dure (Section 6).
Go to step 8.
8 1. Perform the RegiCon #4 Coarse Skew
Adjustment, ADJ 9.14 (Section 4).
Perform the skew
correction adjust-
ments as indi-
cated in the
Control Panel data,
only until the test
passes, then go to
step 3.
Perform the
Coarse RegiCon
Initialization proce-
dure, ADJ 9.8
(Section 4).
Table 1 Troubleshooting Procedures
Step Actions and Questions Yes No
 Loading...


