Installation
9390 Reference manual 2-9
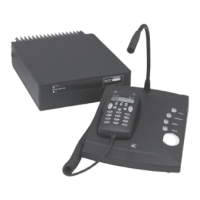
4. Plug the control cable into the 10-pin connector (the
cable only fits one way).
5. If you are connecting an extension loudspeaker, plug the
loudspeaker cable into the
L/S
(extension loudspeaker)
socket.
6. Insert the foam grommet into the slot on the cover plate.
7. The cover plate can be rotated to give you either top or
bottom cable entry. Replace the cover plate and secure it
with the four screws.
8. Make sure that the transceiver is disconnected from the
DC power source.
9. Plug the control cable into the
Remote Control
connector on the rear panel of the transceiver. Fasten the
cable securely.
10. Plug in the microphone by gently rotating the plug in the
microphone socket until the pins locate. Push the plug
home and fasten the locking ring until finger-tight. Do
not over tighten.
11. If the 6-metre control cable is too long, gather the excess
neatly and secure it out of the way. Do not cut the cable.
Make sure that the transceiver is disconnected from the DC
power source before connecting the control head to the
Remote Control
connector on the transceiver.