Do you have a question about the Expert Electronics MB1 and is the answer not in the manual?
Congratulates the user on purchasing the SDR transceiver.
Details the transceiver's features, including independent receive channels and display.
Lists basic and standard configurations of supplied accessories and optional equipment.
Lists critical operating rules to prevent damage and ensure safe operation of the transceiver.
Discusses antenna connection, impedance matching, and SWR requirements.
Emphasizes the importance of reliable grounding for electrical safety.
Details connecting the transceiver to AC mains, ensuring proper grounding.
Explains how to connect accessories to the front panel of the MB1.
Describes the function of the power button for turning the transceiver on and off.
Explains the TX button for switching between transmission and receiving modes.
Details the TUN button's function for activating the Automatic Tuner Unit.
Explains the MUT button for muting/unmuting audio volume and accessing sound mixer settings.
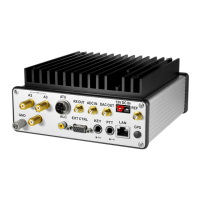
Details the HF antenna connectors for connecting HF antennas.
Explains the VHF antenna connectors for connecting VHF antennas.
Describes the GND terminal for grounding the transceiver.
Details the PA PTT connectors for controlling external power amplifiers.
Provides an overview of the transceiver's software main window display.
Describes the buttons in Section 1 of the main window, including Full screen and Start.
Explains indicators in Section 2, like ATU, PTT, LOCK, and IQ-file recording indicators.
Details indicators and buttons in Section 3, including antenna selection and mode indicators.
Lists technical characteristics of the receiver.
Lists technical characteristics of the transmitter.
Lists technical specifications of the internal PC.
Lists other technical characteristics like dimensions and power.
Explains how to turn the transceiver on and off.
Details various methods for tuning the transceiver frequency.
Explains how to adjust the AF gain (volume).
Details how to adjust the RF gain.
Calls up the ATU SETTINGS local panel.
Activates the Tuner in TX mode.
Activates the tuner and starts the tuning process.
Explains transceiver returning to RX mode after tuning.
Activates the SPLIT mode via the SPLIT button.
Sets the transmit frequency (VFO B) in SPLIT mode.
Transmits the message by pressing PTT or TX button.
Returns transceiver to RX mode after transmission.
Activates the Sub-receiver using the SUB button.
Sets the required VFO B frequency.
Allows simultaneous listening to VFO A and VFO B frequencies.
Explains RIT offset in RX mode for differing transmit and receive frequencies.
Details XIT offset in TX mode for differing transmit and receive frequencies.
| Antenna Connectors | SMA |
|---|---|
| Modes | FM |
| Display | LCD |
| ADC Resolution | 16 bit |
| DAC Resolution | 16 bit |