Home
HP
All in One Printer
PageWide Managed Color E77650
Page 225
HP PageWide Managed Color E77650 - Page 225
264 pages
Manual
Save Page as PDF
To Next Page
To Next Page
To Previous Page
To Previous Page
Loading...
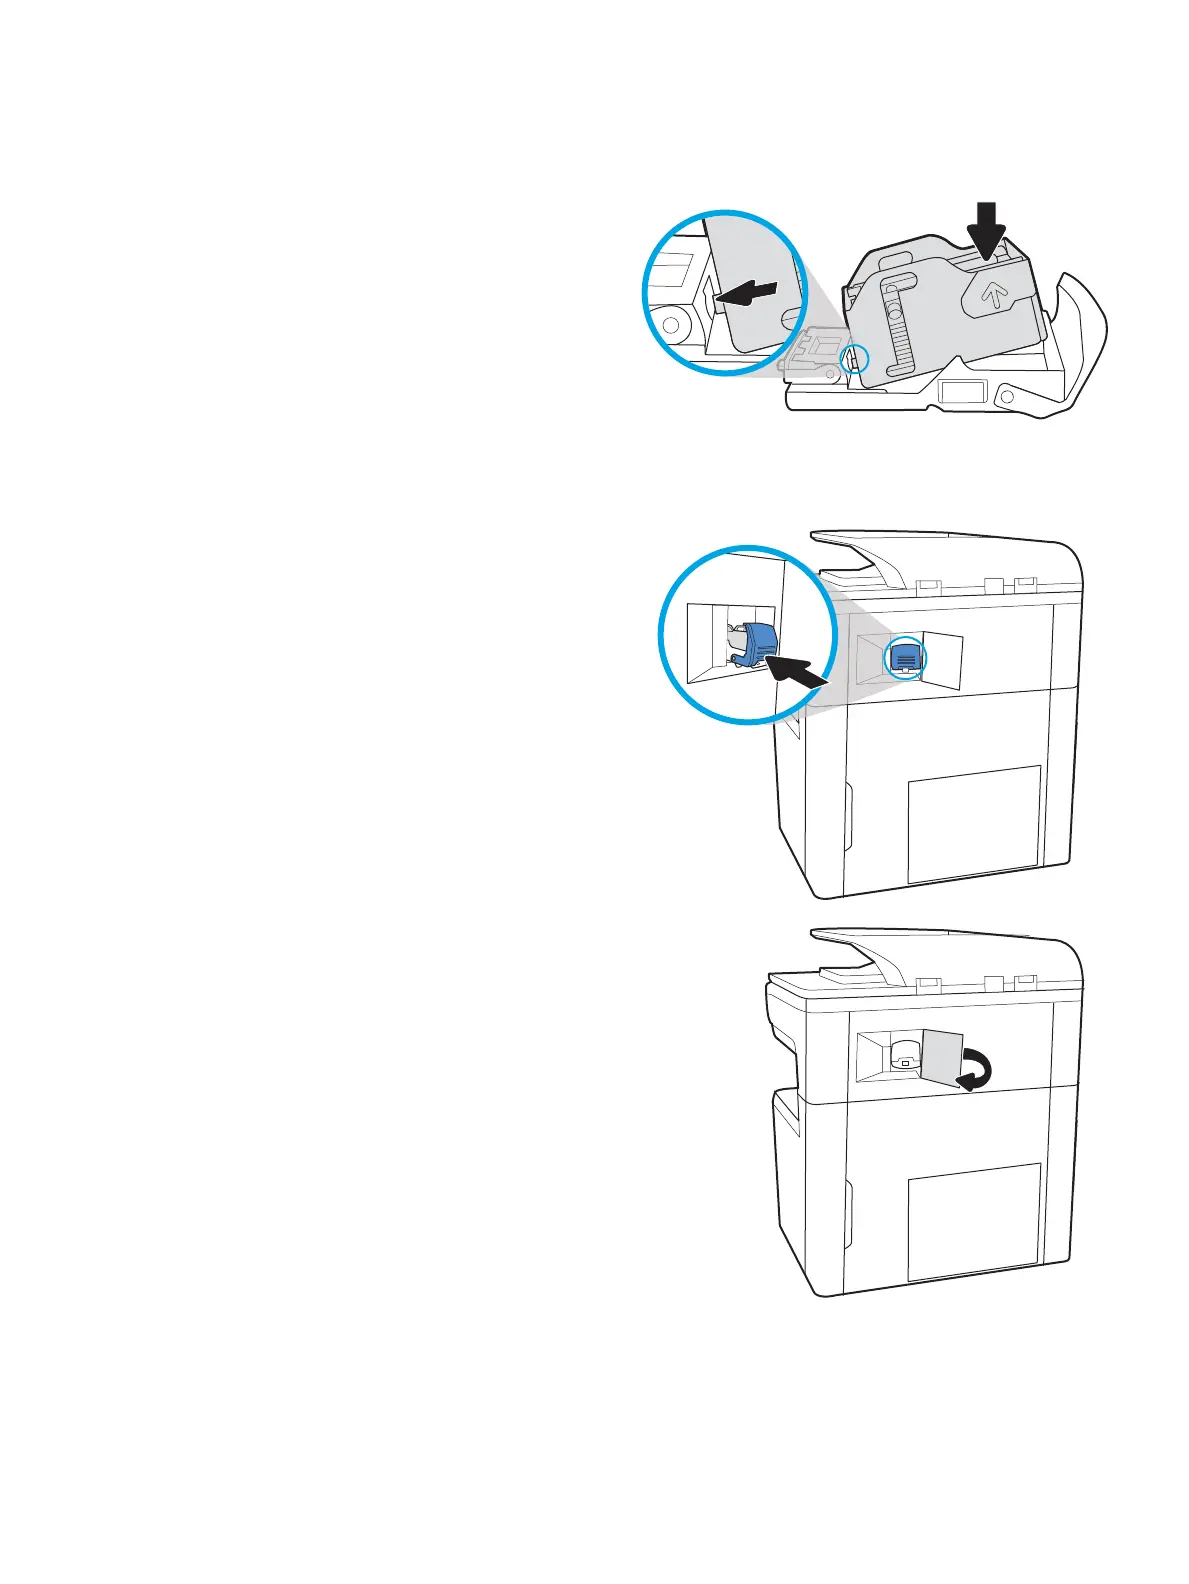
4.
Close the l
ev
er at the back of the stapl
e cartridge.
Be sure that it snaps int
o plac
e.
5.
Insert the staple cartridge int
o the stapl
er and
push on the col
or
ed handl
e until it snaps into plac
e.
6.
Close the stapl
er door.
ENWW
Cle
ar paper jams
213
224
226
Table of Contents
Main Page
Printer overview
13
Caution icons
14
Printer views
15
Printer front view
15
Printer back view and interface ports
16
Control-panel view
17
How to use the touchscreen control panel
19
Printer specifications
20
Technical specifications
20
Supported operating systems
23
Mobile printing solutions
25
Printer dimensions
26
Power consumption, electrical specifications, and acoustic emissions
27
Operating environment range
27
Printer hardware setup and software installation
28
Paper trays
29
Load paper to Tray 1 (multipurpose tray)
30
Introduction
30
Tray 1 paper orientation
31
Use alternative letterhead mode
36
Enable Alternative Letterhead Mode by using the printer control-panel menus
36
Load paper to Tray 2
37
Introduction
37
Tray 2 and the 550-sheet trays paper orientation
39
Use alternative letterhead mode
43
Enable Alternative Letterhead Mode by using the printer control-panel menus
43
Load the 4,000-sheet high-capacity input (HCI) tray
44
Introduction
44
HCI paper orientation
46
Use alternative letterhead mode
47
Enable Alternative Letterhead Mode by using the printer control-panel menus
48
Load and print envelopes
49
Introduction
49
Print envelopes
49
Envelope orientation
49
Load and print labels
51
Introduction
51
Manually feed labels
51
Label orientation
52
Configure stapling (E77650dns, E77650zs, and E77660zs models only)
53
Configure the default staple location
53
Configure the operation mode
54
Supplies, accessories, and parts
57
Order supplies, accessories, and parts
58
Ordering
58
Supplies and accessories
58
Maintenance/long-life consumables (LLC)
60
Customer self-repair parts
60
Replace the cartridges
63
Introduction
63
Cartridge information
63
Remove and replace the cartridges
65
Replace the service fluid container
68
Introduction
68
Remove and replace the service fluid container
68
Replace the staple cartridge (E77650dns, E77650zs, and E77660zs models only)
72
Print
75
Print tasks (Windows)
76
How to print (Windows)
76
Automatically print on both sides (Windows)
76
Manually print on both sides (Windows)
77
Print multiple pages per sheet (Windows)
77
Select the paper type (Windows)
78
Additional print tasks
79
Print tasks (OS X)
80
How to print (OS X)
80
Automatically print on both sides (OS X)
80
Manually print on both sides (OS X)
80
Print multiple pages per sheet (OS X)
81
Select the paper type (OS X)
81
Additional print tasks
81
Store print jobs on the printer to print later or print privately
82
Introduction
82
Create a stored job (Windows)
82
Create a stored job (OS X)
83
Print a stored job
84
Delete a stored job
84
Delete a job that is stored on the printer
84
Change the job storage limit
84
Information sent to printer for Job Accounting purposes
85
Mobile printing
86
Introduction
86
Wi-Fi Direct and NFC Connect and Print
86
HP ePrint via email
87
HP ePrint software
88
AirPrint
88
Android embedded printing
88
Print from the USB port
90
Introduction
90
Enable the USB port for printing
90
Print USB documents
91
Copy
93
Make a copy
94
Copy on both sides (duplex)
96
Additional copy tasks
98
Scan
99
Set up Scan to Email
100
Introduction
100
Before you begin
100
Step one: Access the HP Embedded Web Server (EWS)
100
Step two: Configure the Network Identification settings
101
Step three: Configure the Scan to Email feature
102
Method one: Basic configuration using the Email Setup Wizard
102
Method two: Advanced configuration using the Email Setup
106
Step four: Configure the Quick Sets (optional)
110
Step five: Set up Scan to Email to use Office 365 Outlook (optional)
111
Introduction
111
Configure the outgoing email server (SMTP) to send an email from an Office 365 Outlook account
111
Set up Scan to Network Folder
113
Introduction
113
Before you begin
113
Step one: Access the HP Embedded Web Server
113
Step two: Set up Scan to Network Folder
114
Method one: Use the Scan to Network Folder Wizard
114
Method two: Use Scan to Network Folder Setup
115
Step one: Begin the configuration
115
Step two: Configure the Scan to Network Folder settings
115
Dialog one: Set the Quick Set name, description, and options for user interaction at the control pan ...
116
Dialog two: Folder Settings
116
Configure the destination folder for scanned documents
117
Select the destination folder permissions
120
Dialog three: Notification settings
121
Dialog four: Scan Settings
122
Dialog five: File Settings
122
Dialog six: Summary
123
Step three: Complete the configuration
123
Set up Scan to USB Drive
124
Introduction
124
Step one: Access the HP Embedded Web Server
124
Step two: Enable Scan to USB Drive
125
Step three: Configure the Quick Sets (optional)
125
Default scan settings for Scan to USB Drive setup
126
Default file settings for Scan to USB Drive setup
126
Set up Scan to SharePoint® (Flow models only)
128
Introduction
128
Before you begin
128
Step one: Access the HP Embedded Web Server (EWS)
128
Step two: Enable Scan to SharePoint® and create a Scan to SharePoint Quick Set
129
Quick set scan settings and options for Scan to SharePoint®
130
Scan to email
133
Introduction
133
Scan to email
133
Scan to network folder
136
Introduction
136
Scan to network folder
136
Scan to USB drive
138
Introduction
138
Scan to USB drive
138
Scan to SharePoint
140
Introduction
140
Scan to SharePoint
140
Scan to job storage
142
Introduction
142
Scan to job storage on the printer
142
Print from job storage on the printer
144
HP JetAdvantage business solutions
145
Additional scan tasks
146
Fax
147
Set up fax
148
Introduction
148
Set up fax by using the printer control panel
148
Change fax configurations
149
Fax dialing settings
149
General fax send settings
150
Fax receive settings
150
Send a fax
152
Additional fax tasks
154
Manage the printer
155
Advanced configuration with the HP Embedded Web Server (EWS)
156
Introduction
156
How to access the HP Embedded Web Server (EWS)
156
HP Embedded Web Server features
157
Information tab
157
General tab
158
Copy/Print tab
159
Scan/Digital Send tab
160
Fax tab
161
Troubleshooting tab
161
Security tab
162
HP Web Services tab
162
Networking tab
162
Other Links list
164
Create a Quick Set
165
Introduction
165
Step one: Access the HP Embedded Web Server (EWS)
165
Step two: Add and manage Quick Sets
166
Add a Quick Set
166
Edit a Quick Set
167
Copy a Quick Set
167
Remove a Quick Set
168
Quick Set settings and options
168
Example Quick Sets
173
Configure IP network settings
175
Printer sharing disclaimer
175
View or change network settings
175
Rename the printer on a network
175
Manually configure IPv4 TCP/IP parameters from the control panel
176
Manually configure IPv6 TCP/IP parameters from the control panel
176
Link speed and duplex settings
177
Printer security features
178
Introduction
178
Security statements
178
Assign an administrator password
178
IP Security
179
Lock the formatter
179
Encryption support: HP High Performance Secure Hard Disks
179
Energy-conservation settings
180
Introduction
180
Set the sleep timer and configure the printer to use 1 watt or less of power
180
Set the sleep schedule
180
HP Web Jetadmin
182
Software and firmware updates
183
Solve problems
185
Customer support
186
Control panel help system
187
Restore factory settings
188
Introduction
188
Method one: Restore factory settings from the printer control panel
188
Method two: Restore factory settings from the HP Embedded Web Server (network-connected printers onl ...
188
A “Cartridge is low” or “Cartridge is very low” message displays on the printer control panel
189
Change the “Very Low” settings
189
For printers with fax capability
189
Order supplies
190
Printer does not pick up paper or misfeeds
191
Introduction
191
The printer does not pick up paper
191
The printer picks up multiple sheets of paper
193
The document feeder jams, skews, or picks up multiple sheets of paper
197
Clear paper jams
198
Introduction
198
Paper jam locations
199
Auto-navigation for clearing paper jams
200
Experiencing frequent or recurring paper jams?
200
Clear paper jams in the document feeder
201
Clear paper jams in Tray 1
203
Clear paper jams in Tray 2
206
Clear paper jams in Tray 3
208
Clear paper jams in the output bin
212
Clear paper jams in the duplexer
214
Clear paper jams in the 3x550-sheet trays
215
Clear paper jams in the 4,000-sheet high-capacity input (HCI) tray
218
Clear paper jams in the inner finisher (E77650dns, E77650zs, and E77660zs models only)
222
Clear staple jams (E77650dns, E77650zs, and E77660zs models only)
224
Improve print quality
226
Introduction
226
Check the cartridge status
226
Update the printer firmware
227
Change the print quality setting
227
Print from a different software program
227
Check paper and quality settings
227
Check grayscale and black settings
228
Adjust color settings (Windows)
228
Check paper and the printing environment
229
Step one: Use paper that meets HP specifications
229
Step two: Check the environment
229
Visually inspect the cartridge
230
Clean the printer
231
Print and interpret the Print Quality Report
231
Clean the printhead
231
Clean the rollers
232
Try a different print driver
232
Improve copy image quality
234
Check the scanner glass for dirt and smudges
234
Calibrate the scanner
235
Check the paper settings
236
Check the paper selection options
236
Check the image-adjustment settings
236
Optimize copy quality for text or pictures
237
Edge-to-edge copying
237
Improve scan image quality
238
Check the scanner glass for dirt and smudges
238
Check the resolution settings
239
Check the image-adjustment settings
240
Optimize scan quality for text or pictures
240
Check the output-quality settings
241
Clean the pickup rollers and separation pad in the document feeder
241
Improve fax image quality
244
Check the scanner glass for dirt and smudges
244
Check the send-fax resolution settings
245
Check the image-adjustment settings
246
Optimize fax quality for text or pictures
246
Check the error-correction settings
246
Check the fit-to-page setting
247
Clean the pickup rollers and separation pad in the document feeder
247
Send to a different fax machine
249
Check the sender's fax machine
249
Solve wired network problems
250
Introduction
250
Poor physical connection
250
The computer is unable to communicate with the printer
250
The printer is using incorrect link and duplex settings for the network
251
New software programs might be causing compatibility problems
251
The computer or workstation might be set up incorrectly
251
The printer is disabled, or other network settings are incorrect
251
Solve wireless network problems
252
Introduction
252
Wireless connectivity checklist
252
The printer does not print after the wireless configuration completes
253
The printer does not print, and the computer has a third-party firewall installed
253
The wireless connection does not work after moving the wireless router or printer
253
Cannot connect more computers to the wireless printer
254
The wireless printer loses communication when connected to a VPN
254
The network does not appear in the wireless networks list
254
The wireless network is not functioning
254
Reduce interference on a wireless network
255
Solve fax problems
256
Checklist for solving fax problems
256
What type of phone line are you using?
256
Are you using a surge-protection device?
256
Are you using a phone company voice-messaging service or an answering machine?
256
Does your phone line have a call-waiting feature?
257
Check fax accessory status
257
General fax problems
258
The fax failed to send
258
An Out of Memory status message displays on the printer control panel
258
Print quality of a photo is poor or prints as a gray box
258
You touched the Stop button to cancel a fax, but the fax was still sent
258
No fax address book button displays
258
Not able to locate the Fax settings in HP Web Jetadmin
258
The header is appended to the top of the page when the overlay option is enabled
258
A mix of names and numbers is in the recipients box
258
A one-page fax prints as two pages
258
A document stops in the document feeder in the middle of faxing
259
The volume for sounds coming from the fax accessory is too high or too low
259
Index
261
Related product manuals
PageWide Managed Color Flow MFP E77650
40 pages
HP PageWide Managed P57750DW
12 pages
HP PageWide Enterprise Color 556
678 pages
HP PageWide Pro MFP 577dw
28 pages
HP PageWide 377
16 pages
HP PageWide XL 4000
138 pages
HP pagewide pro 577dw series
205 pages
HP PSC 2410
2 pages
HP Photosmart 5520
18 pages
HP Photosmart 5515
52 pages
HP Photosmart 6510
64 pages
HP Photosmart 5510
140 pages