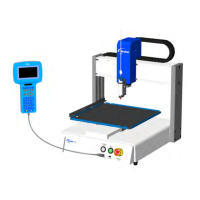
E Series Automated Dispensing System
30 www.nordsonefd.com info@nordsonefd.com 800-556-3484 Sales and service of Nordson EFD dispensing systems are available worldwide.
Menu Item Description
10 Pre-cycle Initialize Enables or disables a pre-cycle initialization before every dispense cycle:
• 1 Enable (default): The tip always returns to the Home Position before
beginning a dispense cycle (also know as auto-initialize).
• 2 Disable: The next dispense cycle begins at the rst point in the dispense
program without returning to the Home Position to initialize.
11 Pre-dispense Wait Time Sets a wait time that occurs prior to the start of each dispense command
within a program (both dot and line dispensing).
• Default: 0 (s)
• Range: 0.0–9999.9 (s)
12 Default Dispense Port Sets the output port for the dispensing valve. Refer to “Setting the Dispenser
Ports” on page43.
• Default: 0
13 Needle Detect Setup (only
systems with the optional tip
alignment kit)
Sets the tip coordinates for the optional tip detector. Refer to “Set a
Calibration Point (Initial Setup for Auto Needle Adjust)” on page72.
14 Run Limit Sets a limit for how many dispense cycles the system can complete in the Run
Mode. When the system reaches the Run Limit, you must reset the counter
(Reset Counter under the Program menu) to run additional dispense cycles.
• Default: 0
• Maximum: 99,999
15 Measurement Unit Used to specify how units of measure are displayed.
• 1 mm (default)
• 2 inch
16 Password Setup Used to change the system password. Refer to “Password Setup” on
page38.
• Default: blank (no password protection)
NOTE: This function is password-protected.
17 Remote Command Enables or disables the ability of the system to accept commands through the
RS232 serial communication port on the back of the robot when the system is
connected to an external PC/PLC.
• 1 Enable: The system accepts command through the RS232 port.
• 2 Disable (default): The system cannot accept command through the RS232
port.
NOTE: Refer to “Appendix B, RS-232 Communication Protocol” on page113
for information on using RS-232 communication.
18 Height Sensor Used only when the optional height sensor is installed. Refer to “Appendix D,
Height Sensor Setup and Use” on page128 for all information related to the
height sensor.
19 Language Used to set the language. Refer to “Language” on page40.
20 System Information Displays the system information, including the robot model and the Teach
Pendant software version.
Teach Pendant Menu Item Descriptions (continued)