Electrical Installation
3
3.5 Control Circuit Wiring
SIEPYEUOQ2A01G AC Drive Q2A Technical Manual 89
*2 Install a wire jumper between terminals DIC-D24V-D0V to select the type of the power supply for MFDI (sinking/sourcing mode or
internal/external power supply).
NOTICE: Do not close the circuit between terminals D24V and D0V. Failure to obey will cause damage to the drive.
• Sinking Mode: Install a jumper between terminals DIC and D24V.
NOTICE: Do not close the circuit between terminals DIC and D0V in Sinking Mode. Failure to obey will cause damage
to the drive.
• Sourcing Mode: Install a jumper between terminals DIC and D0V.
NOTICE: Do not close the circuit between terminals DIC and D24V in Source Mode. Failure to obey will cause damage
to the drive.
• External power supply: Remove the wire jumper between terminals DIC-D0V and terminals DIC-D24V.
*3 The output current capacity of the +10Vand -10V terminals on the control circuit is 20 mA.
NOTICE: Do not install a jumper between terminals +10V, -10V, and A0V. Failure to obey can cause damage to the drive.
*4 Set DIP switches S1-1 to S1-3 to select between a voltage or current input signal to terminals AI1 to AI3. The default setting for S1-1
and S1-3 is voltage input (“V” side). The default setting for S1-2 is current input (“I” side).
*5 Do not ground the control circuit terminals A0Vor connect them to the drive.
WARNING! Do not ground the control circuit terminals A0V or connect them to the drive. Failure to comply may cause
malfunction or failure.
*6 Make sure that you connect terminals E24Vand A0V correctly. Failure to obey will cause damage to the drive.
*7 Set DIP switch S2 to the ON position to enable the termination resistor in the last drive in a Modbus communications.
*8 To use the internal power supply with the Safe Disable input, use sourcing mode.
*9 Disconnect the wire jumper between H1 and HC, and H2 and HC to use the Safe Disable input.
*10 Use multi-function analog monitor outputs with analog frequency meters, ammeters, voltmeters, and wattmeters. Do not use monitor
outputs with feedback-type signal devices.
◆ Control Circuit Terminal Block Functions
The parameters of group H: TERMINALS set functions for the multi-function input and output terminals.
WARNING! Sudden Movement Hazard. Correctly wire the control circuits and make sure that control circuits operate correctly
after connecting the wires. Drives with untested control circuits can cause death or serious injury.
WARNING! Sudden Movement Hazard. Make sure that the drive I/O signals and external sequence are correct before doing a
test run. The I/O terminal function can automatically change from the factory setting when the setting for Macro Preset changes.
Failure to obey can cause death or serious injury.
NOTICE: Turn the drive ON (Run) and OFF (Stop) a maximum of one time each 30 minutes with the MC on the power source
side to extend the service life of the relay contacts and electrolytic capacitors in the drive. Run and Stop the motor as much as
possible with the drive. The drive can fail if users frequently turn the drive ON and OFF with the MC on the power source side to
Run and Stop the drive. Incorrect operation can decrease the service life of the relay contacts and electrolytic capacitors.
■ Multi-function Input Terminals
This chapter contains a list of input terminals and functions.
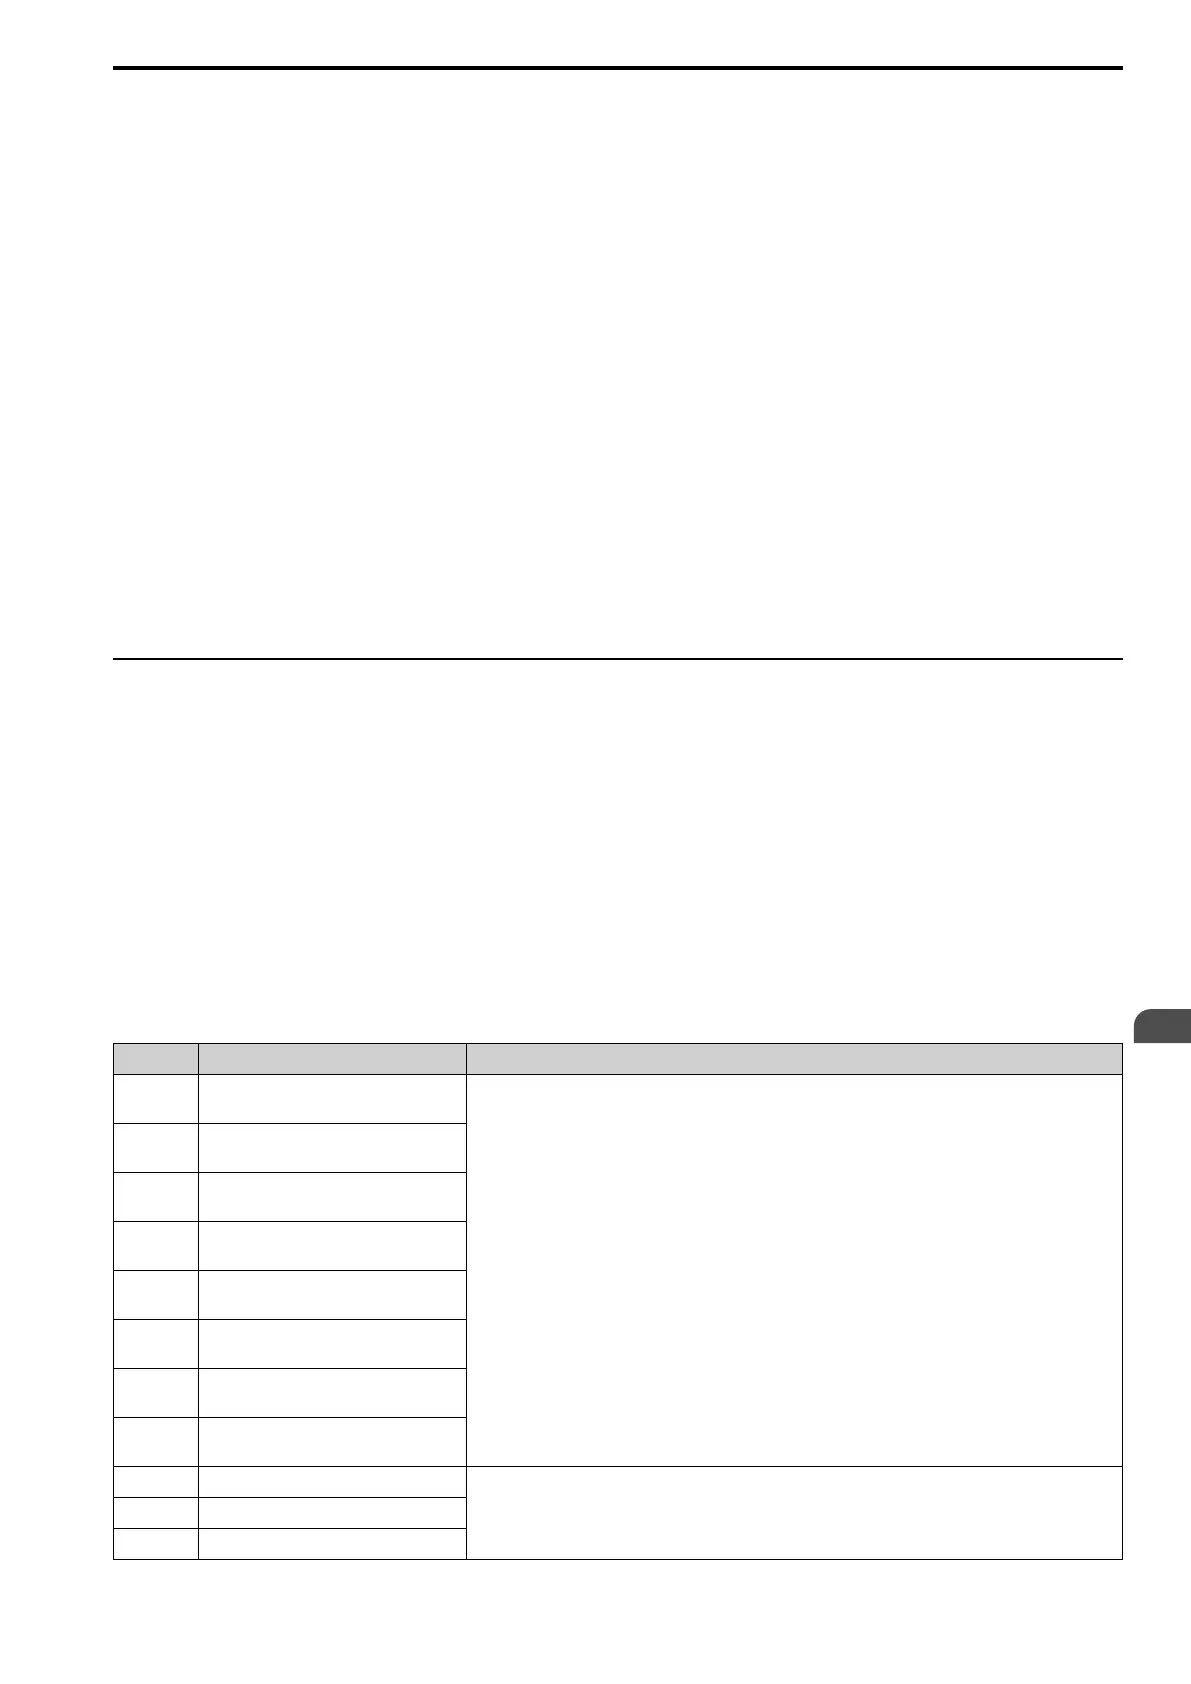
Table 3.4 Digital Inputs
Terminal Name (Default) Function (Signal Level)
DI1
MFDI selection 1
(ON: Forward run OFF: Stop)
• Photocoupler
• 24 V, 6 mA
Note:
Install the wire jumpers between terminals DIC-D24V and DIC-D0V to set the MFDI power supply (sinking/
sourcing mode or internal/external power supply).
• Sinking Mode: Install a jumper between terminals DIC and D24V.
NOTICE: Do not close the circuit between terminals DIC and D0V in Sinking
Mode. Failure to obey will cause damage to the drive.
• Sourcing Mode: Install a jumper between terminals DIC and D0V.
NOTICE: Do not close the circuit between terminals DIC and D24V in Source
Mode. Failure to obey will cause damage to the drive.
• External power supply: No jumper necessary between terminals DIC-D0V and terminals DIC-D24V.
DI2
MFDI selection 2
(ON: Reverse run OFF: Stop)
DI3
MFDI selection 3
(External fault (N.O.))
DI4
MFDI selection 4
(Fault reset)
DI5
MFDI selection 5
(Multi-step speed reference 1)
DI6
MFDI selection 6
(Multi-step speed reference 2)
DI7
MFDI selection 7
(Jog command)
DI8
MFDI selection 8
(Baseblock command (N.O.))
D0V MFDI power supply 0 V
MFDI power supply, 24 V (maximum 150 mA)
NOTICE: Do not close the circuit between terminals D24V and D0V. Failure to
obey will cause damage to the drive.
DIC MFDI selection common
D24V MFDI power supply +24 Vdc