Mounting and installation of the compact control panels
5
117 |
Building Technologies
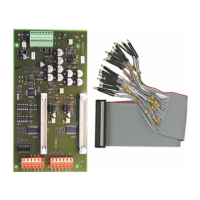
1 Mounting holes on periphery board
2 Spacer bolts
3 Fixing screws
4 Loop extension (FDnet) FCI2003-A1
5 Loop extension connector to the periphery board
X13 Loop 3 connection terminal
X14 Loop 4 connection terminal
1. First, remove the relevant fixing screws (3) from the periphery board.
2. Screw the two spacer bolts (2) into the mounting holes (1) on the periphery
board.
3. Mount the loop extension (FDnet) onto the connector (5) on the periphery
board.
4. Screw the loop extension (FDnet) in place using the two fixing screws (3).
5. Wire up the detector lines according to the pin assignment.
5.10.2 Pin assignments
5.10.2.1 X13 connection loop 3
Pin Designation Description
4 3_2- ↑ Loop extension for loop 3 or ↑ stub 6 (–)
3 3_2+ Loop extension for loop 3 or stub 6 (+)
2 3_1- Loop extension for loop 3 or stub 5 (–)
1 3_1+ Loop extension for loop 3 or stub 5 (+)
Admissible cable cross-section: 0.2…1.5 mm²
● One loop or two stubs can be connected to the ↑ loop extension (FDnet).
● The plug for the loop extension (FDnet) is always located at the corresponding
↑ detector line connection.
3_1+
+
-
+
-
X13
3_1–
3_2+
3_2–
 Loading...