release the vinyl.
Now pull the vinyl
forward, while
pulling the media all
the way to the front,
make sure it is
guided underneath
the left clamp.
To unwind the media roll, press the pushbutton (1), located on the right side. Hold the
media so it does not touch the floor. Insert the vinyl between the cassette station and the
base. As soon as the vinyl covers a sensor, the rear clamps will come down and hold the
vinyl.
The clamps will come down and hold the vinyl.
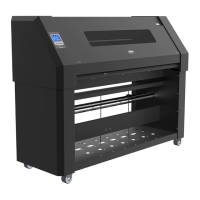
FIG 1-13
1-13 LOADING A ROLL AT THE BACK OF THE DC5(sx)
Next, return to the front of the machine. Hold the vinyl and press .
Align the edge of the media using the alignment marks (1) on the front of the base, then
press .
Just before the DC5(sx) starts to print, it will test the media alignment and the position,
relative to the origin, before it starts printing. If the media is situated too far from the origin,
then the DC5(sx) will “Park” the media on the starting point (origin). If it is not loaded
straight, it will align it automatically (unless OptiTrac is set to ‘white background).
FIG 1-14
1-14 LOADING A ROLL AT THE FRONT OF THE DC5(sx)
The pinch rollers will now come down and the media is properly loaded. The machine will
remain paused until the front cover is closed. After closing the front cover, the DC5(sx) will
measure the media width. If the media width has changed, then the printer will prompt the
user to check if the right pinch roller is set correctly.