Do you have a question about the Toshiba TS3000 Series and is the answer not in the manual?
Contains important information for safe and correct robot operation.
Covers procedures from power ON to manual guide robot operation.
Details TS series robot controller operating procedures and usage.
Refers to the robot language called "SCOL" for programming.
Describes external signals and interface conditions with peripheral equipment.
Describes transport, unpacking, and installation of the robot and controller.
Deals with daily and regular inspections for long-term robot use.
Explains the meaning of danger and caution indications and symbols used.
Explains the meaning of safety symbols like prohibition and mandatory actions.
Summarizes functions controllable via control panel, teach pendant, external signals, and host communication.
Explains the hierarchy and functionality of different operational modes (External, Internal, Teaching, Utility, Error).
Outlines the basic steps for automatic operation from power ON to OFF.
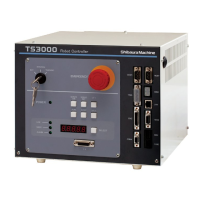
Details the procedure for turning the main and servo power ON/OFF for TS3000.
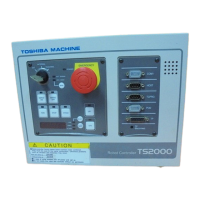
Details the procedure for turning the main and servo power ON/OFF for TSL3000.
Explains how to select the teaching mode for manual guidance and control.
Describes selection of coordinate systems (joint, tool, work, world) for robot guidance.
Explains the different guide modes (JOG, INCHING, FREE) for manual robot movement.
Details how to select speed or travel distance for manual robot guidance.
Procedures for manually guiding the robot using guide keys in JOG or INCHING modes.
Explains how to cancel servo lock for manual movement and delicate positioning.
Steps to launch the program editor to start program editing.
Explains how to input characters, including modes and key operations.
Describes how to input edit commands using function keys and menus.
Details various edit commands like SAVE, DEDIT, JUMP, FIND, CHANGE, etc.
How to create an "AUTOSTR.BAT" file for automatic execution on power ON.
Methods to start the data editor from basic or program editing menus.
Displays and allows editing of positional data entries in coordinate systems.
Shows detailed information for a selected positional data entry.
Displays and allows management of coordinate data entries by system.
Shows detailed information for a selected coordinate data entry.
Displays and allows editing of load data, including mass and center of gravity.
How to select the teaching mode to enable test operation.
Procedure for selecting a program file to be executed for testing.
How to change the run mode (CONT, CYCLE, SEG, STEP) for program execution.
Setting speed override for program execution.
How to execute a program one step at a time for detailed testing.
How to start program execution after setting conditions or restarting an interrupted program.
Methods to stop program execution (CYCLE Stop, STOP, BREAK, FEED HOLD, EMERGENCY Stop).
Operations for resetting execution conditions (Program, Step, Cycle, Output, File).
How to directly execute SCOL commands for setting conditions or running from midway.
Displays values of global variables and allows temporary modifications.
Shows the current line being executed in the program.
Procedures for concluding a test operation session.
Steps to select the internal automatic mode for program execution via control panel.
Procedure for selecting a program file to execute in internal automatic mode.
How to change the run mode (CONT, CYCLE, SEG) for internal automatic operation.
Setting speed override for internal automatic operation.
How to start automatic operation in internal mode.
Methods to stop operation in internal mode (CYCLE Stop, STOP, BREAK, FEED HOLD, EMERGENCY Stop).
Operations for resetting execution conditions in internal mode.
How to directly execute SCOL commands in internal mode.
Displays and allows temporary modification of global variables in internal mode.
Shows the current line being executed in internal mode.
Steps to select external modes (EXT. SIG, EX. 232C, EX. ETHER).
Procedures for selecting an execution file in external automatic mode.
How to change the run mode (CONT, CYCLE, SEG) for external automatic operation.
Setting speed override for external automatic operation.
How to start automatic operation in external mode via start signal or data communication.
Methods to stop operation in external mode (CYCLE Stop, STOP, BREAK, FEED HOLD, EMERGENCY Stop).
Operations for resetting execution conditions in external mode.
Displays and allows temporary modification of global variables in external mode.
Shows the current line being executed in external mode.
How to display the file name directory on RAM and USB drives.
Procedure for copying files between RAM and USB drives.
How to rename existing files.
Procedure for deleting specified files from RAM or USB drives.
Steps to enter the utility mode via the UTILITY key.
Displays the status of auxiliary input/output signals.
Displays the status of external input/output signals.
Displays robot position in joint, world, or work coordinate systems.
Selects work or tool coordinate systems for robot operation.
Exits coordinate system selection and returns to the utility screen.
Displays detailed information for a specific coordinate data entry.
Sets a specified coordinate as the work coordinate system.
Sets or cancels a specified coordinate as the tool coordinate system.
Searches for coordinate data by its name.
Calls the directory display for coordinate data.
Displays robot power ON time and program run time.
Reproduces the machine origin or home point.
Displays and sets joint limit values for each axis.
Displays and sets the system's current date and time.
Displays system and robot component version information.
Displays servo encoder data, intended for maintenance.
Displays PLC input/output data.
Sets the machine zero position or origin.
Displays torque, thermal, and load factor for each servo motor.
Displays the status of the Ethernet connection.
Displays and sets payload values for manual operation.
Screen for factory initialization; users should not use this.
Backs up RAM disk data to flash memory for recovery.
How errors are grouped and processed, referring to the Alarm Manual.
Describes how errors are indicated on the TS3000 and TSL3000 controllers.
Displays error code, description, and time of generation.
Procedures for resetting error display, fault signals, and buzzers after correction.
Resets errors using an external signal in EXT. SIG mode.
Displays a history of past errors, including code and time.
Shows details of compiler errors that occur during program selection.
| Brand | Toshiba |
|---|---|
| Model | TS3000 Series |
| Category | Controller |
| Language | English |