Figure 109. Installing the front fan
Steps
1. Place the front fan on a flat surface.
2. Route the cables through the openings on the fan bracket.
3. Align and place the fan bracket on the fans.
4. Slide and insert the fan grommets into the slots on the fan bracket.
5. Route the cables through the routing guides on the fan bracket.
6. Slide and push the front fan until the releasing clip snaps into position on the chassis.
7. Replace the two screws (M3x5) that secure the front fan to the chassis.
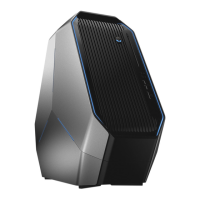
8. Insert the front fan cables into the respective securing clips on the chassis.
9. Connect the front fan cables to the connectors (FAN4 and FAN5) on the system board.
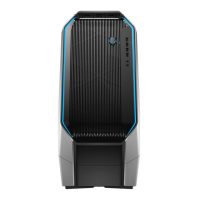
10.Lay the computer in the upright position.
11. Route the front fan LED cables through the opening on the chassis.
12. Insert the front fan LED cables into the securing clip and lock the securing clip to secure the front fan LED cables.
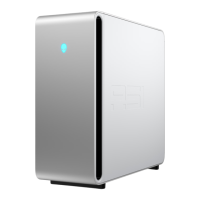
13. Connect the front fan LED cables to the connectors (FAN4_LED and FAN5_LED) on the AlienFX board.
Next steps
1. Install the right cover.
2. Install the left cover.
3. Follow the procedure in After working inside your computer.
Removing and installing Field Replaceable Units (FRUs) 123
 Loading...