Do you have a question about the Andor Technology iKon-L and is the answer not in the manual?
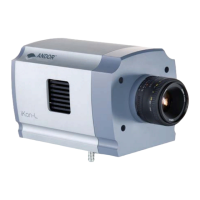
Description of the detector head and its integrated components.
Information on the PS40 and PS29 power supply models.
Procedure for mounting F-mount lenses to the camera.
Instructions for fitting camera mounting posts.
Guidelines for handling and maintaining the camera.
Specifies operating temperature and humidity limits.
Disclaimer on usage not specified by manufacturer.
Advice on preventing electronic interference and static.
Causes and prevention measures for camera overheating.
Explanation of camera cooling methods and importance.
Details on the air cooling method for the camera.
Details on the water cooling method for the camera.
Guidance on preventing condensation during cooling.
Using the dew point graph to set cooling water temperature.
Instructions on controlling the cooling fan speed.
Description of the rear panel connection ports.
Instructions for connecting water cooling pipes.
Keyboard shortcuts for data acquisition functions.
Keyboard shortcuts for data window manipulation.
Shortcuts for the Andor Basic programming language.
Adjusting EM Gain and Exposure Time via sliders.
Using infrared remote for software control.
Enhancing data retrieval and acquisition speed.
Live data display for focusing and event monitoring.
Explanation of various data types like Counts, %Transmittance.
Automatic adjustment of display scales in real-time.
Acquiring raw background data for subtraction.
Acquiring reference data for calculations.
Handling and resolving common acquisition errors.
Capturing a single scan of the CCD.
Adding multiple scans to improve Signal-to-Noise Ratio.
Recording temporal evolution of events with series of scans.
High-speed acquisition with microsecond exposure times.
Identifying and removing artifacts caused by cosmic rays.
System-controlled acquisition start.
Acquisition triggered by external signals.
High-speed external triggering.
Initiating acquisition based on an external start signal.
Flowchart to help select the appropriate triggering mode.
Viewing acquired data as a 2D image.
Acquiring data from multiple defined regions.
Using the CCD as a linear sensor.
Creating and utilizing binned pixels (superpixels).
Reading data from a selected small area of the CCD.
Setting the time for vertical charge transfer between rows.
Adjusting the amplitude of vertical clock pulses.
Defining the rate at which pixels are read from the shift register.
Adjusting the sensitivity of the camera system.
Correcting for baseline drift in acquired data.
Setting the shutter open and close duration.
Settings for accumulate mode timing.
Settings for kinetic mode timing.
Setting trigger periods for kinetic acquisition.
Adjusting the display scale to zoom in or out.
Moving the data view after zooming.
Restoring the display to its original configuration.
Customizing the display of peaks in 2D mode.
Functionality for locating peaks in the data trace.
Options for marking peaks or troughs on the trace.
Displaying data with automatically labeled peaks.
Comparing multiple traces on the same axes.
Adding chemical element labels to spectra.
Method for removing baseline drift from spectral data.
Customizing the appearance of 3D data plots.
Adjusting image display settings like aspect ratio.
Adjusting color mapping, brightness, and contrast.
Adjusting the data range for display scaling.
Understanding contrast adjustments for data visualization.
Adjusting the overall brightness of the image display.
Identifying and managing selected regions of interest.
Calculating statistics for the highest data values within an ROI.
Updating the calculated values within an ROI window.
Calculating ROI data during active acquisition.
Setting the data buffer size for live update.
Visualizing ROI data over a series or time.
Closing data or program windows.
Saving the current data or program state.
Saving data or programs with a new name/location.
Exporting data as plain text file (.asc).
Exporting data as an Audio Video Interleaved file (.avi).
Exporting data as a Windows bitmap file (.bmp).
Exporting data for GRAMS software (.spc).
Exporting data as a compressed image file (.jpg).
Exporting data as a video/audio compression file (.m1v).
Exporting raw data without header information (.dat).
Exporting data as a Tagged Image File Format file (.tif).
Manually calibrating data display axes.
Calibrating axes using spectrograph specifications.
Modifying axis units after initial calibration.
Resetting calibration to default settings.
Inputting axis labels, units, and polynomial order.
Applying the entered calibration to data.
Configuring spectrograph settings for calibration.
Using command line for data processing and calculations.
Executing single commands for data manipulation.
Interface for creating and editing programs.
Overview of editing tools for programs.
Basic text editing operations for programs.
Finding text strings within programs.
Replacing text strings within programs.
Executing a saved program file.
Running programs directly from their file.
Providing user input during program execution.
Definition of Charge Coupled Device.
Process of adding multiple scans for improved signal-to-noise.
The complete data capture process.
Conversion of analog signal to digital binary number.
Dark data acquisition for noise subtraction.
Combining charge from multiple pixels.
Basic unit for displaying and processing data.
Signal generated by dark current during exposure.
The smallest signal detectable with unity signal-to-noise ratio.
The period during which the CCD collects light.
Types and sources of signal noise.
Detector sensitivity to photons at different wavelengths.
Process of transferring pixel data to memory.
The maximum signal level the CCD can measure.
Distinction between data scans and cleaning scans.
CCD component for charge transfer.
Noise caused by random photon arrival.
Measure of signal quality relative to noise.
| Brand | Andor Technology |
|---|---|
| Model | iKon-L |
| Category | Security Camera |
| Language | English |