Home
Canon
All in One Printer
LBP3310
Page 227
Canon LBP3310 - Page 227
438 pages
Manual
Save Page as PDF
To Next Page
To Next Page
To Previous Page
To Previous Page
Loading...
5-30
Basic Usage of the Printer
5
Manuals
2
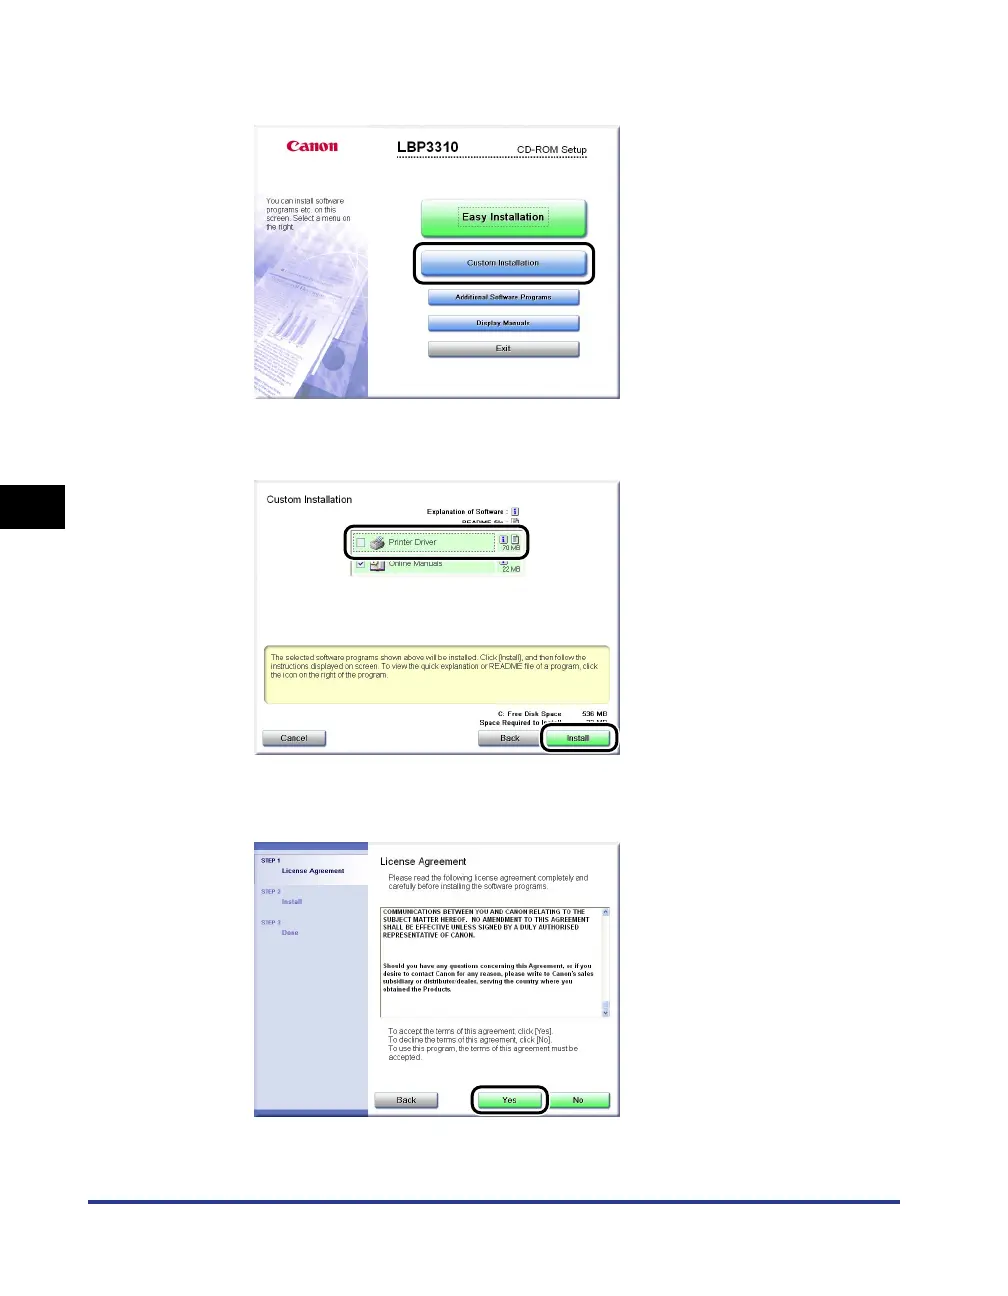
Click [Custom Installation].
3
Clear the [Printer Driver] chec
k bo
x
a
a
a
a
,
then c
lick [Install]
b
b
b
b
.
4
Confirm the contents,
then click [Y
es].
Installation of the instruction manuals star
ts.
a
b
226
228
Table of Contents
Main Page
Default Chapter
4
Default Chapter
4
How this Manual Is Organized
4
Table of Contents
5
Preface
12
How to Use this Manual
12
Symbols Used in this Manual
12
Keys and Buttons Used in this Manual
12
Displays Used in this Manual
13
Illustrations Used in this Manual
13
Abbreviations Used in this Manual
14
Legal Notices
15
Product Name
15
FCC (Federal Communications Commission)
15
EMC Directive (220 - 240 V Model)
16
Laser Safety
16
International Energy Star-Program
17
WEEE Directive
18
Trademarks
18
Copyright
19
Disclaimers
19
Legal Limitations on the Usage of Your Product and the Use of Images
20
Important Safety Instructions
21
Installation
21
Power Supply
23
Handling
24
Maintenance and Inspections
26
Consumables
27
Others
27
Chapter 1 Before You Start
28
Features and Benefits
29
CD-Rom
31
CD-ROM Setup
32
Custom Installation
33
Easy Installation
33
Parts and Their Functions
34
Printer Unit
34
Front View
34
Rear View
35
Inner View
36
Control Panel
37
Optional Accessories
39
Paper Feeder
39
Network Board
40
Chapter 2 Installing the Printer
43
Installation Procedure
43
Installation Site
44
Installation Environment
44
Temperature/Humidity Conditions
44
Installation Requirements
45
Power Supply Requirements
45
Installation Space
46
Required Peripheral Space
46
Foot Positions
47
Confirming the Contents of the Box
49
Carrying the Printer to the Installation Site and Removing the Packing Materials on the Outside of the Printer
51
Cartridge
55
Precautions on Installing the Toner Cartridge
55
Installing the Toner Cartridge
55
Removing the Packing Materials Inside the Printer and Installing the Toner Cartridge
55
Remove the Packing Material
57
Removing the Packing Materials of the Paper Cassette and Loading Paper
64
Connecting the Power Cord
67
Connecting to a Computer
69
Connecting the Printer to a Computer
69
Using a USB Cable
70
Precautions on Connecting a USB Cable
70
Connecting a USB Cable
71
Using a LAN Cable
72
Precautions on Connecting a LAN Cable
72
Connecting a LAN Cable
73
Turning the Printer ON/OFF
74
Turning the Printer on
74
Turning the Printer off
75
Chapter 3 Paper Loading and Output Tray
78
Paper Requirements
79
Usable Paper
79
Paper Size
79
Paper Type
80
Plain Paper
80
Heavy Paper
81
Index Card
81
Printable Area
83
Unusable Paper
84
Storing Paper
85
Storing Printed Paper
85
Paper Source
86
Paper Source Type
86
Paper Capacity of Paper Source
87
Selecting a Paper Source
88
Precautions for Handling the Multi-Purpose Tray or Paper Cassette
89
Output Tray
90
Output Tray Type
90
Face-Down Output Tray
90
Face-Up Output Slot
91
Paper Capacity of the Output Tray
92
Selecting an Output Tray
93
Switching to the Face-Down Output Tray
93
Switching to the Face-Up Output Slot
93
Loading Paper in the Paper Cassette
94
Loading Standard Size Paper
94
Paper Guide
96
Loading Paper of Custom Size (Non-Standard Size) and 16K
100
Loading Paper in the Multi-Purpose Tray
108
Loading Standard Size Paper (Other than Index Card and Envelopes)
109
Loading Index Card or Envelopes
114
Loading Custom Size Paper (Non-Standard Paper)
119
Paper Loading Orientation
126
Chapter 4 Setting up the Printing Environment
128
System Requirements
129
Checking Your Printing Environment
130
Installing the Printer Driver
131
Installing from CD-ROM
132
Installing with Plug and Play
139
For Windows Vista
139
For Windows Xp/Server 2003
146
For Windows 2000
151
After Completing Installation
156
For Windows Vista
156
For Windows Xp/Server 2003
157
For Windows 2000
158
Checking the Operations by Configuration Page Print
159
Printing from a Network Computer by Sharing the Printer on a Network
162
Print Server Settings
163
Preparing the Printer Sharing Settings
163
Printer Sharing Settings
165
Installation on Clients
173
Installing the Printer Driver from CD-ROM Setup
174
Installing from the [Printers and Faxes] Folder or the [Printers] Folder
180
Installing from [Windows Explorer]
193
Uninstalling the Printer Driver
194
Chapter 5 Basic Usage of the Printer
198
Printing from an Application
199
Changing the Default Values for Printing Preferences
205
2-Sided Printing
207
Automatic 2-Sided Printing
207
Manual 2-Sided Printing
213
Canceling a Print Job
217
Canceling a Print Job Using the Print Queue
217
Canceling a Print Job Using the Printer Status Window
219
Canceling a Print Job Using the Cancel Job Key
220
How to Use Help
221
Manuals
226
Installing the Manuals
226
Uninstalling the Manuals
229
For Windows 2000/Xp/Server 2003/Vista (32-Bit)
230
For Windows Vista (64-Bit)
230
Printer Status Window
231
Functions on the Printer Status Window
231
Displaying the Printer Status Window
232
[Preferences (Users)] Dialog Box
233
[Preferences (Administrators)] Dialog Box
233
[Utility] Menu
234
[Device Settings] Menu
234
[Remote UI] (Only if the Network Board Is Installed)
235
[Refresh]
235
[Resolve Error]
235
[Cancel Job]
236
[Print Queue]
236
Chapter 6 Using the Various Printing Functions
238
Utilizing a Variety of Options for Printing
240
Various Sheets in the Printer Driver
247
[Page Setup] Sheet
248
[Finishing] Sheet
249
[Paper Source] Sheet
250
[Quality] Sheet
251
[Device Settings] Sheet
252
[Profile] Sheet
253
Preview
254
Printing Multiple Pages on One Sheet
256
Printing with Scaling
259
Printing with Automatic Scaling
259
Printing with Arbitrary Scaling
260
Poster Printing
262
Watermark Printing
264
Editing Watermarks
266
Printing Borders and Printing Date
268
Booklet Printing
270
Printing with a Gutter
272
Selecting the Paper Output Method
274
Printing with Upper Left of Sheet as Starting Point
276
Printing with the Data Rotated 180 Degrees
278
Selecting Paper for each Page
280
Smoothing out Rough-Textured Images
282
Printing with Toner Density Adjusted
284
Printing with the Brightness and Contrast Adjusted
286
Printing a Grayscale Sample
288
Using "Profiles
290
Selecting a "Profile
290
Adding a "Profile
292
Editing a "Profile
293
Deleting a "Profile
294
Editing Jobs with
296
Chapter 7 Routine Maintenance
300
Replacing the Toner Cartridge
301
Precautions on Replacing the Toner Cartridge
302
Before Replacing the Toner Cartridge
302
Install the Toner Cartridge
306
Replacing the Toner Cartridge
307
Precautions for Handling the Toner Cartridge
314
Storing the Toner Cartridge
316
Cleaning the Fixing Roller
317
Cleaning the Outside of the Printer
320
Moving the Printer
323
Handling the Printer
329
Chapter 8 Troubleshooting
332
Troubleshooting Flowchart
333
Paper Jams
334
Precautions on Clearing Paper Jams
334
Paper Jam Area
337
Procedure for Clearing Paper Jams
338
The Alarm Indicator Is On/Blinking
356
The Alarm Indicator Is on (a Service Error Appears)
357
The Alarm Indicator Is Blinking
360
Print Quality Problems
361
Paper Problems
367
Installation Problems
368
Problems with Local Installation
369
Installation Problems When the Printer Is Shared on a Network
370
Printing a Test Page
372
If Uninstallation Fails
373
Uninstalling the USB Class Driver
376
When Data Is Not Sent to the Printer
379
If the Printer and Computer Are Connected by a USB Cable
379
When the Printer Is Shared on a Network
382
Miscellaneous Problems
385
Confirming the Printer Features
387
Chapter 9 Installing the Optional Accessories
391
Paper Feeder
391
Moving the Printer
392
Removing the Packing Materials and Installing the Paper Feeder
396
Specifying the Status of the Paper Feeder
400
Removing the Paper Feeder
402
Network Board
404
Parts and Their Functions
407
Installing the Network Board
408
Setting the Network Board
413
Resetting the Network Board
416
Ready Indicator
418
Removing the Network Board
420
Chapter 10 Appendix
423
Specifications
423
Hardware Specifications
423
Software Specifications
425
Dimensions of each Part
426
Netspot Device Installer
428
Checking the Processor Version of Windows Vista
429
Confirming the Setting for [Spooling at Host]
430
Index
432
Location of the Serial Number
436
Other manuals for Canon LBP3310
Specfications
2 pages
Related product manuals
Canon LBP352
642 pages
Canon LBP251
495 pages
Canon LBP710Cx
894 pages
Canon LBP6780x
970 pages
Canon LBP6680x
2 pages
Canon LBP712Cx
894 pages
Canon LBP7660Cdn
998 pages
Canon LBP253 Series
523 pages
Canon LBP6680x Series
181 pages
Canon LBP6670dn Series
181 pages
Canon LiDE220
247 pages
Canon LaserBase MF3228
136 pages