Following the standard conventions for model types
Airplane, Glider and Helicopter when assigningcon-
trol functions.
Channel Function
1 Motor/airbrake or pitch
2 Aileron or Roll
3 Elevator or Nick
4 Rudder or Yaw
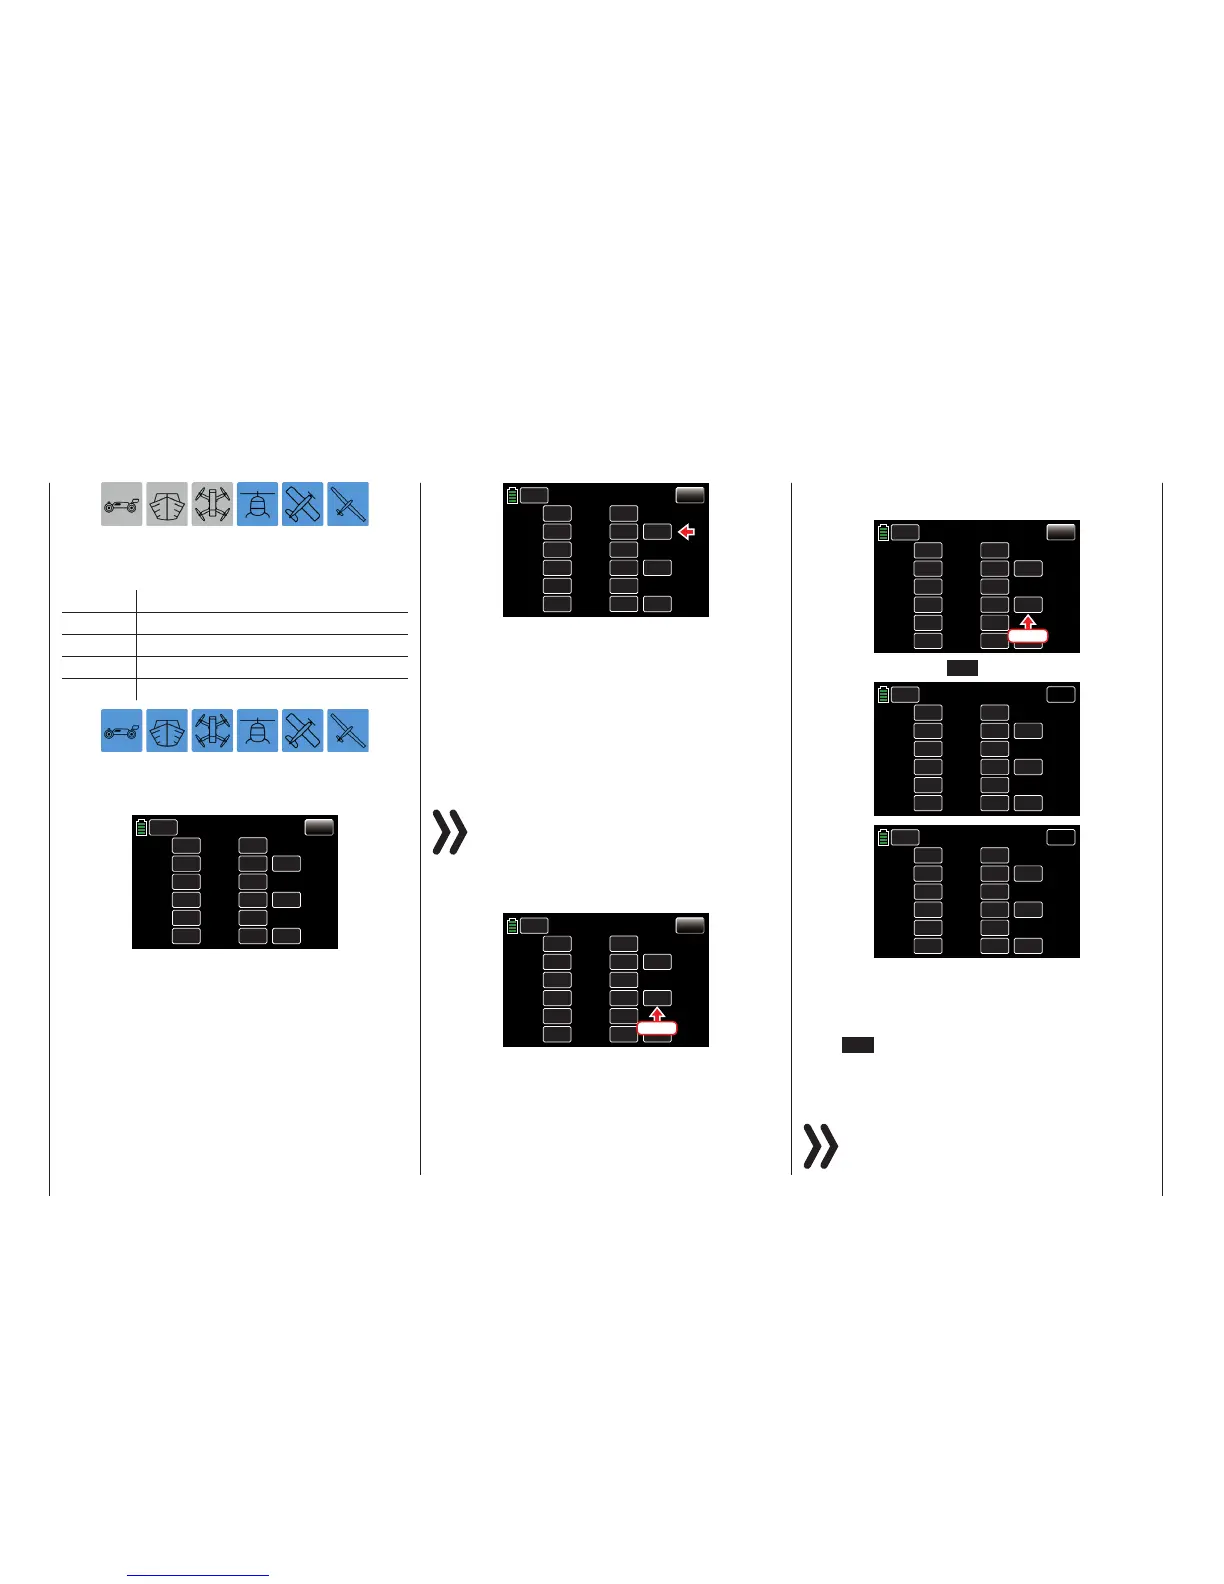
Select by pressing the control function inputs 1 to 12
to be transferred to the PUPIL. In the example below,
inputs 1 - 4 have been transferred to the pupil:
BACK
SERVO
CH 1.
CH 2.
CH 3.
CH 4.
CH 5.
CH 6.
PUPIL
PUPIL
PUPIL
PUPIL
TEACH
TEACH
CH 7.
CH 8.
CH 9.
CH 10.
CH 11.
CH 12.
TEACH
TEACH
TEACH
TEACH
TEACH
TEACH
NONE
OFF
RF
CTL
BIND
TYPE
Trainer
To change between teacher and pupil a trainer-switch
must be assigned in the CTL column value field. Re-
fer to the Control and Switch Assignment section
(page 26).
Using an intermittent switch, such as S8, is highly rec-
ommended so that control can be easily withdrawn
from the trainer at any time:
BACK
SERVO
CH 1.
CH 2.
CH 3.
CH 4.
CH 5.
CH 6.
PUPIL
PUPIL
PUPIL
PUPIL
TEACH
TEACH
CH 7.
CH 8.
CH 9.
CH 10.
CH 11.
CH 12.
TEACH
TEACH
TEACH
TEACH
TEACH
TEACH
SW 8
OFF
RF
CTL
BIND
TYPE
Trainer
Since the trainer system programming an operable
PUPIL transmitter will not be connected to a TEACH
transmitter, the transmitter will react with acoustical
alarms to switches connected during the switch as-
signment. A warning message flashes every second
at the top left in the transmitter’s main display. Open
the switch that has just been assigned.
Binding PUPIL Transmitter to TEACH Transmitter
Notice
During binding, the transmitters cannot be too far
apart. If binding fails, bring the two transmitters
closer together, and restart the binding process.
Start thebinding process in the PUPIL transmitterby
pressingthe value field button in the BIND column:
BACK
SERVO
CH 1.
CH 2.
CH 3.
CH 4.
CH 5.
CH 6.
TEACH
TEACH
TEACH
TEACH
TEACH
TEACH
CH 7.
CH 8.
CH 9.
CH 10.
CH 11.
CH 12.
TEACH
TEACH
TEACH
TEACH
TEACH
TEACH
NULL
OFF
RF
CTL
BIND
TYPE
Trainer
Press
Immediately press the same button on the TEACH
transmitter:
BACK
SERVO
CH 1.
CH 2.
CH 3.
CH 4.
CH 5.
CH 6.
PUPIL
PUPIL
PUPIL
PUPIL
TEACH
TEACH
CH 7.
CH 8.
CH 9.
CH 10.
CH 11.
CH 12.
TEACH
TEACH
TEACH
TEACH
TEACH
TEACH
SW 8
OFF
RF
CTL
BIND
TYPE
Trainer
Press
The value field shows ON in both displays:
BACK
SERVO
CH 1.
CH 2.
CH 3.
CH 4.
CH 5.
CH 6.
TEACH
TEACH
TEACH
TEACH
TEACH
TEACH
CH 7.
CH 8.
CH 9.
CH 10.
CH 11.
CH 12.
TEACH
TEACH
TEACH
TEACH
TEACH
TEACH
NULL
ON
RF
CTL
BIND
TYPE
Trainer
BACK
SERVO
CH 1.
CH 2.
CH 3.
CH 4.
CH 5.
CH 6.
PUPIL
PUPIL
PUPIL
PUPIL
TEACH
TEACH
CH 7.
CH 8.
CH 9.
CH 10.
CH 11.
CH 12.
TEACH
TEACH
TEACH
TEACH
TEACH
TEACH
SW 8
ON
DSC-S
CTL
BIND
TYP
Trainer
The transmitters are now bound. Both transmitters
can now return to the basic displayand commence
training after a thorough check of allfunctions.
Bind has failed if only one (or neither) transmitter dis-
plays ON in the BIND column. Bring the two trans-
mitters closer together, and restart the binding pro-
cess.
Attention
BEFORE starting trainer mode for the operational
model, always make sure all functions have been
correctly transferred.
146 Function menu | general - Trainer

 Loading...


