ON
00.0s
INC
RES
DEC
000
0
NULL
TIME
POS
ON
BACK
SERVO
Sequence
CH7 ON
CH8
CH6
STEP
CTL
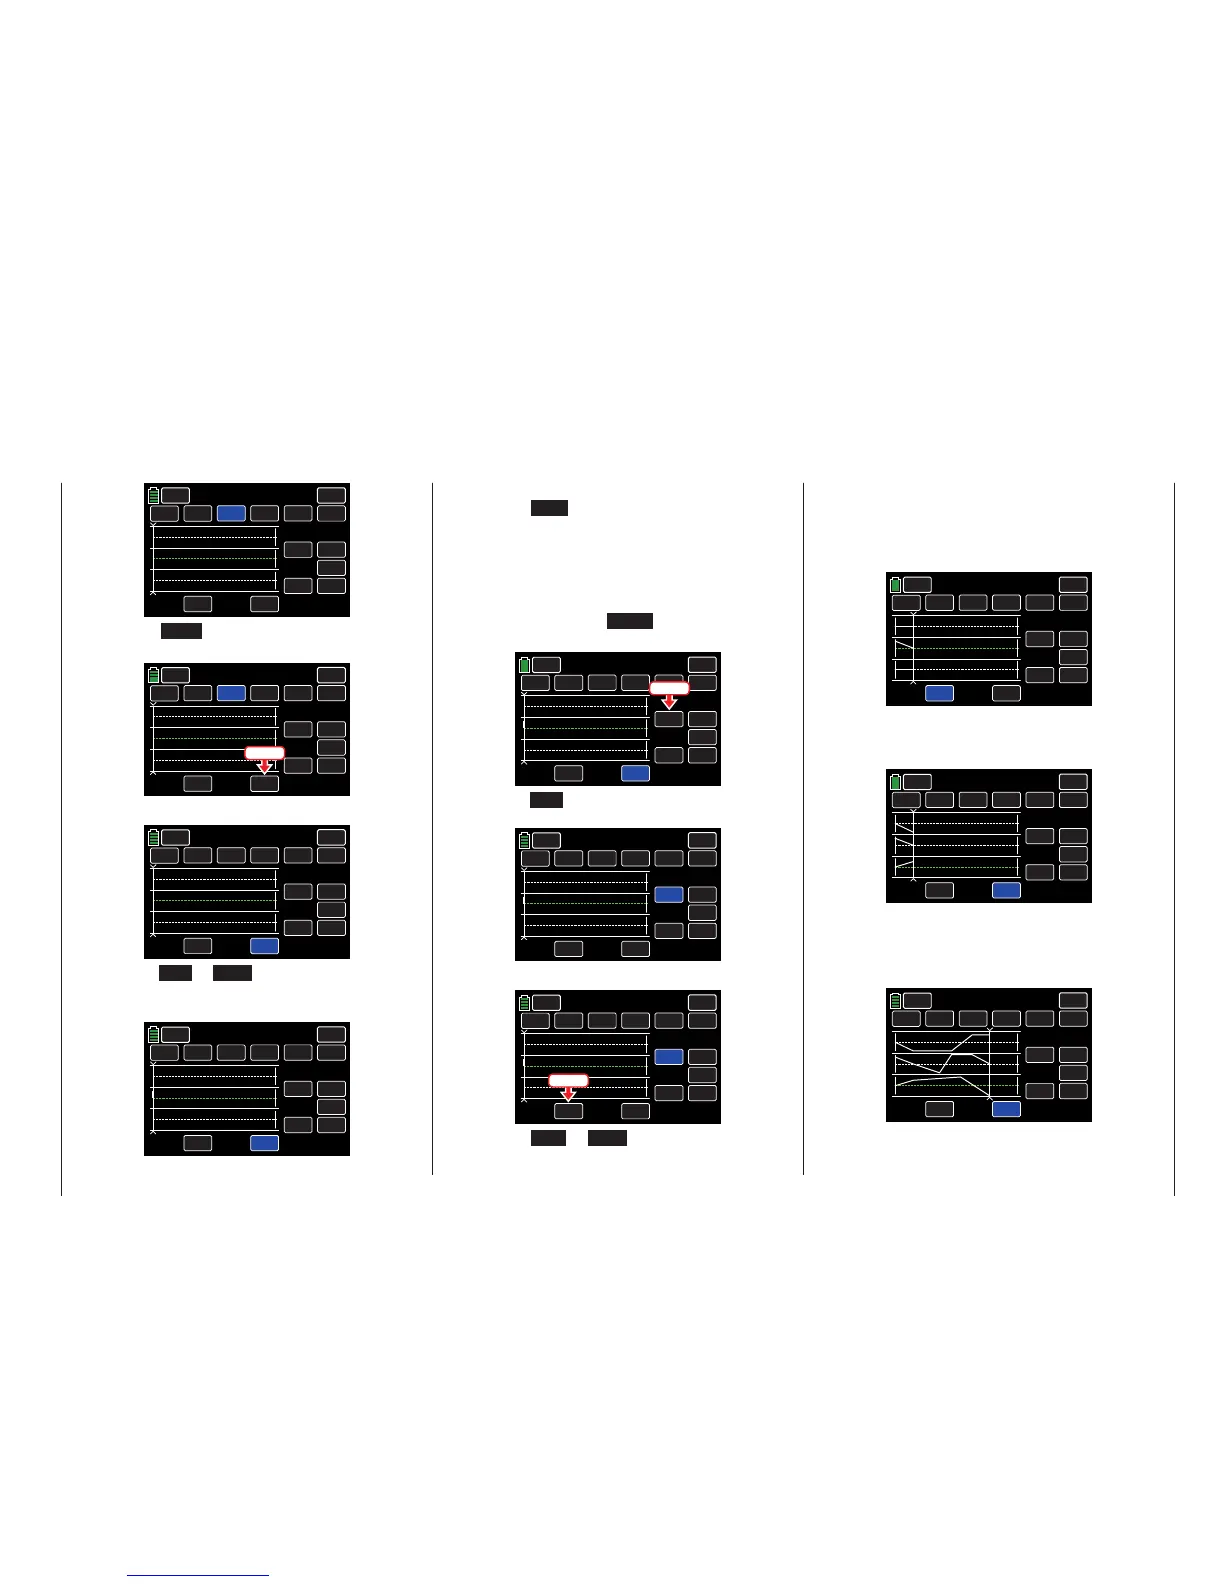
Press the POS button at the bottom right of the
display:
ON
00.0s
INC
RES
DEC
000
0
NULL
TIME
POS
ON
BACK
SERVO
Sequence
CH7 ON
CH8
CH6
STEP
CTL
Press
The field highlights blue:
ON
00.0s
INC
RES
DEC
000
0
NULL
TIME
POS
ON
BACK
SERVO
Sequence
CH10 ON
CH11
CH9
STEP
CTL
Press the INC or DEC button or the arrow keys (
pq ) to increase or decrease the value. In the ex-
ample below, the POS needs to be increased +67:
ON
00.0s
INC
RES
DEC
+067
0
NULL
TIME
POS
ON
BACK
SERVO
Sequence
CH 7 ON
CH 8
CH 6
STEP
CTL
The setting range is ±100.
Repeat the process for the other two channels.
Press the RES button to reset the changed value
back to the default.
• STEP 1: First Result
After setting the output positions a time lapse must
be set before the desired action does or does not
occur.
Press to highlight the STEP button at the right of
the display:
ON
00.0s
INC
RES
DEC
+067
0
NULL
TIME
POS
ON
BACK
SERVO
Sequence
CH 7 ON
CH 8
CH 6
STEP
CTL
Press
Press the INC button or the up arrow key ( p ) in-
crease the STEP value by 1:
ON
00.0s
INC
RES
DEC
000
1
NULL
TIME
POS
ON
BACK
SERVO
Sequence
CH 7 ON
CH 8
CH 6
STEP
CTL
Press to highlight the TIME value field:
ON
00.0s
INC
RES
DEC
000
1
NULL
TIME
POS
ON
BACK
SERVO
Sequence
CH 7 ON
CH 8
CH 6
STEP
CTL
Press
Press the INC or DEC button or the arrow keys
( pq ) to increase or decrease the value. In the
example below, the time delay is set for 4.5s. The
vertical line, representing the time flow, moves to
the right while the angled lines, representing the
flow of the servo positions, are displayed between
the time points "0" and "1":
ON
04.5s
INC
RES
DEC
000
1
NULL
TIME
POS
ON
BACK
SERVO
Sequence
CH 7 ON
CH 8
CH 6
STEP
CTL
After the first time lapse, set the desired servo out-
put positions (as described in STEP 0), or leave the
servo(s) in the previous sequence position:
ON
04.5s
INC
RES
DEC
+050
1
NULL
TIME
POS
ON
BACK
SERVO
Sequence
CH 7 ON
CH 8
CH 6
STEP
CTL
• STEP 2 through 9:
Repeat the previous steps to continue the se-
quence until the servos target position has been
reached:
ON
23.0s
INC
RES
DEC
+100
6
NULL
TIME
POS
ON
BACK
SERVO
Sequence
CH 7 ON
CH 8
CH 6
STEP
CTL
151
Function menu | general - Sequencer

 Loading...


