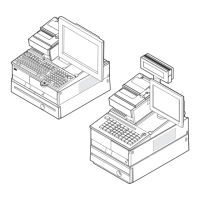
Chapter 4. Installing external options
This section describes the installation procedures for the external options for
SurePOS Models 721/741/781 and 722/742/782.
Before you start
These instructions describe how to install devices and connect cables on the
SurePOS 700.
Note: Not all device options can be integrated on the narrow-footprint system units.
Your store planner should provide instructions that show all of your system devices
and where you should connect them. If that arrangement is different than the one
that is shown here, follow the planner’s instructions.
You can place the printer, short keyboard, displays, and fillers on the left, or on the
right side of the unit.
To install the SurePOS 700:
1. Gather the cables from the OPEN FIRST box, as needed.
2. Follow the directions of your store planner in arranging the devices.
3. After completing the installation of the I/O devices, save any publications or
diskettes that came in the OPEN FIRST box.
4. After you install the I/O devices, configure the system unit.
Attaching the cables to the system unit
The POS I/O cables developed by IBM all have latches or screws to secure them to
the system unit and thus, prevent accidental disconnection. Cables are sometimes
used that do not provide latches or screws, such as standard PC USB cables. The
SurePOS 700 provides several methods to secure such cables.
Securing IBM USB POS keyboard cables
If you ordered a USB POS keyboard from IBM with a standard PC USB connection,
the cable ships with a locking clip. Figure 44 on page 54 shows the steps to secure
the cable using the clips and brackets.
Updated October 31, 2007
© Copyright IBM Corp. 2003, 2007 53