EasyManua.ls Logo

Cessna 182 1978 - Fuel Filler Cap - Metal

Cessna 182 1978
680 pages
Print Icon
To Next Page IconTo Next Page
To Previous Page IconTo Previous Page
Loading...
MODEL
182
&
T182
SERIES
SERVICE
MANUAL
1.
Handle
2.
Fuel
Cap
Body
3.
O-Ring
NOTE
4.
Check
Valve
(Vent)
5.
Umbrella
Vent
safety
valve
(4)
opens
at
or
before
6.
Fuel
Cap
Lock
Plate
16
.25
PSI
vacuum
pressure,
and
5.
0
PSI
7.
Washer
2
positive
pressure.
8.
Adapter
Assembly
9.
Placard
10.
Nut
3
11.
Safety
Chain
12.
Lug
13.
O-Ring
14.
Stem
15.
Spring
16.
Split
Washer
17.
Handle
Pin
14
6
13
NOTE
A
letter
M
on
the fuel
cap
body
located
un-
der
the
handle
(1),
signifies
that
the
O-ring
(3)
mounting
groove
is
machined.
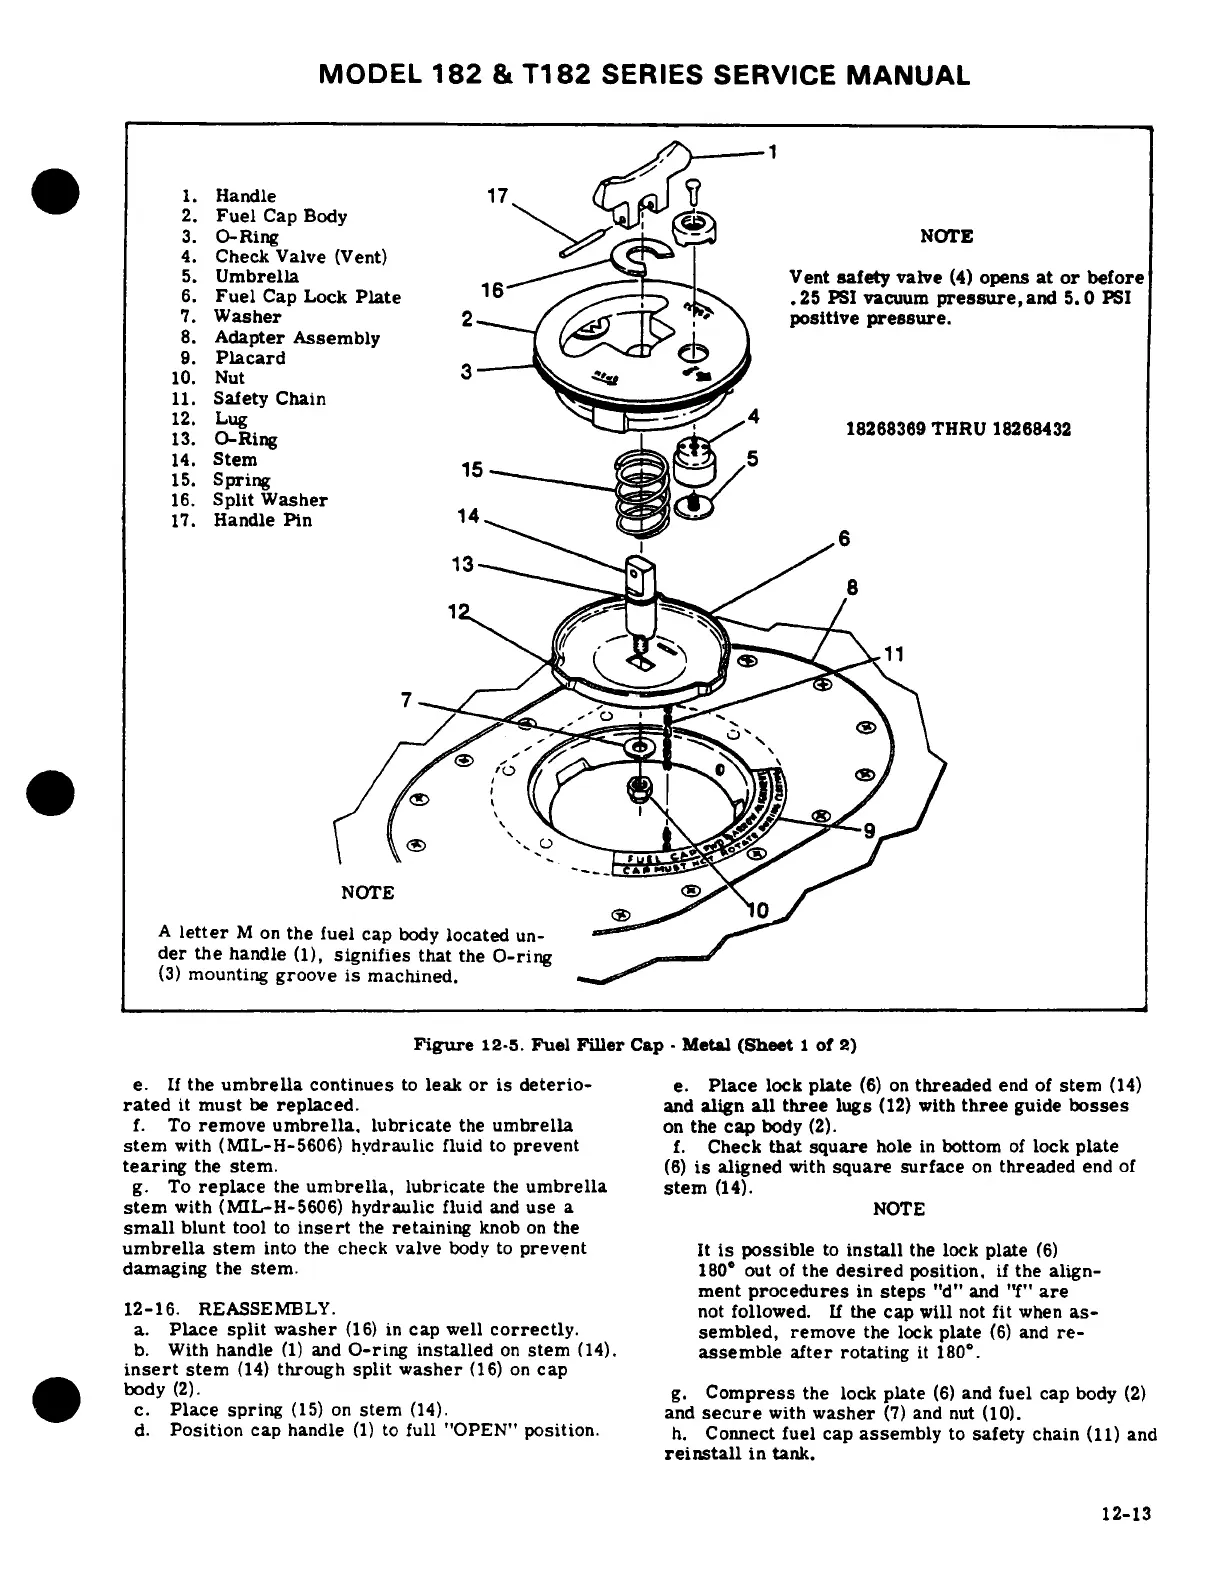
Figure
12-5.
Fuel
Filler
Cap
- Metal
(Sheet
1
of
2)
e.
If
the
umbrella
continues
to
leak
or
is
deterio-
e.
Place
lock
plate
(6)
on
threaded
end
of
stem
(14)
rated
it
must
be
replaced.
and
align
all
three
lugs
(12)
with
three
guide
bosses
f.
To
remove
umbrella,
lubricate
the
umbrella
on
the
cap
body
(2).
stem
with
(MIL-H-5606)
hydraulic
fluid
to
prevent
f.
Check
that
square
hole
in
bottom
of
lock
plate
tearing
the
stem.
(6)
is
aligned
with
square
surface
on
threaded
end
of
g.
To
replace
the
umbrella,
lubricate
the
umbrella
stem
(14).
stem
with
(MIL-H-5606)
hydraulic
fluid
and
use
a
NOTE
small
blunt
tool
to
insert
the
retaining
knob
on
the
umbrella
stem
into
the
check
valve
body
to
prevent
It
is
possible
to
install
the
lock
plate
(6)
damaging
the
stem.
180°
out
of
the
desired
position,
if
the
align-
ment
procedures
in
steps
"d"
and
"f"
are
12-16.
REASSEMBLY.
not
followed.
If
the
cap
will
not
fit
when
as-
a.
Place
split
washer
(16)
in
cap
well
correctly.
sembled,
remove
the
lock
plate
(6)
and
re-
b.
With
handle
(1)
and
O-ring
installed
on
stem
(14).
assemble
after
rotating
it
180°.
insert
stem
(14)
through
split
washer
(16) on
cap
body
(2).
g.
Compress
the
lock
plate
(6)
and
fuel
cap
body
(2)
c.
Place
spring
(15)
on
stem
(14).
and
secure
with
washer
(7)
and
nut
(10).
d.
Position
cap
handle
(1)
to
full
"OPEN"
position.
h.
Connect
fuel
cap
assembly
to
safety
chain
(11)
and
reinstall
in
tank.
12-13

Table of Contents