Home
Fujitsu
Scanner
ScanSnap N1800
Page 170 (Viewing the Scanner Details)
Fujitsu ScanSnap N1800 - Viewing the Scanner Details
543 pages
Manual
To Next Page
To Next Page
To Previous Page
To Previous Page
Loading...
4.14 Viewing the Scanner Details
170
4.14
Viewing the Scanner Details
4.14.1
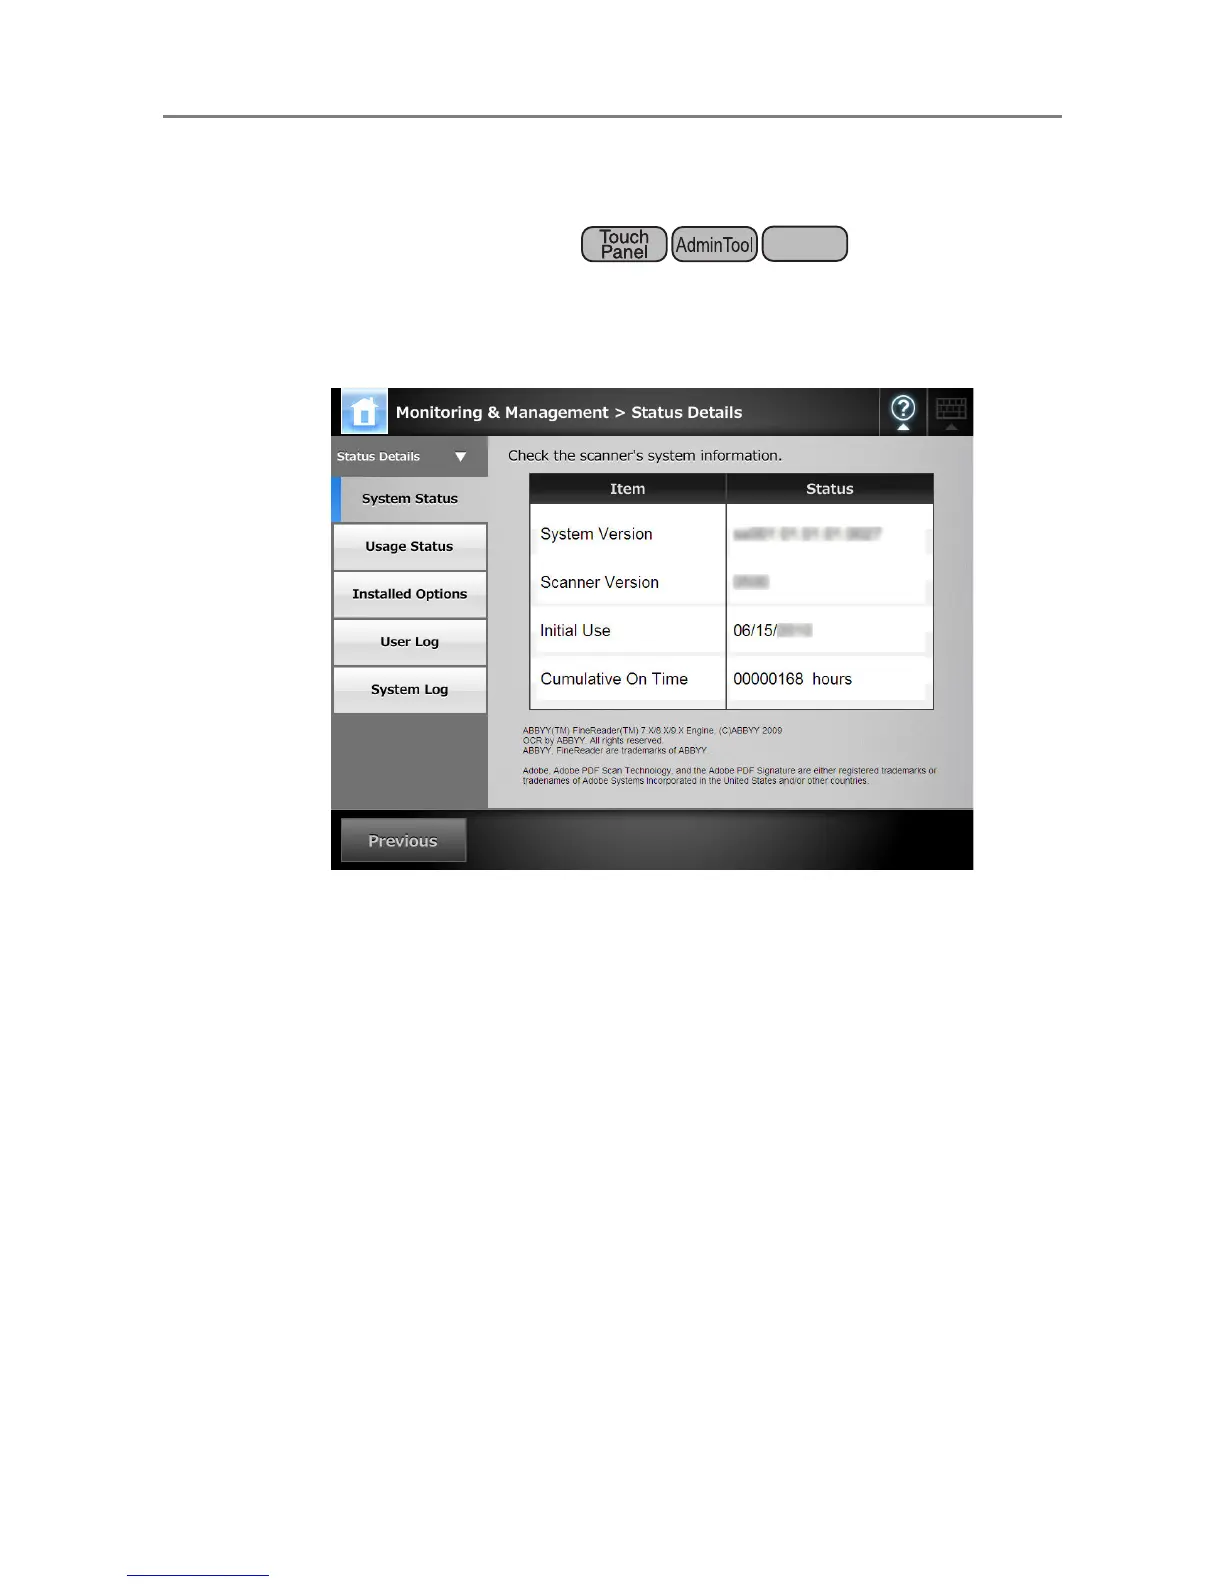
Viewing the System Status
1.
Select [Monitorin
g & Management]
J
[Status Details]
J
[System Status].
D
The system status information is displayed.
Ce
ntral
Admin
Console
169
171
Table of Contents
Main Page
' Operators Guide
2
Default Chapter
2
Table of Contents
2
Copyright
18
Introduction
24
About this Manual
25
Opening Help
28
Chapter 1 Overview
30
Scanner Features
31
Basic Uses for Scanned Data
31
Advanced Security Measures
32
Configure and Manage with Ease
32
Part Names and Functions
34
Front View
34
Rear View
35
Removable Parts
36
User Types and Operations
37
Operations with Administrator Right
38
System Settings
38
Network Settings
39
Monitoring & Management
42
Device Test
44
Job Mode Settings
44
Regular User Operations
45
System Requirements
46
Requirements for Admin Tool
46
Requirements for Central Admin Console
47
Requirements for Central Admin Server
48
Requirements for Related Servers
49
Network Requirements for Central Admin
52
Scanner Requirements for Central Admin
52
Port Number List
53
Chapter 2 Basic Scanner Operations
56
Default Chapter
57
Turning the Power On/Off
57
Turning the Power on
57
Turning the Power off
58
Using the Scanner Buttons
59
Using the Power Button
59
Using the Top Cover Scan Button
61
Using the LCD Touch Panel
62
Using the On-Screen Keyboard
63
Showing/Hiding the On-Screen Keyboard
63
Keyboard Layout
64
Using the On-Screen Keyboard
64
Chapter 3 Administrator Operations (Overview)
66
Operating and Managing Scanners
67
Required Scanner Function Settings
69
Chapter 4 Administrator Operations (Lcd Touch Panel and Admin Tool)
74
Windows
75
Administrator Windows Via the LCD Touch Panel
75
Administrator Windows Via the Admin Tool
76
Administrator Login
78
Administrator Login: Via the LCD Touch Panel
78
When Automatic Login Is Not Set
78
When Automatic Login Is Set
79
Setting up for Administrator Access Via the Admin Tool
80
Checking the Internet Explorer Cache Settings
80
Setting the Internet Explorer Trusted Sites
81
Installing the Admin Tool
82
Uninstalling the Admin Tool
86
Administrator Login: Via the Admin Tool
87
Setting the System Settings with the Installation Wizard on the LCD Touch Panel
90
Setting the Setting Mode for the LCD Touch Panel
92
Configuring the System
94
Setting the Scanner Name
94
Setting the Language
96
Setting the Region/Timezone
97
Setting the Date/Time
98
Setting the Keyboard
99
Managing Certificates
100
Importing a Certificate File
100
Deleting a Certificate File
101
Setting the Scan Options
102
Setting the Multifeed Detection Method
102
Adjusting the Scan Starting Position (Offset/Magnification)
105
Setting General Scanner Settings
106
Configuring the Login-Related Settings
107
Setting the Login Settings
107
Setting the Time to Standby Mode
110
Changing the Admin Password
112
Configuring the Network Settings
113
Giving the Scanner an IP Address
113
Setting the DNS Server
115
Setting the WINS Server
116
Setting the NTP Server
117
Setting the Proxy Server
118
Checking the Network Connection with a Ping Test
119
Checking the Network Operating Status
121
Checking the Network Status
121
Setting the Link Speed/Duplex Mode
122
Setting Wake on LAN
122
Setting the Admin Connection
123
Setting a Central Admin Server
125
Configuring the LDAP Settings
127
Setting the Login LDAP Server
127
LDAP Search Target
129
Setting the E-Mail LDAP Server
133
Setting the LDAP Search Parameters
135
Configuring the E-Mail-Related Settings
137
Setting the E-Mail Server
137
Configuring Settings for Sending E-Mail
139
Setting a File Name Format for When Attaching Scanned Data to E-Mail
140
Setting the Fax Server
142
Setting Folders for Saving Scanned Data
143
Setting the Network Folders
143
Registering a Network Folder (Network Tree)
144
Registering a Network Folder (Network Path)
146
Removing a Network Folder
147
Renaming a Network Folder
147
Viewing the Network Folder Details
148
Setting the FTP Server Folders
149
Registering an FTP Server Folder
149
Changing the FTP Server Folder Settings
151
Removing an FTP Server Folder
151
Viewing the FTP Server Folder Details
152
Setting the Sharepoint Folders
153
Renaming a Sharepoint Folder (Display Name)
154
Removing a Sharepoint Folder
155
Setting a File Name Format for When Saving Scanned Data
156
Setting the Network Printers
159
Checking the Printer Drivers
160
Setting the Printer Properties
161
Registering a Network Printer (Network Tree)
164
Registering a Network Printer (Network Path)
167
Renaming a Network Printer
168
Removing a Network Printer
169
Viewing the Printer Details
169
Viewing the Scanner Details
170
Viewing the System Status
170
Viewing the Usage Status
171
Resetting the Usage Counter
171
Viewing the Status of Consumable Parts
171
Viewing the Status of Installed Options
172
Managing the User Log
173
Viewing the User Log Details
173
Clearing the User Logs
174
Downloading the User Logs in CSV Format
174
Managing the System Log
175
Viewing the System Log Details
175
Clearing the System Log
176
Downloading the System Log in CSV Format
176
Managing the User Data Store and System Settings
177
Maintaining the User Data Store
177
Backing up the User Data Store
178
Clearing the User Data Store
180
Restoring the User Data Store
180
Maintaining the System Settings
181
Downloading the System Settings in CSV Format
181
Backing up System Settings
182
Restoring the System Settings
183
Resetting Factory Defaults
184
Maintaining the System
185
Updating the Scanner's System Software
185
Checking for New Updates
187
Checking for New Updates Manually
187
Checking for Updates at Scanner Startup
188
Requesting E-Mail Notification When a New Update Is Available
188
Maintaining Add-In Modules
189
Installing an Add-In Module
189
Uninstalling an Add-In Module
190
Viewing the Add-In Status
190
Setting the On-Screen Keyboard When Running an Add-In
191
Uploading an Add-In Settings File
191
Setting the Information Output Level
192
Obtaining Technical Support
193
Setting the Destination for Alert Notifications
194
Getting a Screenshot on the LCD Touch Panel
195
Setting a Job Sequence
197
Job Setting Quick User Guide
199
Setting a Job Sequence
201
Adding a Job Sequence
201
Cloning a Job Sequence
207
Editing a Job Sequence
207
Deleting a Job Sequence
208
Filtering Job Sequences
208
Filtering the LDAP List
209
Setting a Job Menu
210
Adding a Job Menu
210
Cloning a Job Menu
214
Editing a Job Menu
214
Deleting a Job Menu
215
Viewing the Detailed Settings for a Job Menu
215
Setting a Job Group
216
Adding a Job Group
216
Deleting a Job Group
220
Editing a Job Group
220
Assigning Job Menus to Users Not Included in a Job Group
221
Viewing the Detailed Settings for a Job Group
221
Filtering the LDAP List
223
Messages
224
Administrator Window Messages
225
Chapter 5 Administrator Operations (Central Admin Console)
226
(Central Admin Console)
226
Function List
227
Central Admin Console Window
230
Central Admin Console Quick Guide
231
Pre-Settings for Using Central Admin Console
233
Installing the Central Admin Server Software
233
Importing the Certificate
237
Installing the Central Admin Console
238
Setting up a Firewall for the Central Admin Server
240
Configuring the Scanner Settings for Central Admin Management
240
Admin Console
241
Uninstalling the Central Admin Console
241
Uninstalling the Central Admin Server Software
241
Central Admin Server Login: Via the Central Admin Console
242
Setting the Central Admin Server
245
Setting the Operating Environment
245
Changing the Admin Password
248
Clearing the User Roaming Data
250
Setting Scanner Configuration
251
Importing Scanner Configuration
254
Exporting Scanner Configuration
255
Adding Scanner Configuration
256
Cloning a Scanners Configuration
257
Editing Scanner Configuration
257
Deleting Scanner Configuration
258
Viewing the Scanner List
259
Monitoring and Maintaining the Scanner Network
260
Updating the System
261
Installing an Add-In
263
Updating the Scanner Settings
266
Setting the Job Mode
269
Viewing the Update Status Lists
272
Viewing the Scanners Operating Status
274
Viewing Event Log
275
Downloading Event Log
276
Clearing All Events
276
Collecting and Exporting Audit Logs
277
Collecting Audit Logs
277
Exporting Audit Logs
278
File Format of Audit Logs
279
Maintaining Central Admin Server Settings
281
Backing up Central Admin Server Settings
281
Restoring Central Admin Server Settings
283
Obtaining Technical Support on the Central Admin Server
284
Migrating Data to an Updated Version of the Central Admin
285
Server Software
285
Messages
287
Central Admin Console Messages
287
Event Log
288
System Event Log
288
Backup/Restore Command Messages
290
Error
290
Information
290
Audit Log Export Command Messages
295
Chapter 6 Regular User Operations
296
Loading Documents
297
How to Load Documents
297
Loading Documents Using a Carrier Sheet
300
Using LCD Touch Panel Windows: Regular User
303
Main Menu] Window
303
Job Menu] Window
304
Regular User Settings Overview
305
Logging In: Regular User Mode
306
Sending the Scanned Data by E-Mail
309
Selecting an E-Mail Target from the E-Mail Address Book
313
Adding an E-Mail Target to the E-Mail Address Book
317
Editing an E-Mail Target in the E-Mail Address Book
321
Deleting an E-Mail Target from the E-Mail Address Book
323
Sending the Scanned Data by Fax
324
Selecting a Fax Number from the Fax Number List
327
Adding a Contact to the Fax Number List
329
Editing a Contact in the Fax Number List
331
Deleting a Contact from the Fax Number List
332
Printing the Scanned Data
333
Scaling
337
Positioning
341
Print Side
343
Saving the Scanned Data to a Network Folder
344
Saving the Scanned Data to a Sharepoint Folder
348
Setting the Scan Options
356
Carrier Sheet
362
Color Mode
363
Paper Size
364
Long Page Mode
365
Resolution
366
Scan Mode
367
Document Feed Direction
368
File Format
369
Searchable PDF
371
Setting a Keyword for the PDF
373
PDF Password
378
Compression
380
Brightness
383
Contrast
384
Sharpness
385
Dropout Color
386
Background Removal
387
Blank Page Skip
388
Page Orientation
389
Multifeed Detection (Layer and Length)
392
Edge Cropping
393
Enabling/Disabling the Scan Viewer
395
Editing the Scanned Data in the Scan Viewer
398
Rotating a Scanned
399
Scanning an Additional
400
Deleting a Scanned
401
Checking the User Log
402
Maintenance
403
Processing a Job
405
Enabling/Disabling the Message Screen
408
Changing a File Name (for Save/E-Mail Attachment)
410
Checking the Number of Sheets to be Scanned
411
Changing a User Password
414
Chapter 7 Scanner Care
416
Cleaning Supplies and Part to Clean
417
Which Parts and When
418
Cleaning the Exterior of the Scanner
419
Cleaning Inside the Scanner
420
Cleaning the Carrier Sheet
425
Replacing Parts
426
Checking the Consumable Alert Status
427
Replacing the Pad Assy
428
Replacing the Pick Roller
430
Purchasing the Carrier Sheet
435
Performing a Scan Test
436
Calibrating the LCD Touch Panel
439
Chapter 8 Troubleshooting
442
Default Chapter
443
Removing Jammed Documents
443
Network Connection Troubleshooting
446
System Time
449
Checking the Mail Server by Sending a Test Mail
450
Other Network Connection Troubleshooting
451
Fqdn
453
Failure to Add a Network Printer
454
Failure to Print on a Network Printer
455
Failure to Access the Scanner Using a Web Browser, Admin Tool, or Central Admin Server
456
Other Troubleshooting
459
Scanner Cannot be Turned on
460
Data Cannot be Scanned Properly
461
Scanned Data Is Inappropriate
463
Cannot Login
464
Operation Does Not Work
465
Points to Check before Contacting Your FUJITSU Scanner Dealer
467
Error Status
468
Problem with Central Admin Server Software
469
Checking the Scanner Labels
470
Pre-Maintenance Preparations
471
Appendix A Paper Specifications
472
A.1 Paper Size
473
A.2 Paper Quality
474
A.3 Maximum Document Loading Capacity
476
A.4 Area Not to be Perforated
477
A.5 Multifeed Detection Conditions
478
A.6 Conditions for Using the Carrier Sheet
480
Appendix B Management Settings and Files
482
B.1 E-Mail Address Setting Values
483
B.2 Scanner Configuration File Format
484
B.2.2 Scanner Configuration File Format (for Exporting)
485
Appendix C Root Certification Authority
488
C.1 Root Certification Authority List
489
Appendix D Scanner Specifications
492
D.1 Installation Specifications
493
D.2 Basic Scanner Specifications
494
D.3 Changing the Functions on the On-Screen Keyboard
495
Appendix E Editing Using User Editor
496
This Appendix Describes How to Edit Mail Address Books and Local Accounts Using User
497
What Is User Editor
497
System Requirements
498
E.2 System Requirements
498
Pre-Settings
499
E.3 Pre-Settings
499
E.3.2 Uninstalling User Editor
502
Windows of User Editor
503
Starting/Exiting User Editor
505
Viewing the Mail Address Book/Local Accounts
506
Loading from a File
507
File Format of Mail Address Book Loaded from a File
508
File Format of Local Accounts Loaded from a File
509
Editing an E-Mail Target in the Mail Address Book
510
Changing the Group Name
511
E.7.2 Setting a Distribution List
512
Editing a Distribution List
513
E.7.3 Setting an E-Mail Address
514
Editing an E-Mail Address
515
Editing Local Accounts
516
E.8.2 Editing a Local Account
517
Discarding the Edited Mail Address Book or Local Accounts
518
Saving the Mail Address Book/Local Account
519
Saving the Edited Information to a File
520
User Editor Information Shown in User Log
521
Appendix F Compatibility with Different Versions
522
F.1 Updating System Settings from the Central Admin Server
523
F.2 Functional Compatibility between the Scanner and Central Admin Server
524
F.3 Backing Up/Restoring Data between Different Versions of the Central Admin Server Software
525
F.4 Event Source Name Output by Central Admin Server
526
Appendix G Glossary
528
About Maintenance
534
Index
536
Other manuals for Fujitsu ScanSnap N1800
Brochure & Specs
4 pages
Software Guide
22 pages
Related product manuals
Fujitsu ScanSnap S510
287 pages
Fujitsu ScanSnap iX500
514 pages
Fujitsu ScanSnap S1500
81 pages
Fujitsu ScanSnap S1300
320 pages
Fujitsu ScanSnap S1100
387 pages
Fujitsu ScanSnap iX100
141 pages
Fujitsu ScanSnap iX1600
514 pages
Fujitsu ScanSnap S1300i
514 pages
Fujitsu ScanSnap iX1500
514 pages
Fujitsu SCANSNAP iX1300
109 pages
Fujitsu ScanSnap S1500M
468 pages
Fujitsu SCANSNAP iX1400
514 pages
 Loading...