使用说明书 Operation Instruction
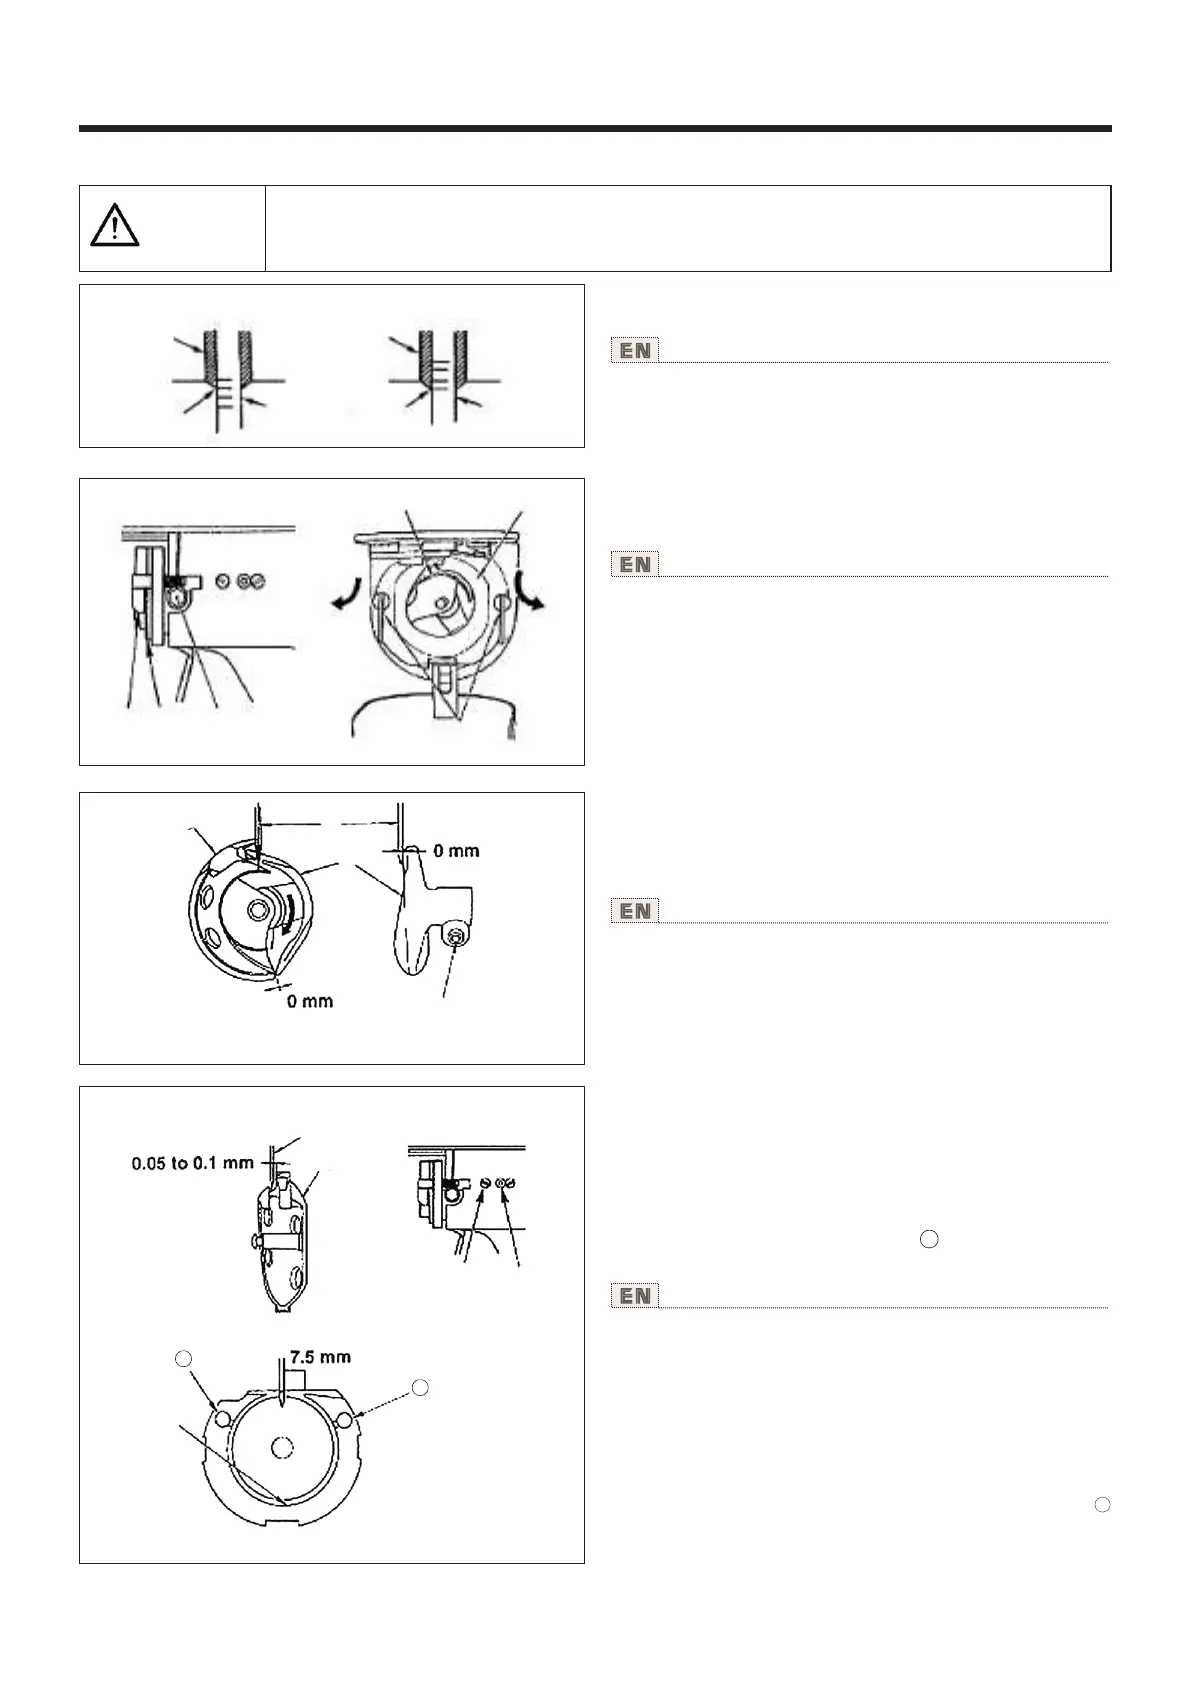
2.机针与旋梭 eedle-to-shuttle relationAdjusting the n
1)用手转动手轮,针杆①上升时,把下刻线②对准
针杆下挡块前端一致。
1) Turn the handwheel by hand. When needle bar ① has gone
up, adjust so that lower marker line ② engraved on the needle
bar aligns with the bottom end of the needle bar bushing ③ ,
lower.
为了防止缝纫机的意外起动,请关掉电源之后进行操作
注意
CAUTION
Turn OFF the power before starting the work so as to prevent accidents caused by abrupt start of the
sewing machine.
①
③
②
①
③
②
①
③
②
④
③
②
机针 和 刻 线 的 关 系
relation between needle and engraved lines
2) Loosen setscrew ① in the driver. Open inner hook pressers
② to the right and left, and remove inner hook presser ③ .
(NOTE) At this time, be careful not to let inner hook ④ come
off and fall.
2)拧松驱动器固定螺丝①,左右打开中旋梭压片②,
卸下中旋梭压脚③。
(注意)此时请注意不要脱落中旋梭④。
④
①
3)为了让中旋梭④的梭尖与针⑤的中心一致,同时
防止驱动器⑥在前端面与机针相碰,弄弯机针,请把
驱动器前端面与机针的间隙调整为0mm,然后把驱动
器固定螺丝①拧紧。
3) Adjust so that the blade point of inner hook ④ aligns with
the center of needle ⑤. and that a clearance of 0 mm is
provided between the front end of the driver and the needle
as the front end face of driver ⑥ receives the needle to
prevent the needle from being bent. Then tighten setscrow ①
of the driver.
⑤
⑥
4)拧松大旋梭固定⑦,左右转动大旋梭调节轴⑧,调节
大旋梭的前后位置,把机针⑤和中旋梭④的梭尖的间
隙调整为0.05-0.1mm。
5)调整完大旋梭的前位置后,机针和大旋梭的间隙
应为7.5mm,然后拧紧大旋梭固定螺丝⑦。
(注意)较长时间没有使用缝纫机或清扫过旋梭周围
之后等时,请往轨道部⑨和油芯⑨加少量的机油后再
使用。
4) Loosen setscrew ⑦ of the shuttle,and adjust the longitudinal
position of the shuttle. To do this adjustment, turn shuttle race
adjusting shaft ⑧ clockwise or counterclockwise to provide a
0.05 to 0.1 mm clearance between needle ⑤ and the blade
point of inner hook ④ .
5) After adjusting the longitudinal position of the shuttle,further
adjust to provide a 7.5 mm clearance between the needle and
the shuttle by adjusting the rotaiing direction. Then tighten
setscrew ⑦ of the shuttle.
(NOTE) Apply a small amount of oil to race section ⑨ and oil wick ⑨,
and use the sewing machine after an extended period of disuse or
cleaning the periphery of hook portion.
10
10
⑨
10
⑧
⑤
④
⑦
10
32


 To Next Page