Do you have a question about the Molecular Devices FLIPR Tetra and is the answer not in the manual?
Measures fluorescence in wells using LEDs to excite fluorescent dye.
Operates in luminescence mode with ICCD camera and light-tight enclosure.
Overview of electrical, physical, and environmental requirements.
Details power consumption and electrical requirements for the system.
Specifies the physical dimensions and space requirements for the instrument.
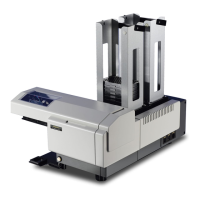
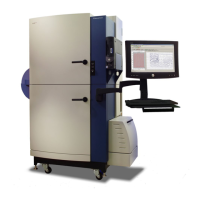
Describes the cabinet, compartments, and major subsystems of the FLIPR Tetra System.
Illustrates the overall layout and connectivity of the FLIPR Tetra System components.
Explains how plates are managed within the instrument.
Details the five positions available on the stage for plates and tips.
Explains the panel indicating instrument status and emergency interrupt.
Describes how to operate the instrument manually for assay setup.
Discusses using automated plate handlers for increased throughput.
Details the TETRAcycler plate shuttle for automated plate handling.
Overview of how fluids are transferred within the system.
Information on the standard pipettor heads available for the system.
Details the Cell Suspension option for maintaining cell viability.
Describes the pin tool head for liquid transfer using capillary action.
Details the process for washing pipette tips and pin tools.
Explains the optical components for excitation and detection.
Discusses the available camera options for fluorescence and luminescence assays.
Explains the four LED banks used for plate illumination.
Details the three-position filter slider for separating emission bands.
Information about the host and embedded computer systems.
Describes the role of the embedded computer in controlling basic system functions.
Step-by-step guide for powering on and initializing the instrument.
Procedures for safely powering off the instrument and associated components.
Step-by-step guide for installing the ScreenWorks software.
Procedures for activating the software license.
Explains the differences between online and offline installation modes.
Instructions for removing the ScreenWorks software from the computer.
Description of the main ScreenWorks interface layout.
Explanation of the toolbar shortcuts for main menu commands.
Explains the commands available within the Menu Bar.
Details commands for opening, closing, saving, and printing files.
Explains commands for managing the display of windows and panels.
Provides access to instrument communication and manual dialogs.
Commands for controlling specific hardware operations.
Covers functions for checking system and assay plate performance.
Configuration for automating plate handling with the SynchroMax ET.
Access to default directory settings and plate library management.
Dialog for managing plate definitions and camera parameters.
Options for arranging and viewing multiple windows.
Access to user guide, release notes, and software information.
Reports current status of hardware components and experimental steps.
Shows current configuration of LED banks, filters, pipettor, and TETRAcycler.
Used for creating new protocols by incorporating processes.
The main interface for creating, viewing, and editing protocols and data.
Outlines the combination of processes to build experimental protocols.
First protocol process for defining read modes, plate positions, and data directories.
Configures up to four read modes for experiments.
Assigns plate types to specific positions for experiment execution.
Configures file naming conventions for experiment data.
Designates directories for saving data and export files.
Allows setting desired plate-stage temperatures for experiments.
Selects information to be automatically printed at the end of an experiment.
Second protocol process, handles data viewing and analysis.
Options for viewing acquired data in graphs and tables.
Displays traces of relative light units versus time for each well.
Configures automatic export of statistics and time sequence files.
Applies data-correction algorithms for modifying data display.
Displays selected read modes enlarged for detailed analysis.
Using Grouping and Correction dialogs to analyze experimental data.
Defines groups of wells with common characteristics for data analysis.
Dialog for applying data-correction algorithms and viewing ratiometric data.
Enables viewing data as a ratio of one read mode to another.
Table used to analyze data produced during an experiment.
Methods for exporting data in various formats.
Configuration for automatic export of time sequence, statistics, and group statistics.
Configures parameters for exporting time-sequence data.
Configures kinetic reductions for averages, maximums, and minimums.
Configures group statistics based on kinetic reduction.
Exports batches of data files to individual or single export files.
Dialog to view images saved during an experiment.
Dialog for entering comments with protocol files and viewing them in data files.
Configuration options for the Aspirate section of the Transfer Fluid page.
Configuration options for the Dispense section of the Transfer Fluid page.
Aspiration configuration options when a pin tool is selected.
Dispense configuration options when a Pin Tool head is selected.
Adds fluid mixing steps to protocols as independent or linked steps.
Details fluid mixing using a standard pipettor with aspirations and dispenses.
Describes fluid mixing using a pin tool with up and down motions.
Mixes fluid immediately after dispense for proper mixing.
Adds read steps to protocols as independent or linked steps.
Eliminates unwanted agonist or antagonists prior to additions or between experiments.
Options for washing pipette tips using the Wash Tips process.
Options for washing pin tools using the Wash Pins process.
Used to dry pins between transfers or washes to prevent carry-over.
Prevents future pipettor motion until the pause is complete.
Cleans and sterilizes fluid paths in the Cell Reservoir.
Instructions for swapping pipettor and pin tool heads.
Step-by-step guide to remove a pipettor head.
Instructions for installing a pipettor head onto the instrument.
Steps to remove the wash reservoir top.
Steps to install the wash reservoir top.
Procedure to reset the instrument after hardware changes.
Instructions for replacing the 1536 tip gasket.
Procedure to unload and remove the tip block and gasket.
Information on swapping pin tools.
Steps for loading and unloading pin tools.
Instructions for replacing LED modules.
Steps to remove LED banks from the instrument.
Steps to install new LED banks into the instrument.
Instructions for removing and installing emission filters.
Steps to remove an emission filter from the system.
Steps to install a new emission filter into the system.
Describes the plate hold-down devices and their purpose.
Guidance on choosing the correct plate hold-down device for different plates.
Information about the cell reservoir.
Steps to reinstall the cell reservoir.
Steps to remove the cell reservoir.
Steps to calibrate the instrument's optical system.
Process for adding new plate types and masks to the software library.
Explains the flat-fielding algorithm for uniform illumination.
Procedure to recalibrate optics after hardware changes.
When to perform signal tests to check system and protocol settings.
Daily checks to ensure system performance.
Procedure for performing the yellow plate signal test.
Running a plate before an experiment to check parameters.
Outlines tasks required for running an assay and types of assays.
Guidelines for preparing adherent cells for assays.
Information on optimal cell densities for fluorescence assays.
Methods for seeding cells into plates.
Guidelines for preparing suspension cells for assays.
Procedures for powering on and initializing the instrument.
Daily system checks using the Yellow Plate Signal Test.
Process for loading fluorescent dyes into cells.
Steps for preparing source plates with compounds.
Method for preconfiguring protocol files to ensure consistency.
Defines experiment parameters within a protocol file.
Configuring read mode, plate position, and data file settings.
Dragging and defining experimental processes to build the assay sequence.
Adjusting hardware components for optimal signal output.
Optimizing excitation intensity, exposure, gain, and pipettor settings.
Adjusting pipettor height for optimal compound delivery.
Recommends fluid dispense speeds for different plate formats.
Information on fluid volume parameters and their effect on assays.
Evaluating factors for proper compound transfer with pin tools.
User-adjustable settings for optimizing suspension cell delivery.
Steps to initiate an assay run.
Procedures and information for running the Calcium Assay Kit.
Lists materials needed for the FLIPR Calcium Assay Kit.
Information on the optimized fluorescent dye used in the kit.
Guidelines for preparing cells for the FLIPR Calcium Assay Kit.
Procedure for preparing the loading buffer for the assay.
Steps for loading cells into plates using the loading buffer.
Steps to start and run the calcium assay.
Provides recommended experimental parameters for EMCCD and ICCD cameras.
Solutions for common problems encountered during calcium flux assays.
Addresses issues related to fluorescence drops after compound addition.
Procedures and information for running the Membrane Potential Assay Kit.
Lists materials required for membrane potential assays.
Guidelines for preparing cells for membrane potential assays.
Information on optimal cell densities for membrane potential assays.
Procedures for loading dyes for membrane potential assays.
Steps for preparing the loading buffer for membrane potential assays.
Steps for loading cells using the loading buffer for voltage sensor probes.
Steps to begin and run the membrane potential assay.
Solutions for problems encountered during membrane potential assays.
Addresses fluorescence drops during compound addition in membrane potential assays.
Procedures and information for running voltage sensor probe assays.
Lists materials required for voltage sensor probe assays.
Explains the FRET-based assay technology for voltage sensor probes.
Guidelines for preparing cells for voltage sensor probe assays.
Information on cell densities for voltage sensor probe assays.
Procedures and information for running luminescence assays.
Lists materials required for luminescence assays.
Information on cell densities for luminescence assays.
Steps for loading coelenterazine for adherent cell luminescence assays.
Steps for loading coelenterazine for suspension cell luminescence assays.
Procedures for preparing the cell reservoir and running luminescence assays.
Instrument settings specific to luminescence assays.
Recommended parameters for luminescence detection.
General guidance on optimizing assay conditions.
Conditions to check for cell culture optimization.
Conditions to check for cell seeding optimization.
Conditions to check when loading coelenterazine.
Conditions to check for source plate preparation.
Explains the meaning of instrument status indicator colors.
Solutions for common start-up errors and symptoms.
Common issues and their solutions related to instrument operation.
Common problems and solutions related to the pipettor head.
Common issues and solutions related to the optical system.
Troubleshooting steps for issues related to the yellow test plate.
Common problems and solutions related to the tip washer.
Common problems and solutions related to the cell reservoir.
Troubleshooting steps for issues with data analysis and results.
Solutions for problems encountered with robotic integration.
Overview of the interface between the instrument and robotic systems.
Describes the document's aim to detail the interface and communication protocol.
Explains conventions used for commands, parameters, and formatting.
Information on the versioning of the automation interface.
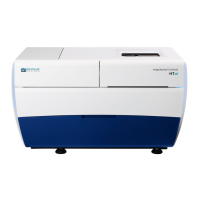
Basic functions and subsystems of the FLIPR Tetra System.
Describes the primary function of the system in fluorescence and luminescence assays.
Introduction to the instrument's subsystems like control system, plate reader, and pipettor.
Demonstrates the basic layout of the instrument subsystems.
Details the four positions on the stage for plates and tips.
Explains how users manually or automatically handle plates.
Defines terminology for instrument sides and orientation.
Describes how plates are loaded into the instrument using the TETRAcycler.
Describes the door for accessing optics for filter and LED module changes.
Details the placement of the tip/pin washer.
Describes the mounting location of the Cell Suspension module.
Illustrates other important access points on the instrument.
Instructions for positioning the host computer's monitor and keyboard.
Details the necessary space around the instrument for access and operation.
Describes the system's control architecture including host computer and instrument.
Overview of the FLIPR Tetra System's components and operating modes.
Default operating mode where users manually load plates and configure assays.
Mode for communicating with external devices like robots for automated operation.
Details the TCP/IP protocol and IP addresses for communication.
Overview of running the system in remote mode.
Steps involved in powering on and initializing the instrument.
Steps to start the host computer and ScreenWorks Software.
User must create protocols in manual mode before remote operation.
How to set the instrument to remote mode for external control.
Loading protocols using the openprotocol command in remote mode.
Running protocols remotely using the runprotocol command.
Information obtained from status response about plates in the instrument.
Methods for tracking bar codes of plates used in assays.
Awareness of specific items when setting up protocols for remote mode.
Protocols must be created and tested in manual mode before remote use.
Configuring read modes, plate types, and cell conditions.
Assigning plates to positions is critical for assay function.
Configuring file naming conventions for data files.
Settings for transferring fluids in remote control, with exceptions.
User requirement to keep pipettor in well after dispensing.
Describes the version command for checking interface version.
Command to retrieve the status of the instrument.
Command to load plates or tips to specified locations from the landing pad.
Command to remove plates or tips from a specified location.
Command to open a specified protocol file.
Returns all protocols in a specified folder.
Command to run the currently open protocol.
Command to stop the current action being performed by the instrument.
Cleans errors in case recoverable errors have occurred.
Command to load tips onto the pipettor head.
Command to unload pipette tips from the pipettor head.
Operation to cycle camera temperature for optimal performance.
Command to set the temperature for the instrument chamber.
Washes pipette tips with specified parameters.
Command to return the configuration of the instrument.
Extended status command returning more detailed instrument status.
Washes the Cell Reservoir with specified parameters.
Categorization and explanation of interface errors.
Errors generated by issuing a command.
Errors generated by executing a command.
History of revisions to the remote interface.
Lists commonly used bar code symbols supported by the scanner.
Recommendations for optimal bar code reading performance.
A hypothetical experiment used to describe data adjustment algorithms.
Compensates for light crossover between neighboring wells.
Method for calculating crosstalk correction factors.
Compensates for variations in illumination and cell density across the plate.
Derives correction factors based on mean fluorescence counts.
Corrects for fluorescence changes occurring in all wells over the experiment.
Derives negative control correction factors.
Compares percent change in positive control wells with all wells for normalization.
Method for calculating positive control scaling factors.
Algorithm to determine change in fluorescence over background.
Method for determining subtract bias.
Algorithm to compensate for variations within a single well.
Derives correction factors based on baseline start and end samples.
Lists accessories for the FLIPR Tetra System.
Accessories for field installation of the system.
Lists available pipettor heads for the system.
Lists consumable optical components like LED modules and filters.
Lists consumable items for pipetting, such as tips.
Lists consumable parts for the cell reservoir system.
Lists available plates for the system.
Lists various 96-well read plates.
Lists available masks for 96-well read plates.
Lists available 96-well source plates.
Lists available 384-well read plates.
Lists available 384-well source plates.
Lists available 1536-well read plates.
Lists available 1536-well source plates.
Lists available source reservoirs.
Lists assays that can be performed on the system.
Lists consumables specific to calcium flux assays.
Lists consumables for the Membrane Potential Assay Kit.
Lists general equipment and supplies needed for assays.
Explains how AquaMax Sterilant removes residues and kills microorganisms.
Lists the components included in the AquaMax Sterilant kit.
Lists materials needed but not supplied with the kit.
Storage recommendations for AquaMax Sterilant components.
Procedures for preparing AquaMax Sterilant solutions.
Recommended procedures for using the sterilant.
Instructions for filling out the decontamination certificate.
Canadian regulatory compliance information.
Classification of the equipment as ISM equipment.
FCC notice regarding compliance and potential interference.
| Brand | Molecular Devices |
|---|---|
| Model | FLIPR Tetra |
| Category | Laboratory Equipment |
| Language | English |