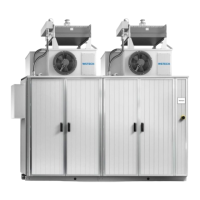
EasyManua.ls Logo

WSTECH APS Series - Cooling Tower Mounting

WSTECH APS Series
213 pages
Print Icon
To Next Page IconTo Next Page
To Previous Page IconTo Previous Page
Loading...
Original Operating Instructions
APS Series Outdoor Hybrid Inverter
Installation
APS-Series 120 Operating Instructions v320 EN
Page 79 of 213
4.4 Cooling Tower
NOTICE
Damage to the product due to ingress of moisture!
Incorrect sealing of the cooling tower leads to leakages.
Surfaces and threaded studs must be clean, dry and free of all
traces of grease, oil, moisture and dust.
All threaded studs must be applied with assembly paste.
Observe the instructions for processing the assembly paste.
Only the delivered parts should be used for mounting the
cooling tower and radial fan.
Mount the radial fan immediately after mounting the
cooling tower.
If the construction adhesive is missing, see Section 4.4.1.1.
4.4.1 Mounting Cooling Tower
Table 10: Required material for one cooling tower
Quantity
Description
Part No.
Delivery
23 pcs.
Bonded sealing
990179
See separate package
19 pcs.
Spring lock washer
430100
See separate package
19 pcs.
Hexagon nut
440055
See separate package
4 pcs.
Wing nut
440048
See separate package
20 pcs.
Washer
430091
See separate package
-
Assembly paste
(WEICON ASW 030)
720305
See separate package
NOTICE: For option Seismic IEEE 693 more screw connections for mounting a
cooling tower are required.
Table 11: Required material for one cooling tower (option Seismic IEEE 693)
Quantity
Description
Part No.
Delivery
27 pcs.
Bonded sealing
990179
See separate package
23 pcs.
Spring lock washer
430100
See separate package
23 pcs.
Hexagon nut
440055
See separate package
4 pcs.
Wing nut
440048
See separate package
24 pcs.
Washer
430091
See separate package
-
Assembly paste
(WEICON ASW 030)
720305
See separate package
NOTICE: For transport the radial fan is mounted inside the cabinet.
Procedure:
1. Dismount the radial fan.

Table of Contents