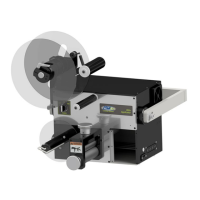
The CTM Labeling Systems Standard 360a Model Y (360y) Label Applicator is a high-speed labeling device designed to apply pre-printed adhesive-backed labels to products. It is a self-contained module that can be mounted in various orientations (top, bottom, and/or sides) to suit different production line arrangements or workstation setups. The applicator's symmetrical design allows for dispensing labels to either the right-hand or left-hand side, with the hand configuration being adjustable by swapping the applicator nose with the unwind/rewind assemblies. While many parts are ambidextrous, some, like tamp pads and label manifolds, are hand-specific and may require new purchases when changing configurations. The applicator can also be adapted to different label application types by changing the nose assembly, with the core unit remaining the same.
Function Description:
The 360y applicator automates the process of applying labels to products, whether they are stationary or moving on a production line. It utilizes various nose assemblies to achieve different application methods:
- Merge (no air required): Dispenses labels via a wipe-on/merge application, where a brush wipes the label onto a moving product.
- Air Blow: Applies labels of various sizes without contact, using axial fans to create vacuum for holding the label on a grid and then air blasts to apply it to the product.
- Reverse Vacuum Blow (RVB): Dispenses labels with an air blast using a stationary tamp label pad and manifold, holding the label on the pad with vacuum before an air blast places it on the product.
- Straight Line Tamp: Extends a tamp pad to the product, applies the label with an air blast, and then retracts.
- Inline or Perpendicular Swing Tamp: Uses a rotary actuator to swing the label 90° into the product path for application via an air blast, suitable for leading or trailing edges.
- Inline or Perpendicular Dual Action Tamp (DAT): Applies up to two labels on one product, one on the sidewall and one on either the leading or trailing edge, using a straight-line air cylinder and a rotary actuator.
Important Technical Specifications:
- Electrical Requirements: 108 – 132 VAC, 1 Ø, 10 AMPS, 10K SCCR, 50/60 Hertz, Single-Phase. The power cable is 3m long, 3-wire, 16 AWG (1.00mm2) conductors rated at 10 amperes, terminated with a NEMA5-15 plug.
- Air Requirements: 80 PSI clean dry air (for non-merge applicators), 4 SCFM. Tamp applications may use higher SCFM depending on venturi vacuum pressure.
- Operating Environment: Ambient Operating Temperature: 40°F – 104°F; Ambient Operating Humidity: 20% – 90% RH, non-condensing; Ambient Storage Temperature: -4°F – 140°F; Ambient Storage Humidity: 0% – 90% RH, non-condensing; Operating Altitude: 3280ft above sea level or lower.
- Label Specifications: Labels should be supplied on a liner web with a minimum label gap of 1/8 inch. The applicator accepts and dispenses labels from rolls up to 20 inches outer diameter (O.D.).
- Laser Sensors (Banner Q3X and Q4X):
- Q3X (Class 2): Laser Wavelength: 655nm, Output: <0.42mW, Pulse Duration: 5µs.
- Q4X (Class 1): Laser Wavelength: 655nm, Output: <0.20mW, Pulse Duration: 7µs to 2ms.
- Noise Emissions: Less than 70dB(A).
- Weight: Applicators can weigh 120lb or more.
Usage Features:
- HMI Display: The applicator is controlled via a Human-Machine Interface (HMI) display, allowing users to adjust numerous variables for optimal operation. It features a backlight saver function that turns off after 60 minutes of inactivity and wakes up on touch or critical alarm.
- Label Setup: Includes procedures for threading labels, setting up various sensors (Banner S18-2, Q3X Laser, Q4X Laser, DF-G3 Fiber Optic), and configuring label length.
- Sensor Teach Modes: Offers "Auto Teach" for automatic setting of label sensitivity, length, and stop values, and "Manual Teach" for fine-tuning when auto-teach is insufficient.
- Static Test: Essential for verifying consistent label placement on the product, crucial for troubleshooting.
- Configuration Menu: Provides access to applicator options, I/O diagnostics, and label sensor reset.
- Applicator Options: Includes settings for Missing Label Option, Encoder Option, Enable On Power Up, Auto Prime Pad Option, Loose Loop, Crossover Option (for zero-downtime with two applicators), Imprint Menu, Tamp Home Mode, Label On Pad, Vacuum Control, Foldover Option, Powered Rewind Option, Multi-Label Option, Skip Count, and Label to Placement Time.
- Warning and Critical Alarms: The HMI displays alarms to indicate problems, with critical alarms stopping the applicator until resolved.
- Changing Numeric and Text Values: User-friendly interface for adjusting parameters and format names.
- Passcode Protection: Setup Menus and Special Options Menu are protected by a programmable passcode.
- Applicator Orientations: Can be positioned Nose Up/Nose Down, Reels Up, Upright and Above, or Bottom Up.
- Connecting Cables: Detailed instructions for connecting power, display, and optional cables (I/O, Encoder, Crossover, Low Label, End of Web, Product Detect, Alarm, Valve).
Maintenance Features:
- Preventative Maintenance Schedule:
- Daily: Examine peel edge, blow box grid, label pad, and rollers for adhesive build-up; check air filter for water/oil; examine for loose screws/rollers; clean printhead and platen roller (for loose loops).
- Weekly: Clean rollers, blow box grid, label pad, and peel edge; examine air lines and connections for leaks; examine for loose screws/rollers.
- Monthly: Examine dancer arm tension and unwind brake O-ring; examine drive and rewind belts; examine rollers for free rotation/play; examine rewind slip clutch disk for wear; replace air inlet filter.
- Semi-Annual: Replace air inlet filter and clean collection bowl; clean inside and outside of applicator with industrial vacuum; replace slip clutch disk and clean friction surfaces; check roller clutch on rewind shaft; examine pulleys for wear.
- Dancer Arm Adjustment: Procedures for maintaining proper tension on the label liner and brake operation.
- Rewind Slip Clutch Adjustment: Instructions for adjusting rewind tension based on label width/length, applicator attitude, web speed, and motor acceleration/deceleration.
- Drive Belt Adjustment: Steps for replacing and adjusting the drive belt, including angular alignment.
- Changing Dispense Hand: Detailed sequence for reconfiguring the applicator for opposite-hand dispensing, including nose assembly removal and installation, rewind removal and installation, and wiring changeover.
- Troubleshooting Chart: Provides common problems, possible causes, and solutions for issues like power, display, label liner breaking, label advance, and label holding/placement.
- I/O Diagnostics: A troubleshooting tool to verify input status and force outputs.
- Servo Tuning: Allows adjustment of stepper motor parameters like position width, torque limits, acceleration/deceleration rates, and motor current.
- Software Version Display: Shows current and previous software versions for display interface and controller.
- Change Main Password: Option to change the default password.
- Total Cycle Counter: Tracks the total number of labels applied and can be reset.
- Encoder Setup: Access to Encoder Resolution and Pulse Length variables, and the ability to turn the Encoder Option on/off.
- Compensation Setup: Adjusts label placement for applicator variances across different speeds.