LC700 – User’s Guide
2.14
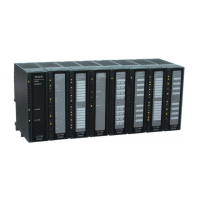
A - Joining the Rack: When assembling more than one rack in the same DIN rail, use this metallic
piece to interconnect the racks. This connection generates stability to the assembly and makes
possible the digital ground connection (K).
B - Jumper W1: When connected, it allows the rack to be powered by the previous rack.
C - Module support: Module holder located in the top of the rack.
D - DIN Rail: base rack connection. It should be tightly fixed to the place where the rack is being
mounted.
E - Flat Cable Connector (Top): When existing more than one rack in the same DIN rail, they must
be hooked up by a flat cable (J) connected to the flat cable connectors (I) and (E).
F - Module Connector: Bottom connection of the module to the rack.
G - Rack Address Switch: When using more than one rack in the DIN rail, the rack address switch
allows a distinct address to each rack.
H - Clips: The clips, located above of the rack, allow it to be connected in the DIN rail. It should be
pushed down before inserting the rack in the DIN rail and after that pushed up to fix the pieces.
I - Flat Cable Connector (Bottom): When existing more than one rack in the same DIN rail, they
must be hooked up by a flat cable (J) connected to the flat cable connectors (I) and (E).
J - Flat Cable: Cable used to connect the data bus between the racks.
K - Digital Ground: When using more than one rack in the same DIN rail, the connection between
digital grounds (K) must be reinforced through appropriate metallic piece.
L - Connection of the Rail: Support that brings the connection between the rack and the DIN rail
(D).
Installing a Rack in the DIN rail
1. In case of only one rack, this fixation can be done as the first step, even before of fixing any
module to the rack.
2. Use a screwdriver (or your fingers) to pull the clips (H) down.
3. Place the back of the rack on the top of the DIN rail edge.
4. Accommodate the rack on the DIN rail and push the clips up. You will hear a click sound when
they lock properly.
5. Set the correct address for the rack using the rotating switch at the rack.
Adding Racks
1. In case of using more than one rack in the same DIN rail, take a look in the flat cable
connections (J) in the top connector of the first rack and in the bottom connector in the second
rack, before plugging the new module in the slot 3 of the first rack;
2. Fix one rack to the other through the joining part of the rack (A). Pass the metal connector of one
rack to the other and fix with screws;
3. Connect the digital ground (K), using one metallic connection fixed by screws.
4. Do not forget to place a terminator in the last rack. The terminator should be plugged in the flat
cable connector (top) (E);
5. Set the address for the new rack using the rotating switch.
Tips for Assembling
− If there is more than one rack in the same system:
− Do the grip in the DIN rail at the end of the assembly.
− Keep free the slot 3 of the rack to connect the other module through the flat cable connector.
− Check the addresses configuration (rack address switch), as well as the jumper W1 and the
cable of the bus.
− Remember that to give continuity to the DC power supply to the previous rack, it is necessary to
have the jumper W1 connected.
− Make the amendment of racks and strengthens the digital ground of the hardware.