NOTICE
If t
he system plug is mounted with excessive force, the contacts can break or bend.
b
Plug in the system plug carefully.
b
Do not force it.
Tool required:
•
T
X10 Torx wrench
•
TX20 Torx wrench
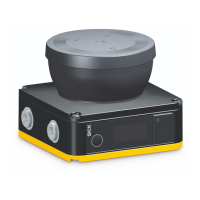
11.4.1 Replacing the safety laser scanner without system plug
Overview
In many cases, you can reuse the existing bracket and the existing system plug. Detach
t
he defective safety laser scanner from the bracket and the system plug. Then, mount
the new safety laser scanner on the bracket and the system plug. When the new safety
laser scanner is switched on for the first time, it reads the configuration from the
system plug and can be used without having to be reconfigured.
Approach
1. Make sure that the environment is clean and clear of fog, moisture, and dust.
2. Unscrew screws in the system plug and remove the system plug from the defective
safety laser scanner.
3. Unscrew the fixing screws and remove the defective safety laser scanner.
4. Mount the system plug on the new safety laser scanner, see "Replacing the system
plug", page 127.
5. Mount the new safety laser scanner, see "Mounting", page 65.
6. Check the effectiveness of the protective device.
°
Generally, the protective device is checked exactly as during commissioning,
see "Check during commissioning and modifications", page 116.
°
If, during project planning, the possible tolerances of the devices have been
considered and it is ensured that neither the configuration nor the wiring or
the alignment of the safety laser scanner have been changed, a function test
is sufficient, see "Thorough check of the principal function of the protective
device", page 62.
Complementary information
In certain cases (in the event of dust, high air humidity), it may make sense not
to initially disconnect the system plug and the safety laser scanner. In these cases,
proceed as follows:
1. Disconnect the connecting cables to the system plug.
2. Unscrew screws from the bracket and remove the defective safety laser scanner
from the bracket.
3. Move the safety laser scanner with the system plug to a clean location (e.g. office,
maintenance areas).
4. Unscrew screws in the system plug and remove the system plug from the defective
safety laser scanner.
5. See above for further steps.
11.4.2 Completely replacing the safety laser scanner
1. Disconnect the connecting cables the system plug.
2.
Unscrew the fixing screws and remove the defective safety laser scanner.
3. Mount the new safety laser scanner, see "Mounting", page 65.
4. Reconnect the connecting cables to the system plug.
11 M
AINTENANCE
126
O P E R A T I N G I N S T R U C T I O N S | microScan3 Core I/O 8025870/2020-09-04 | SICK
Subject to change without notice