9 Communication
9.2 EtherNet / IP
Rapid Link 5 · RAMO5 · RASP5 05/20 MN034004EN www.eaton.com 211
9.2.8 Configuration
The following instructions describe the configuration of the Rapid Link 5
modules in an EtherNet/IP network.
Connect the device to the EtherNet/IP environment.
You will need the following components to do so:
• Head-end controller (PLC)
• Computer (for programming and configuration purposes)
• Rapid Link 5 modules
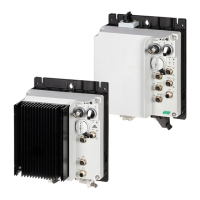
Figure 117: Example of using Rapid Link 5
(RASP5-xxxxEIP…, RAMO5-WxxxEIP…and RAMO5-DxxxEIP…)
a Sensor (light barriers)
b RASP5
c Motor connection cable
d Mains connection on power bus
e EtherNet/IP cable
f RAMO5-D…
g RAMO5-W…
h Head-end controller (PLC)
Switch on the device (switch on the power supply L1-L3 400 V AC or
power supply 24 DC via socket M12).
Address the Rapid Link 5 modules (i.e. assign IP addresses).
( Section 9.2.9, Configuring the IP address, page 213)
Now configure the project.
(For information on a detailed configuration, please consult the manual
provided by the PLC’s manufacturer.)
Check the LED indicators. The head-end controller must recognize the
device address and the MS and NS LEDs must light up green
( Section 9.2.4, LED indicators for EtherNet/IP, page 206).
Now download the project and navigate through the programming soft-
ware (such as CODESYS or Studio 5000) to RUN/Online.
①
①
①
②
③
③
③
④
④
④
⑤
⑤
⑤
⑤
⑤
⑤
⑧
⑥
⑦
 Loading...