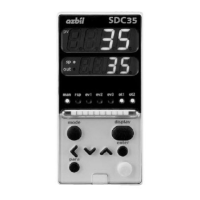
D-5
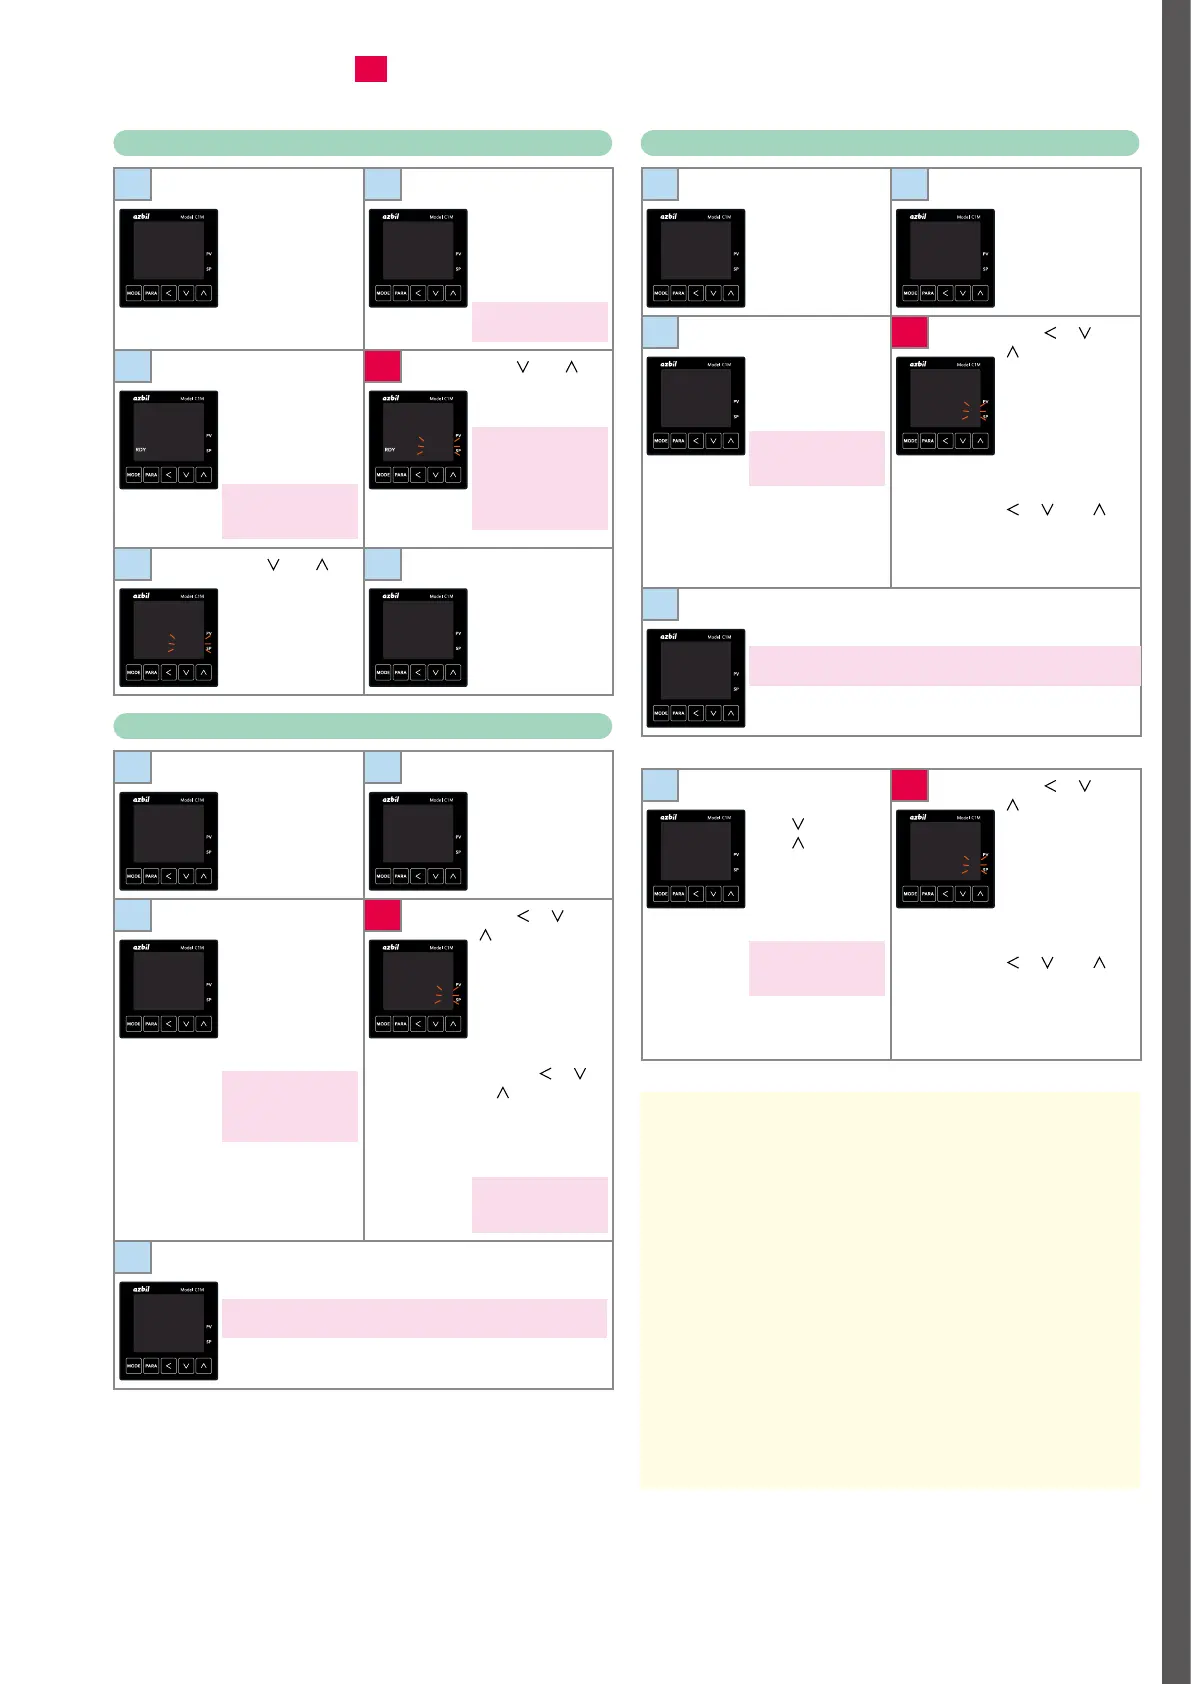
RUN/READY mode selection
1
Press [MODE]
once to show the
operation display.
2
Hold down [PARA]
for 2 s or longer. The
screen for specifying
parameters is shown
with
a--M
on the
upper display.
In ON/OFF control,
r--r
is on the upper display.
25
0
A--M
AUTO
3
Press [PARA] once.
r--r
is shown on
the upper display
and
rdy
or
run
is
shown on the lower
display.
The current mode is
indicated by
run
(RUN) or
rdy
(READY).
4
Press [ ] or [ ].
The lower display
flashes.
If “RUN/READY
selection” is set as the
DI assignment, the
display does not flash
and the mode cannot be
changed using the keys.
r--r
rdy
r--r
rdy
5
Press [ ] or [ ] to
select
run
or
rdy
.
6
Do not press any
key for 2 s. The new
value stops flashing
and the mode is
now set.
r--r
run
r--r
run
Setup of PID values
1
Press [MODE]
once to show the
operation display.
2
Hold down [PARA]
for 2 s or longer. The
screen for specifying
parameters is shown
with
a--M
on the
upper display.
25
0
A--M
AUTO
3
Press [PARA]
several times.
p-1
(proportional band)
is shown on the
upper display and
the present setting
is shown on the
lower display.
If the control method
is ON/OFF control, the
parameter and setting
are not displayed.
4
Press [ ], [ ], or
[
]. The rightmost
digit on the lower
display flashes and
its value can be
changed.
Change to the
desired P value by
pressing [
], [ ],
or [
].
Flashing means the
setting has not been
finalized.
The setting range of the
proportional band is
from 0.1 to 999.9 %.
P-1
5.0
P-1
0100
5
Do not press any key for 2 s. The new value stops flashing
and is now set.
If [MODE] is pressed while the setting is flashing, the status returns to that of
step 1.
P-1
10.0
Use
i-1
for specifying the integral time (0–9999 s) and
d-1
for the
derivative time (0–9999 s).
Setup of event value
1
Press [MODE]
once to show the
operation display.
2
Hold down [PARA]
for 2 s or longer. The
screen for specifying
parameters is shown
with
a--M
on the
upper display.
25
0
A--M
AUTO
3
Press [PARA] several
times.
e1
is shown
on the upper display
and
0
on the lower
display.
0
on the lower display
means that the event
main setting is “0.”
4
Press [ ], [ ], or
[
]. The rightmost
digit on the lower
display flashes and
its value can be
changed.
Change to the
desired event
setting by pressing
[
], [ ], or [ ].
Flashing means the
setting has not been
finalized.
E1
0
E1
0020
5
Do not press any key for 2 s. The new value stops flashing
and is now set.
If [MODE] is pressed while the setting is flashing, the status returns to that of
step 1.
E1
20
Use
e2
to specify the setting for event 2, and
e3
for event 3.
6
To proceed to
hysteresis setup,
press [
] twice or
press [
] several
times.
e1.hy
is shown
on the upper display
and
5
on the lower
display.
5
on the lower display
means that the hysteresis
setting is “5.”
7
Press [ ], [ ], or
[
]. The rightmost
digit on the lower
display flashes and
its value can be
changed.
Change to the
desired hysteresis
setting by pressing
[
], [ ], or [ ].
Do not press any
key for 2 s. The new
value stops flashing
and is now set.
E1.hy
5
E1.hy
3
Use
e2.hy
to specify the hysteresis setting for event 2, and
e3.hy
for event 3.
Memo
For highlighted steps (e.g.,
4
), the following precaution applies:
• If keys are locked, the setting does not flash and cannot be changed. To change the setting, cancel the key lock first.