○○○○○○○○○○○○○○○○○○○○○○○
Front/Rear Panel 1•1
Quick Guide
This chapter explains briefly what each button and control does on the Front panel of the PS1000/1300 and explains more about
the jacks and connectors of the Rear panel.
Following this you’ll find information about setting the instrument up and some basic operating instructions.
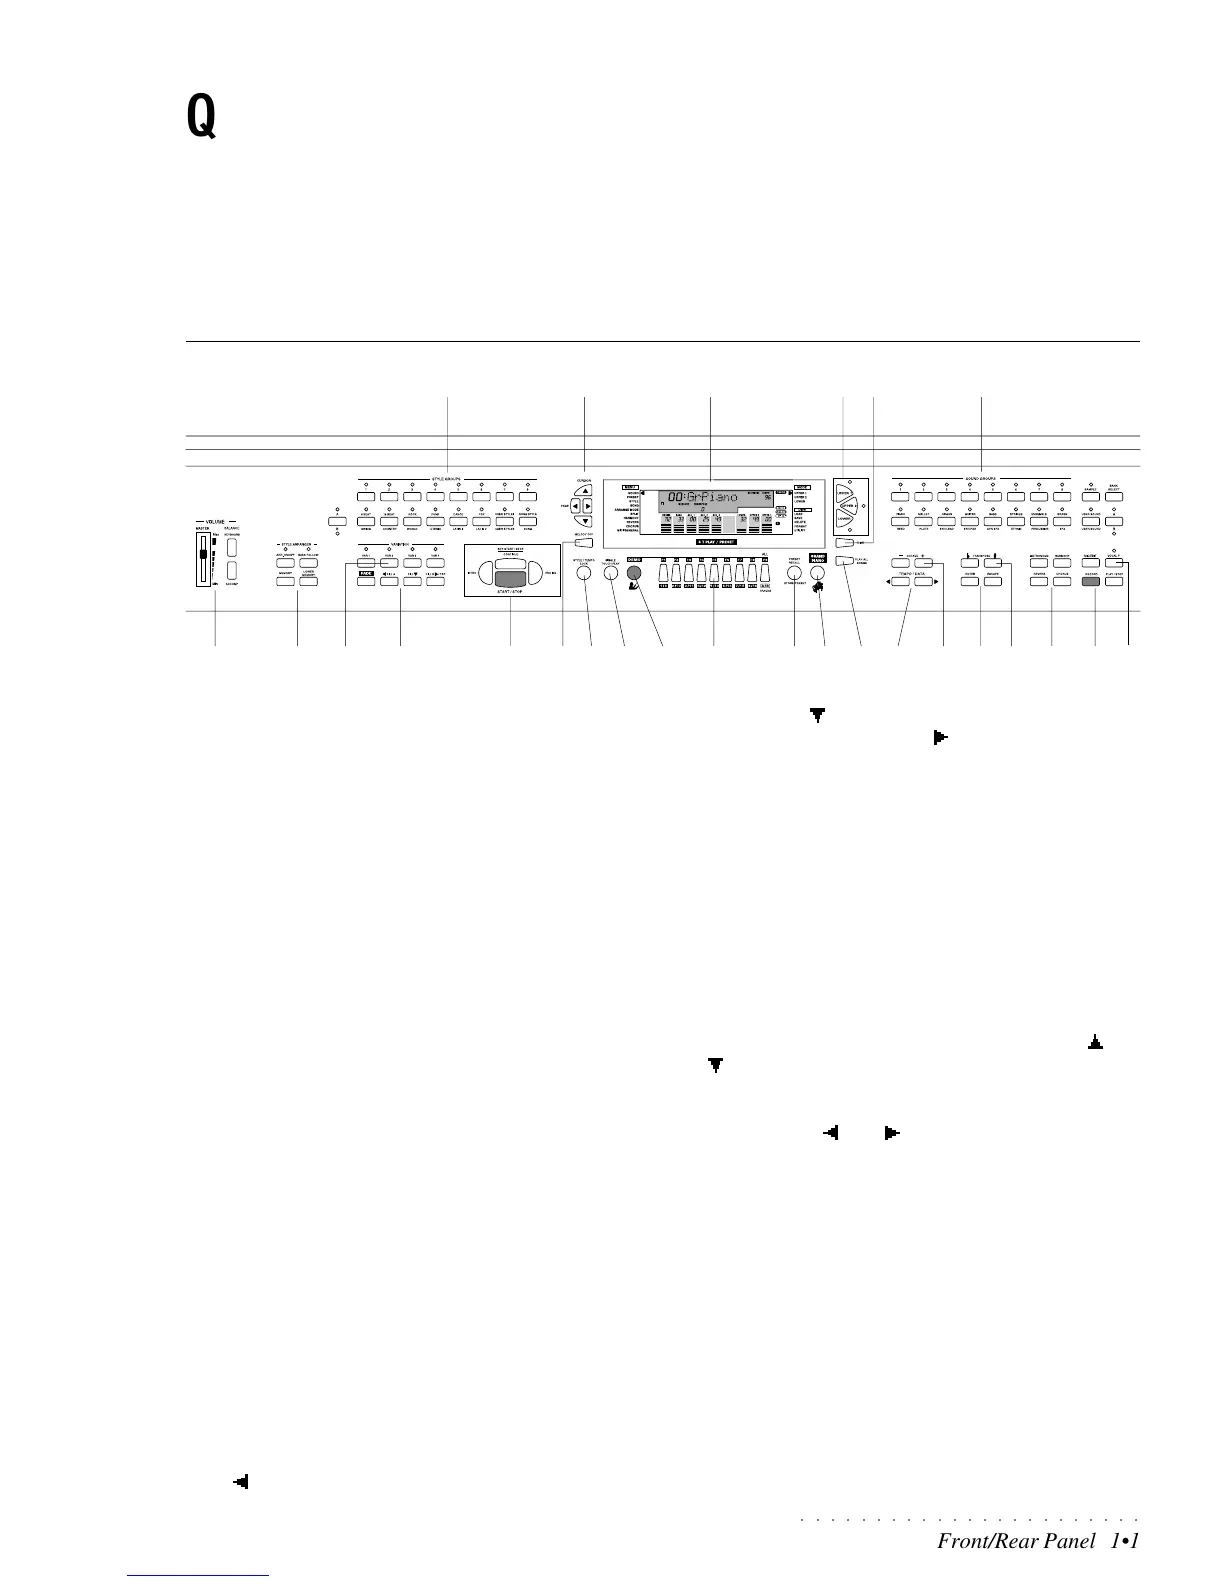
Instrument layout - Front panel PS1000/PS1300
1 VOLUME. MASTER: Adjusts the overall volume of the entire
instrument (headphones and the stereo Right/M-Left out-
puts). BALANCE: adjusts the balance between the Upper 1/
Upper 2/Lower sections and the automatic arrangements.
2 ARRANGER. 4 functions which control the Styles. AR-
RANGE ON/OFF: Enables (On) or disables (OFF) the Style
arrangements. Holding the button pressed gains access to
the Arrange Mode programming page where you can pro-
gram the Chord recognition modes for the Style Accompa-
niment. MEMORY: When ON, releasing the keys from the
keyboard causes the Style accompaniments to continue
playing; when OFF, all accompaniments except the Drum
track stop instantly after key release. LOWER MEMORY: When
ON, the Sound assigned to the Lower keyboard track con-
tinues playing after releasing the keys; when OFF, the lower
sound stop instantly after key release. BASS TO LOWEST: when
On (LED on), the Bass track of the Style auto accompani-
ment follows the lowest left note of the chord played, allow-
ing real time changes of the bass accompaniment accord-
ing to the lowest note played. When Off, the bass track
follows the programmed pattern of the Style, regardless of
the chord inversion played.
3. STYLE GROUPS. Each button of the lower row corre-
sponds to a “bank” of items, comprising the Style “family”
groups (8 Beat, 16 Beat, etc.), the User Style groups (1 &
2), a Song Style group and a Song group. Each button of
the upper row selects an item (Style, User Style, Song Style
or Song) from the current Group.
4 VAR 1, VAR 2, VAR 3, VAR 4: These buttons allow you to
switch from one Style Variation to another.
5 FADE, FILL IN A, FILL IN, FILL IN B/TAP. FADE: Starts
and stops a Style with a gradual increase or decrease of
volume. Starting requires pressing the Start button. FILL IN
A [ ]: recalls a Fill pattern then moves to the previous Vari-
ation. FILL IN [ ]: recalls a Fill pattern then continues with
the same variation. FILL IN B [ ] / TAP: Fill In B: pressed
during Style play recalls a Fill pattern then moves to the
next variation. Tap: sets the Style playing speed by tap-
ping on the button and starts the Style auto accompani-
ment automatically.
6 START/STOP, INTRO, ENDING, KEY START/CONTINUE.
START/STOP: starts and stops the playback of a Style, Song
Style or Song. INTRO: places the introduction of a Style on
“standby” before Style start. ENDING: Stops the Style with
an ending. KEY START: synchronizes the start of a Style
with a note (or chord) pressed on the lower keyboard area.
CONTINUE: pressed in Song or Song Style mode restarts the
Song Style or Song from the current stop point.
7 CURSOR/PAGE. Navigational arrows: the CURSOR [ ] and
[ ] buttons select the MENU functions shown on the left of
the display and the DISK functions shown on the right. The
black arrowhead in the display points to the selected func-
tion. The PAGE [ ] and [ ] buttons pass from one function
page to another.
8. DISPLAY. A colored, backlit, LCD (Liquid Crystal Display)
of the multi-function type that simultaneously displays and
provides access to several parameters. This user inter-
face displays the current situation of the instrument at all
times, showing the On/Off status of several panel buttons
by means of display indicators and icons which turn on or
off. The surrounding markings on the left and right also
form part of the display area and are explained in detail in
the relevant chapter further ahead.
9. UPPER 1, UPPER 2, LOWER. The
Keyboard Activator
buttons activate (LED on) or mute (LED off) the respective
keyboard sections and, therefore, determine the configura-
tion of the keyboard sounds.
45
3
21
7
6
89
10 11 15 241413 2522 232117 20
18 19
1612
25