D
THE
FUEL SYSTEM
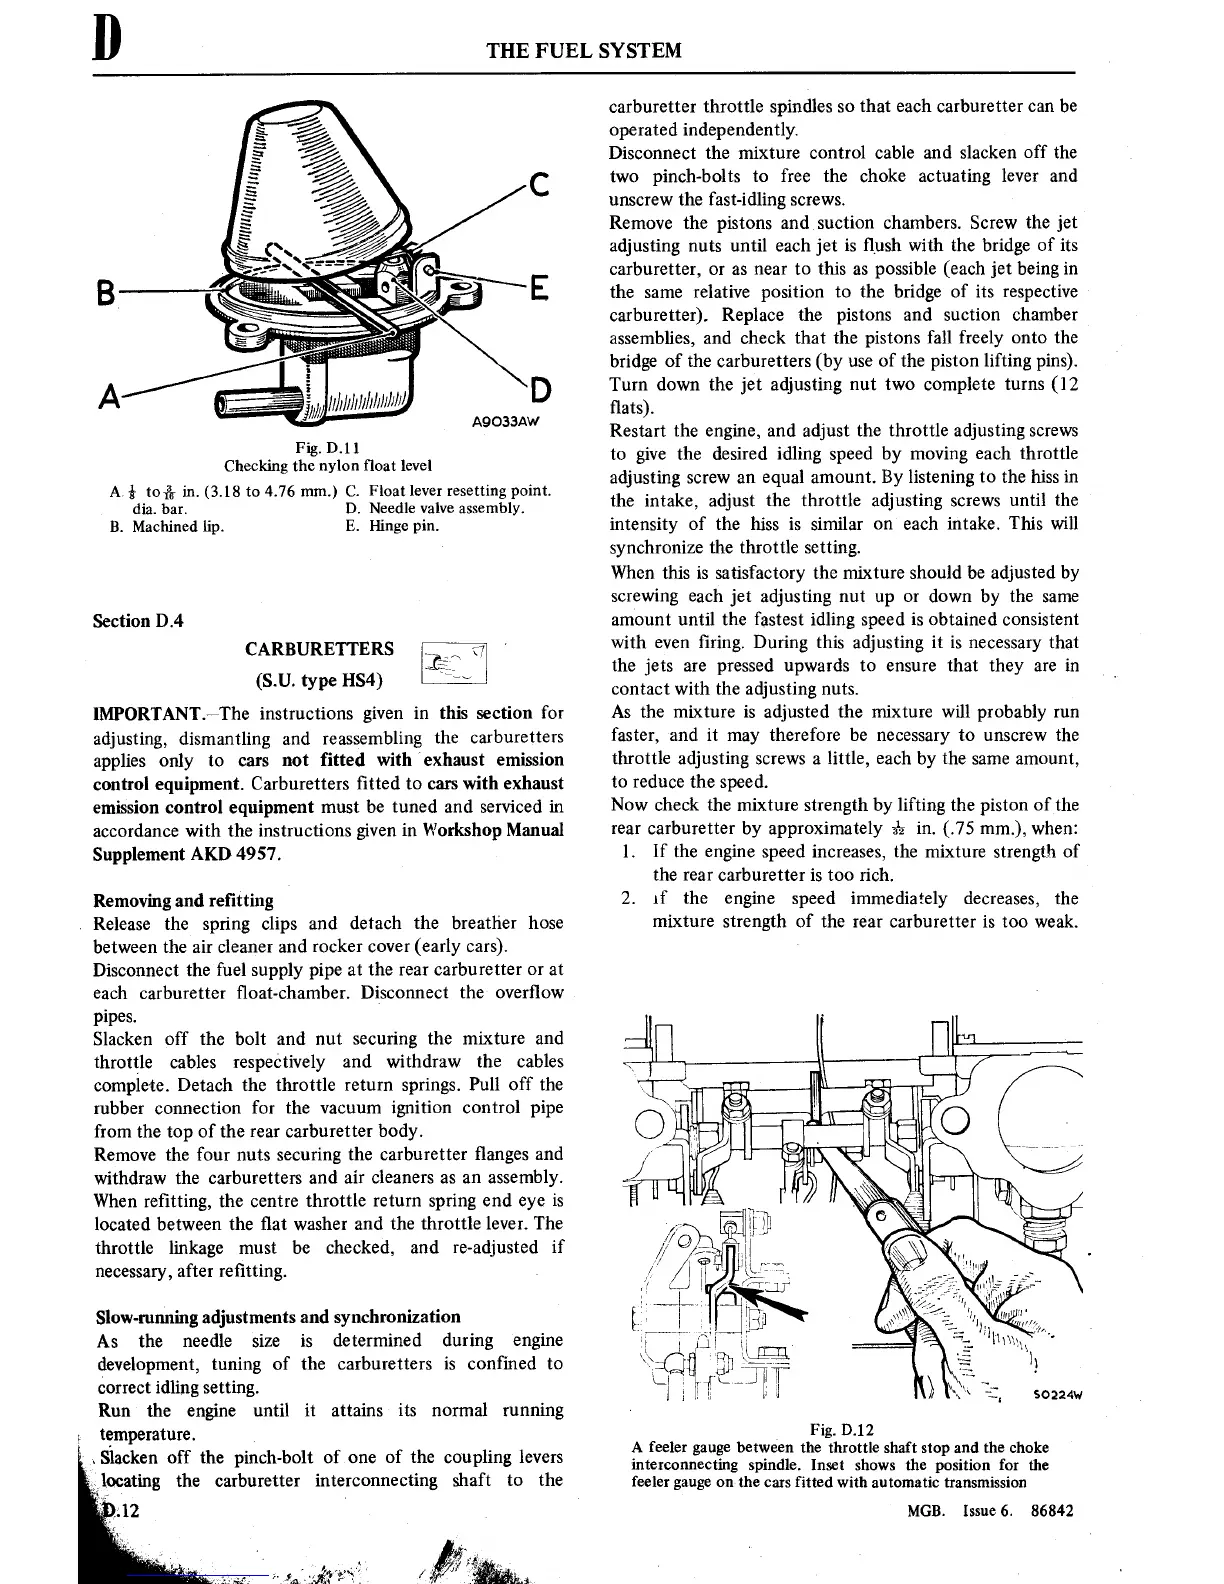
A9033AW
Fig. D.11
Checking the nylon
float
level
A,
s
t013g
in. (3.18
to
4.76 mm.) C.
Float lever
resetting point.
D.
Needle valve assembly.
E. Hinge
pin.
dia.
bar.
B.
Machined lip.
Section D.4
CARBURETTERS
(S.U.
type
H84)
IMPORTANT.7The
instructions
given in
this
section
for
adjusting, dismantling and
reassembling
the
carburetters
applies only
to
cars
not
fitted with ’exhaust emission
control
equipment.
Carburetters
■tted
to
cars
with exhaust
emission
control
equipment
must
be
tuned
and serviced
in
accordance with the
instructions given
in
Workshop Manual
Supplement AKD 4957.
Removing
and re■tting
.
Release
the
spring
clips and
detach
the
breather hose
between
the
air
cleaner
and rocker
cover
(early cars).
Disconnect
the
fuel
supply
pipe
at
the
rear
carburetter
or
at
each carburetter
■oat-chamber. Disconnect
the over■ow
pipes.
Slacken off the bolt and
nut
securing
the
mixture
and
throttle cables
respeCtively
and
withdraw the cables
complete.
Detach the throttle
return
springs.
Pull
off
the
rubber
connection
for the
vacuum
ignition
control
pipe
from the
top
of
the
rear
carburetter
body.
Remove
the
four
nuts
securing
the carburetter
■anges
and
withdraw the carburetters
and air
cleaners
as
an
assembly.
When re■tting, the
centre
throttle
return
spring
end
eye
is
located between the
■at
washer
and the throttle lever. The
throttle
linkage
must
be
checked,
and re-adjusted
if
necessary,
after re■tting.
Slow-running adjustments
and synchronization
As
the
needle
size is
determined during
engine
development,
tuning
of the carburetters
is
con■ned
to
correct
idling
setting.
Run
the
engine
until
it attains its
normal
running
_
temperature.
'
.Slacken off the pinch-bolt
of
one
of the coupling levers
coating
the carburetter interconnecting
shaft
to
the
carburetter throttle
spindles
so
that each carburetter
can
be
operated independently.
Disconnect
the
mixture
control cable and slacken
off
the
two
pinch-bolts
to
free the choke
actuating
lever
and
unscrew
the fast-idling
screws.
Remove the
pistons
andsuction chambers.
Screw
the
jet
adjusting
nuts
until each
jet is
■ush with the bridge
of
its
carburetter,
or as near
to
this
as
possible
(each
jet being
in
the
same
relative
position
to
the bridge of
its respective
carburetter).
Replace
the
pistons
and
suction
chamber
assemblies, and
check that the
pistons
fall freely
onto
the
bridge
of
the carburetters
(by
use
of
the
piston
lifting pins).
Turn
down
the
jet
adjusting
nut two
complete
turns
(12
■ats).
Restart
the
engine,
and adjust the
throttle
adjusting
screws
to
give
the desired idling speed by
moving
each
throttle
adjusting
screw an
equal
amount.
By
listening
to
the hiss
in
the intake,
adjust the throttle adjusting
screws
until the
intensity
of the hiss
is
similar
on
each intake. This will
synchronize the
throttle
setting.
When this
is
satisfactory the
mixture
should
be
adjusted by
screwing each
jet
adjusting
nut
up
or
down by the
same
amount
until the fastest
idling speed
is
obtained
consistent
with
even
■ring. During this adjusting
it is
necessary
that
the
jets
are
pressed upwards
to
ensure
that they
are
in
contact
with the
adjusting
nuts.
As
the
mixture is
adjusted the
mixture
will probably
run
faster,
and
it
may
therefore
be
necessary
to
unscrew
the
throttle adjusting
screws
a
little, each
by
the
same
amount,
to
reduce the speed.
Now check
the
mixture
strength by
lifting
the
piston
of
the
rear
carburetter
by
approximately 312-
in.
(.75
mm.),
when:
1.
If
the
engine
speed
increases,
the
mixture
strength
of
the
rear
carburetter
is
too
rich.
2.
if
the
engine
speed immediately
decreases, the
mixture
strength of the
rear
carburetter
is
too
weak.
i' ‘
«7
1
'
I
u
‘1
i:
I
I,
‘
i‘i
.
i.
.
‘V‘
i if
f
M
i
;
i3:
2
'
j
j 1
a.
i
J
y
2,
50224w
r
Fig. D.12
A
feeler
gauge
between the throttle shaft
stop
and the choke
interconnecting spindle.
Inset
shows the
position
for
the
feeler
gauge
on
the
cars
fitted
with automatic transmission
MGB. Issue6.
86842