EasyManuals Logo

MG MGB User Manual

MG MGB
417 pages
To Next Page IconTo Next Page
To Previous Page IconTo Previous Page
Page #390 background imageLoading...
Page #390 background image
THE
BODY
Ba
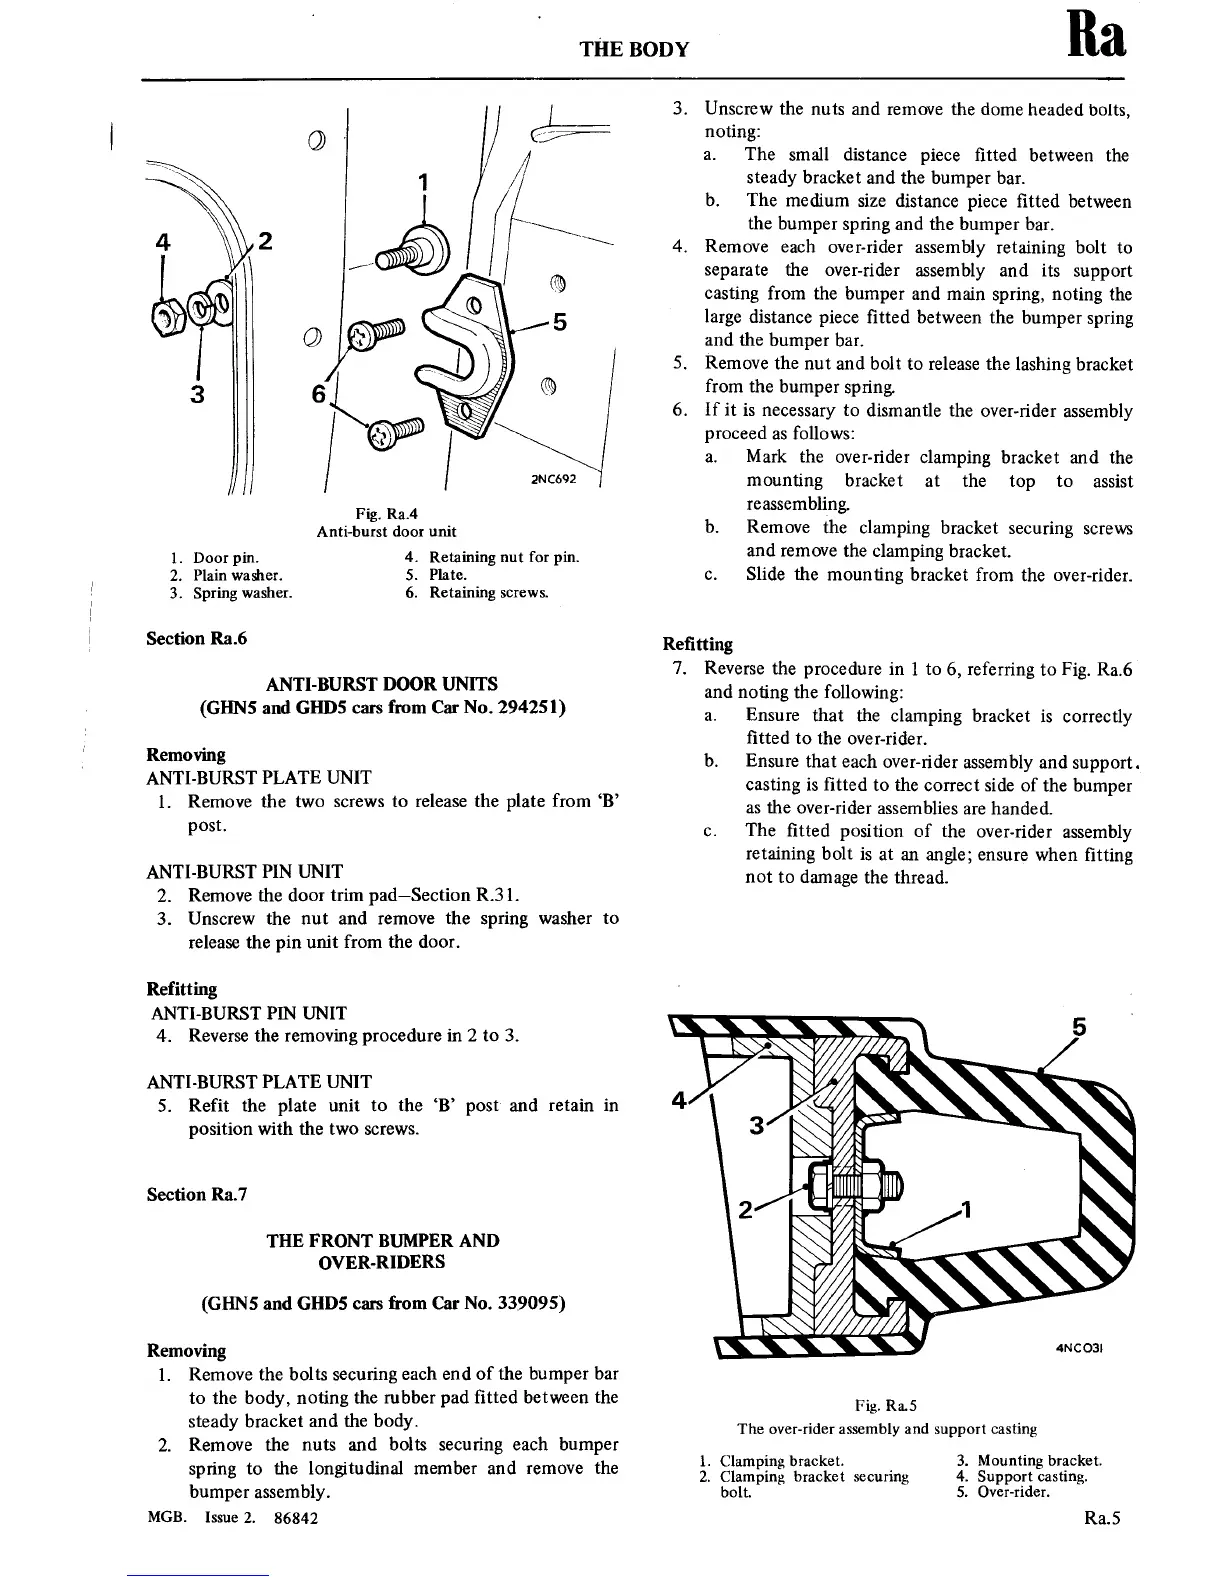
2NC692
Anti—burst
door
unit
1.
Door pin.
2.
Plain washer.
3. Spring
washer.
4. Retaining
nut
for pin.
5.
Plate.
6. Retaining
screws.
Section
Ra.6
ANTI-BURST
DOOR UNITS
(GI-INS and
GHDS
cars
from
Car No.
294251)
Removing
ANTI-BURST
PLATE UNIT
1.
Remove
the
two
screws
to
release
the plate from ‘B’
post.
ANTI-BURST
PIN UNIT
2.
Remove
the door
trim
pad—Section R3
1.
3.
Unscrew the
nut
and
remove
the
spring
washer
to
release the
pin unit
from
the
door.
Refitting
ANTI-BURST
PIN UNIT
4.
Reverse
the
removing
procedure
in 2
to
3.
ANTI-BURST
PLATE UNIT
5.
Refit
the
plate
unit
to
the
‘B’
post
and
retain in
position
with the
two
screws.
Section Ra.7
THE FRONT BUMPER AND
OVER-RIDERS
(GI-INS and
GHDS
cars
from
Car No.
339095)
Removing
1.
Remove
the
bolts
securing
each end
of the
bumper
bar
to
the body,
noting
the rubber pad
tted
between the
steady bracket
and the body.
2.
Remove
the
nuts
and
bolts
securing
each
bumper
spring
to
the
longitudinal member and
remove
the
bumper
assembly.
MGB.
Issue
2.
86842
3.
Unscrew the
nuts
and
remove
the
dome
headed
bolts,
noting:
a.
The
small distance
piece
tted
between the
steady bracket
and the
bumper bar.
b. The
medium
size
distance
piece
tted
between
the bumper
spring
and the
bumper bar.
4. Remove each
over-rider assembly
retaining
bolt
to
separate
the
over-rider assembly
and
its
support
casting
from the
bumper and
main
spring, noting
the
large
distance
piece
tted
between the
bumper
spring
and the
bumper bar.
5.
Remove
the
nut
and bolt
to
release the
lashing
bracket
from
the bumper
spring
6.
If
it
is
necessary
to
dismantle the
over-rider assembly
proceed
as
follows:
a.
Mark the
over-rider clamping
bracket and the
mounting
bracket
at
the
top to
assist
reassembling
b.
Remove the clamping
bracket
securing
screws
and
remove
the
clamping bracket.
c.
Slide the
mounting
bracket from
the
over-rider.
Retting
7. Reverse the
procedure
in l
to
6, referring
to
Fig.
Ra.6
and
noting
the following:
a.
Ensure that
the clamping
bracket
is
correctly
tted
to
the over-rider.
b. Ensure
that
each over-rider
assembly
and
support.
casting
is
tted
to
the
correct
side of the bumper
as
the
over-rider
assemblies
are
handed.
c.
The tted
position
of the
over—rider
assembly
retaining
bolt
is
at
an
angle;
ensure
when
tting
not to
damage the thread.
ANCON
Fig. Ra.5
The over-rider assemblyand
support
casting
l.
Clamping bracket.
3. Mounting bracket.
2. Clamping bracket
securing 4. Support
casting.
bolt. 5.
Over-rider.
Ra.5

Table of Contents

Questions and Answers:

Question and Answer IconNeed help?

Do you have a question about the MG MGB and is the answer not in the manual?

MG MGB Specifications

General IconGeneral
BrandMG
ModelMGB
CategoryAutomobile
LanguageEnglish

Related product manuals