THE
IGNITION
SYSTEM
B
SDIO76W
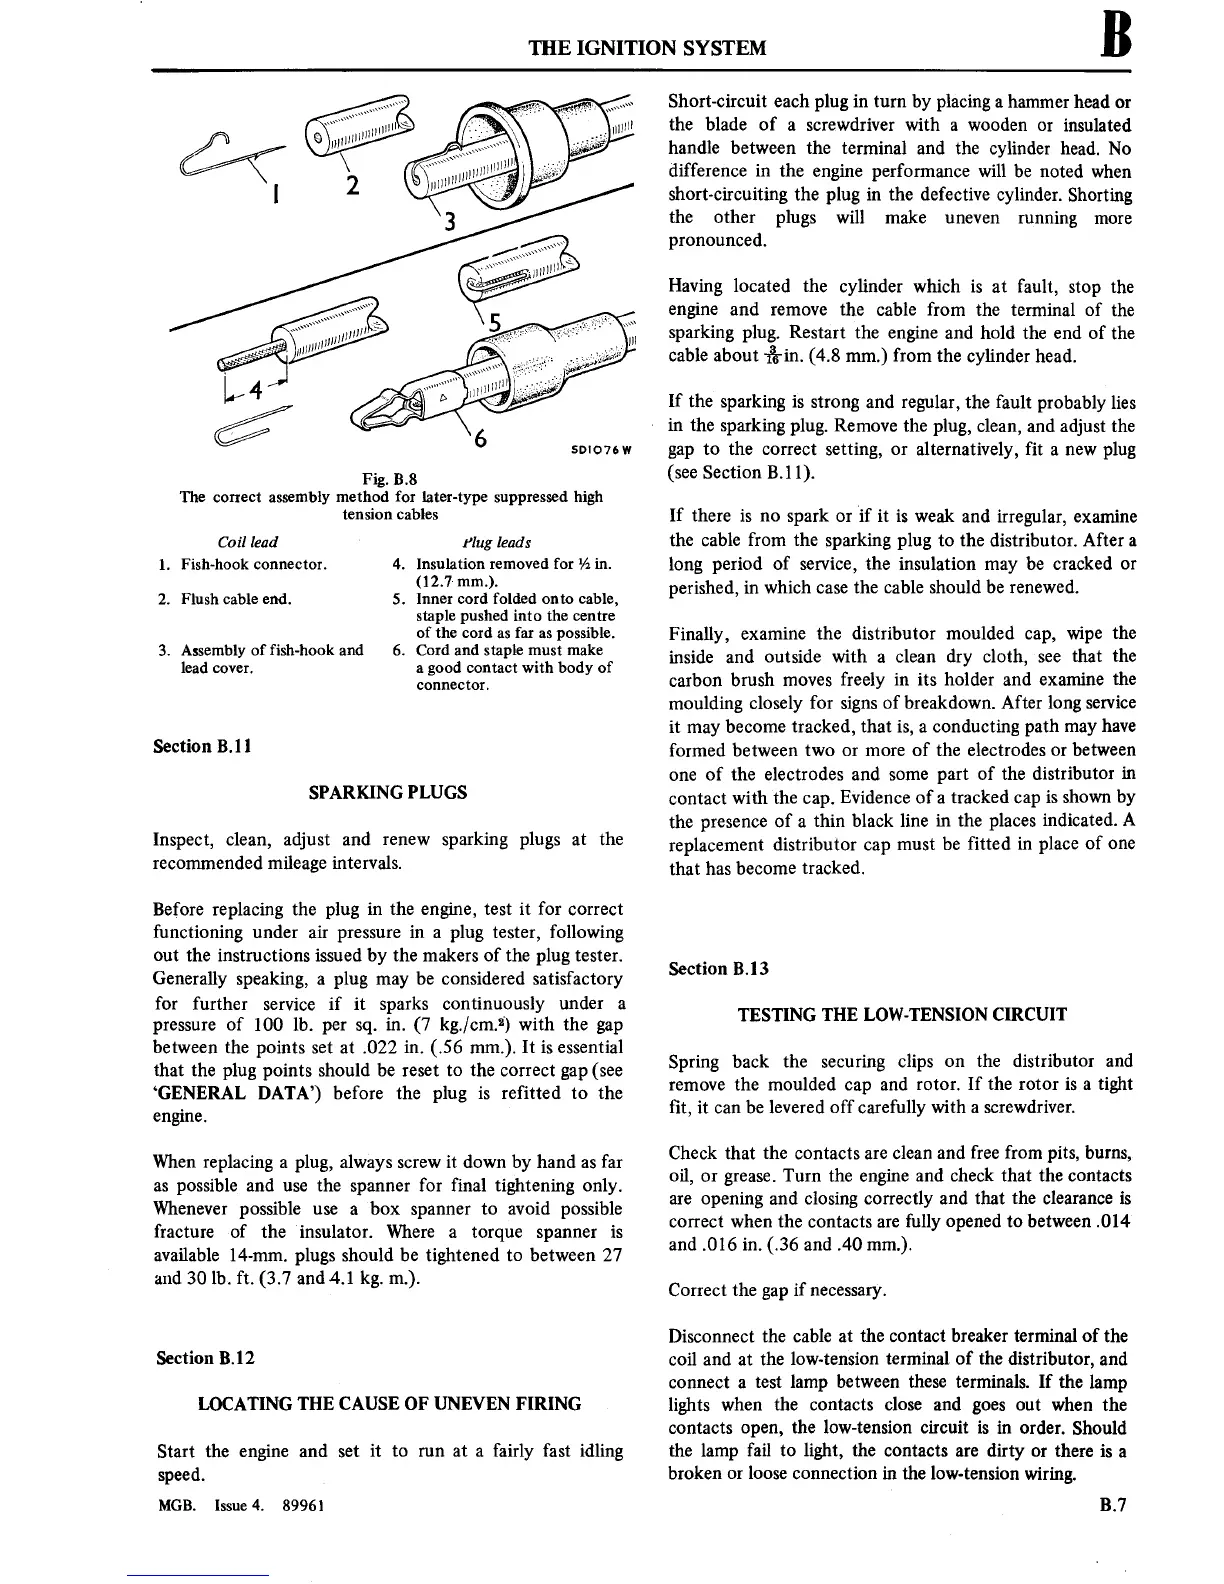
Fig. B.8
The
correct
assembly
method for
later-type
suppressedhigh
tension cables
Coil lead
I’Iug leads
1.
Fish-hook
connector.
4. Insulation removed
for 1/2
in.
(12.7-
mm.).
2.
Flush cableend. 5. Inner
cord folded
onto
cable,
staple pushed into the
centre
of the
cord
as
far
as
possible.
3.
Assembly
of fish-hook and 6. Cord and staple
must
make
lead
cover. a
good
contact
with body of
connector.
Section
8.11
SPARKING PLUGS
Inspect,
clean, adjust
and
renew
sparking plugs
at
the
recommended mileage intervals.
Before replacing
the
plug
in
the
engine,
test
it
for
correct
functioning
under
air
pressure
in
a
plug
tester,
following
out
the
instructions
issued
by the
makers
of
the
plug
tester.
Generally
speaking,
a
plug
may
be
considered satisfactory
for further
service
if
it
sparks
continuously under
a
pressure
of
100
lb.
per
sq.
in.
(7
kg./cm.2’)
with
the
gap
between the
points
set at
.022 in.
(.56 mm).
It is
essential
that the plug
points
should be
reset to
the
correct
gap
(see
‘GENERAL
DATA’) before
the plug
is
refitted
to
the
engine.
When replacing
a
plug, always
screw
it
down by
hand
as
far
as
possible and
use
the
spanner
for final
tightening only.
Whenever
possible
use a
box
spanner
to
avoid possible
fracture
of the
insulator.
Where
a
torque
spanner
is
available
14-min.
plugs
should be tightened
to
between
27
and 301b. ft. (3.7 and
4.1
kg.
m.).
Section B.l2
LOCATIN'G THE
CAUSE OF UNEVEN
FIRING
Start
the
engine
and
set
it
to
run
at
a
fairly fast
idling
speed.
MGB.
Issue
4.
89961
Short-circuit each plug
in
turn
by
placing
a
hammer
head
or
the blade of
a
screwdriver with
a
wooden
or
insulated
handle
between the terminal and the cylinder
head.
No
difference
in
the
engine
performance
will be
noted when
short-circuiting
the plug
in
the defective
cylinder. Shorting
the other
plugs will make
uneven
running
more
pronounced.
Having located the
cylinder which
is
at
fault,
stop
the
engine
and
remove
the cable
from
the terminal of the
sparking plug. Restart the
engine
and hold the
end
of
the
cable about
jag-in.
(4.8 mm.) from
the
cylinder head.
If
the
sparking
is
strong
and regular, the fault
probably lies
-
in
the
sparking plug.
Remove
the
plug, clean, and adjust the
gap
to
the
correct
setting,
or
alternatively, fit
a
new
plug
(see
Section
B.l
1).
If
there
is
no
spark
or
if
it is
weak and
irregular,
examine
the cable
from
the sparking
plug
to
the distributor.
After
a
long
period
of
service,
the
insulation
may
be cracked
or
perished,
in
which
case
the cable
should be renewed.
Finally,
examine
the
distributor moulded
cap,
wipe
the
inside
and outside
with
a
clean
dry cloth,
see
that
the
carbon
brush
moves
freely
in its
holder and
examine
the
moulding
closely for
signs
of breakdown. After long service
it
may
become tracked,
that
is,
a
conducting
path
may
have
formed between
two
or more
of the electrodes
or
between
one
of the electrodes and
some
part
of the distributor
in
contact
with the
cap.
Evidence of
a
tracked
cap
is
shown
by
the
presence
of
a
thin
black line
in
the places
indicated. A
replacement
distributor
cap
must
be
fitted
in
place
of
one
that
has become
tracked.
Section B. l 3
TESTING THE LOW-TENSION
CIRCUIT
Spring
back the
securing
clips
on
the
distributor and
remove
the moulded
cap
and
rotor.
If
the
rotor
is
a
tight
■t,
it
can
be levered
off carefully with
a
screwdriver.
Check that the
contacts
are
clean
and free from
pits,
burns,
oil,
or grease.
Turn
the
engine
and
check that the
contacts
are
opening
and closing
correctly and that the clearance
is
correct
when the
contacts
are
fully opened
to
between
.014
and
.016
in.
(.36
and .40
mm).
Correct the
gap
if
necessary.
Disconnect
the cable
at
the
contact
breaker terminal of the
coil and
at
the low-tension
terminal
of the
distributor,
and
connect
a
test
lamp
between these terminals. If the
lamp
lights
when the
contacts
close and
goes
out
when
the
contacts
open,
the low-tension
circuit is in
order. Should
the lamp
fail
to
light, the
contacts
are
dirty
or
there
is
a
broken
or
loose
connection
in
the
low-tension
wiring.
B.7