EasyManuals Logo

MG MGB User Manual

MG MGB
417 pages
To Next Page IconTo Next Page
To Previous Page IconTo Previous Page
Page #279 background imageLoading...
Page #279 background image
THE ELECTRICAL
SYSTEM
4
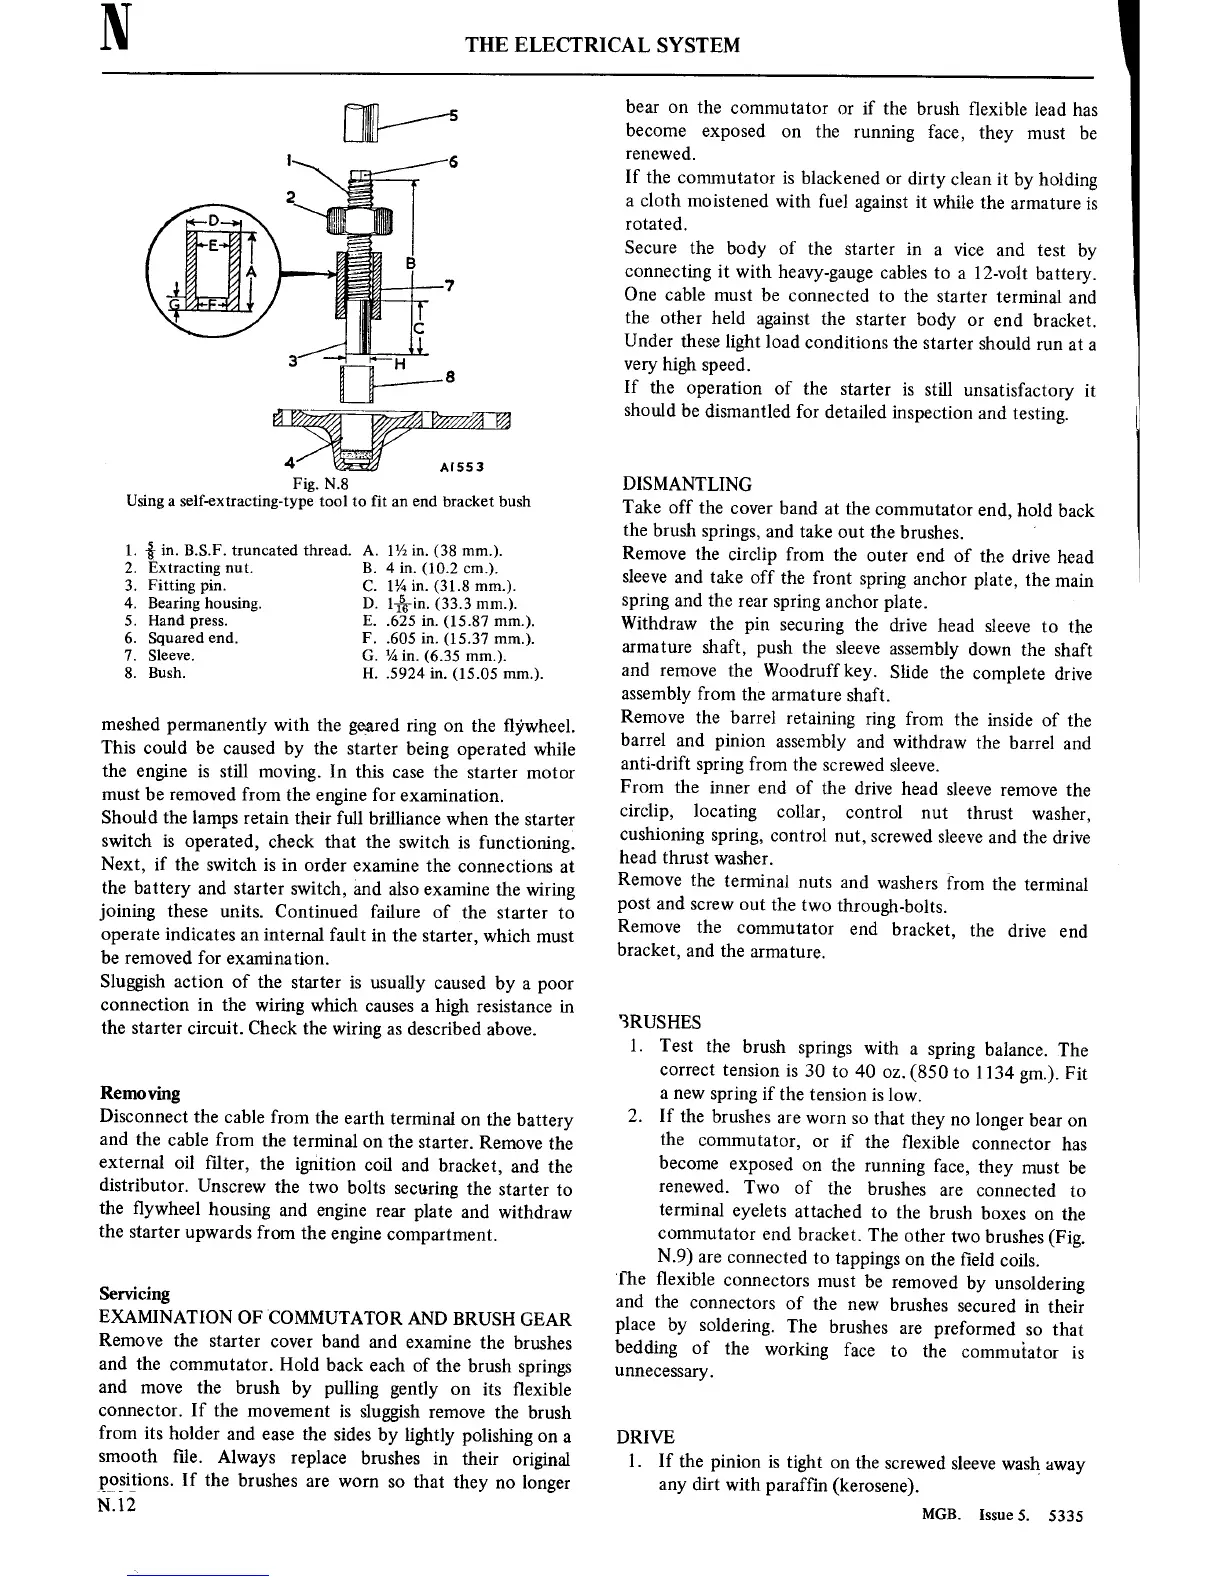
Al553
Fig. N.8
Using
a
self-extracting-type
tool
to
fit
an
end bracket bush
1.
—§
in. B.S.F. truncated thread.
A.
11/2
in. (38
mm.).
2. Extracting
nut.
B. 4 in.
(10.2 cm.).
3. Fitting
pin. C.
1%
in. (31.8
mm.).
4. Bearing housing. D.
1%in.
(33.3
mm.).
5.
Hand
press.
E.
.625
in.
(15.87 mm.).
6.
Squaredend. F. .605
in. (15.37
mm.).
7. Sleeve. G.
1/4in.
(6.35
mm.).
8. Bush.
H.
.5924 in.
(15.05 mm.).
meshed
permanently with
the geared
ring
on
the ywheel.
This
could be caused
by the
starter
being
operated while
the
engine is
still
moving.
In this
case
the
starter motor
must
be
removed from the
engine
for
examination.
Should the lamps
retain
their full
brilliance
when the
starter
switch
is
operated, check that
the
switch
is
functioning.
Next, if
the switch
is
in
order
examine
the
connections
at
the
battery and
starter
switch,
and
also
examine
the
wiring
joining these
units.
Continued failure
of
the
starter
to
operate
indicates
an
internal
fault
in
the
starter,
which
must
be
removed
for
examination.
Sluggish
action
of
the
starter
is
usually
caused by
a poor
connection
in
the
wiring
which
causes
a
high
resistance
in
the
starter
circuit.
Check
the
wiring
as
described
above.
Removing
Disconnect
the
cable from
the
earth
terminal
on
the
battery
and the
cable from
the
terminal
on
the
starter.
Remove
the
external oil lter,
the
ignition
coil and
bracket,
and the
distributor.
Unscrew
the
two
bolts
securing
the
starter
to
the ywheel
housing
and
engine
rear
plate
and
withdraw
the
starter
upwards from
the
engine
compartment.
Servicing
EXAMINATION
OF
'COMMUTATOR
AND
BRUSH GEAR
Remove the
starter
cover
band
and
examine
the
brushes
and the
commutator.
Hold back each
of
the brush
springs
and
move
the
brush by
pulling
gently
on
its
exible
connector.
If the
movement
is
sluggish
remove
the brush
from
its
holder
and
ease
the
sides by
lightly
polishing
on
a
smooth
le.
Always
replace
brushes
in
their
original
positions. If the
brushes
are worn
so
that
they
no
longer
N.12
bear
on
the
commutator
or
if
the brush
exible
lead has
become
exposed
on
the
running
face,
they
must
be
renewed.
If the
commutator
is
blackened
or
dirty
clean
it
by holding
a
cloth
moistened
with
fuel
against
it
while
the
armature
is
rotated.
Secure
the
body of
the
starter
in
a
vice and
test
by
connecting
it
with heavy-gauge
cables
to
a
12-volt
battery.
One
cable
must
be
connected
to
the
starter
terminal
and
the other
held
against
the
starter
body
or
end bracket.
Under these
light
load
conditions
the
starter
should
run
at
a
very
high
speed.
If
the
operation
of the
starter
is
still
unsatisfactory
it
should
be dismantled
for
detailed
inspection and
testing.
DISMANTLING
Take off
the
cover
band
at
the
commutator
end, hold
back
the brush
springs,
and take
out
the
brushes.
Remove
the circlip
from
the
outer
end
of the
drive head
sleeve
and
take
off
the
front
spring
anchor
plate,
the
main
spring
and the
rear
spring anchor plate.
Withdraw
the
pin
securing
the
drive
head
sleeve
to
the
armature
shaft,
push the
sleeve
assembly
down
the shaft
and
remove
the Woodruff
key.
Slide
the
complete
drive
assembly from
the
armature
shaft.
Remove
the barrel
retaining
ring
from
the
inside of
the
barrel
and
pinion
assembly and
withdraw
the
barrel
and
anti-drift
spring
from
the
screwed sleeve.
From
the
inner
end
of
the
drive head
sleeve
remove
the
circlip,
locating
collar,
control
nut
thrust
washer,
cushioning
spring, control
nut,
screwed
sleeve
and the drive
head
thrust
washer.
Remove
the
terminal
nuts
and
washers
from
the
terminal
post
and
screw
out
the
two
through-bolts.
Remove
the
commutator
end
bracket,
the
drive
end
bracket,
and the
armature.
‘3RUSHES
1. Test the
brush
springs with
a
spring
balance.
The
correct
tension
is 30
to
40
oz.
(850
to
1134 gm).
Fit
a new
spring
if the
tension is
low.
2.
If the
brushes
are
worn so
that
they
no
longer
bear
on
the
commutator,
or
if
the exible
connector
has
become
exposed
on
the
running
face,
they
must
be
renewed.
Two of
the
brushes
are
connected
to
terminal
eyelets
attached
to
the
brush
boxes
on
the
commutator
end
bracket.
The
other
two
brushes (Fig.
N.9)
are
connected
to
tappings
on
the eld
coils.
The exible
connectors
must
be
removed
by
unsoldering
and the
connectors
of
the
new
brushes
secured
in their
place
by
soldering.
The
brushes
are
preformed
so
that
bedding
of
the
working
face
to
the
commuiator
is
unnecessary.
DRIVE
1.
If the
pinion
is
tight
on
the
screwed sleeve
wash
away
any
dirt
with
paraffin (kerosene).
MGB.
lssueS.
5335

Table of Contents

Questions and Answers:

Question and Answer IconNeed help?

Do you have a question about the MG MGB and is the answer not in the manual?

MG MGB Specifications

General IconGeneral
BrandMG
ModelMGB
CategoryAutomobile
LanguageEnglish

Related product manuals