THE
BODY
R
Starting
at
the
bottom
of
the pillar, carefully
tap
it into
place with
the
palm
of the hand, working alternately from
bottom
to top.
When both pillars have been
correctly
located refit the
securing
screws
and the lower sealing
rubber.
Assemble
the
centre
rod and
ensure
that the
dome
nut
is
not
overtightened.
Refitting
The foot of
each pillar
is
supported
in
the body
by
a
metal
and
a
■bre
packing
piece.
The
packing
pieces
are
screwed
to
the
side
of
the body and should
not
normally be
removed.
If
a
new
windscreen
is
being fitted
or
extensive
body
repairs
carried
out,
check the fit of
the windscreen by fitting
it
to
the
car
and checking the
clearance between
the body and
the foot of
each pillar. Adjust the ■t
by
inserting
or
removing the
again.
(2.38 mm.)
fibre
packing
pieces.
Place
the bottom bracket packing
piece
on
the body
and
the
sealing
grommets
on
the windscreen
pillars. Fit
the
windscreen
to
the body and align the
holes
in
the
pillar
feet
with the
packing
pieces.
Place
a
special
washer
on
each
of
the four
bolts and
screw
the bolts
through the
packing
pieces
and
into
the pillars.
Spread the bottom
rail sealing
rubber,
secure
the
centre
rod bottom
bracket
to
the
body,
and finally
tighten the windscreen
pillar
securing
bolts.
Close
the doors and check the fit of the
ventilator
window
against
the pillar sealing rubbers.
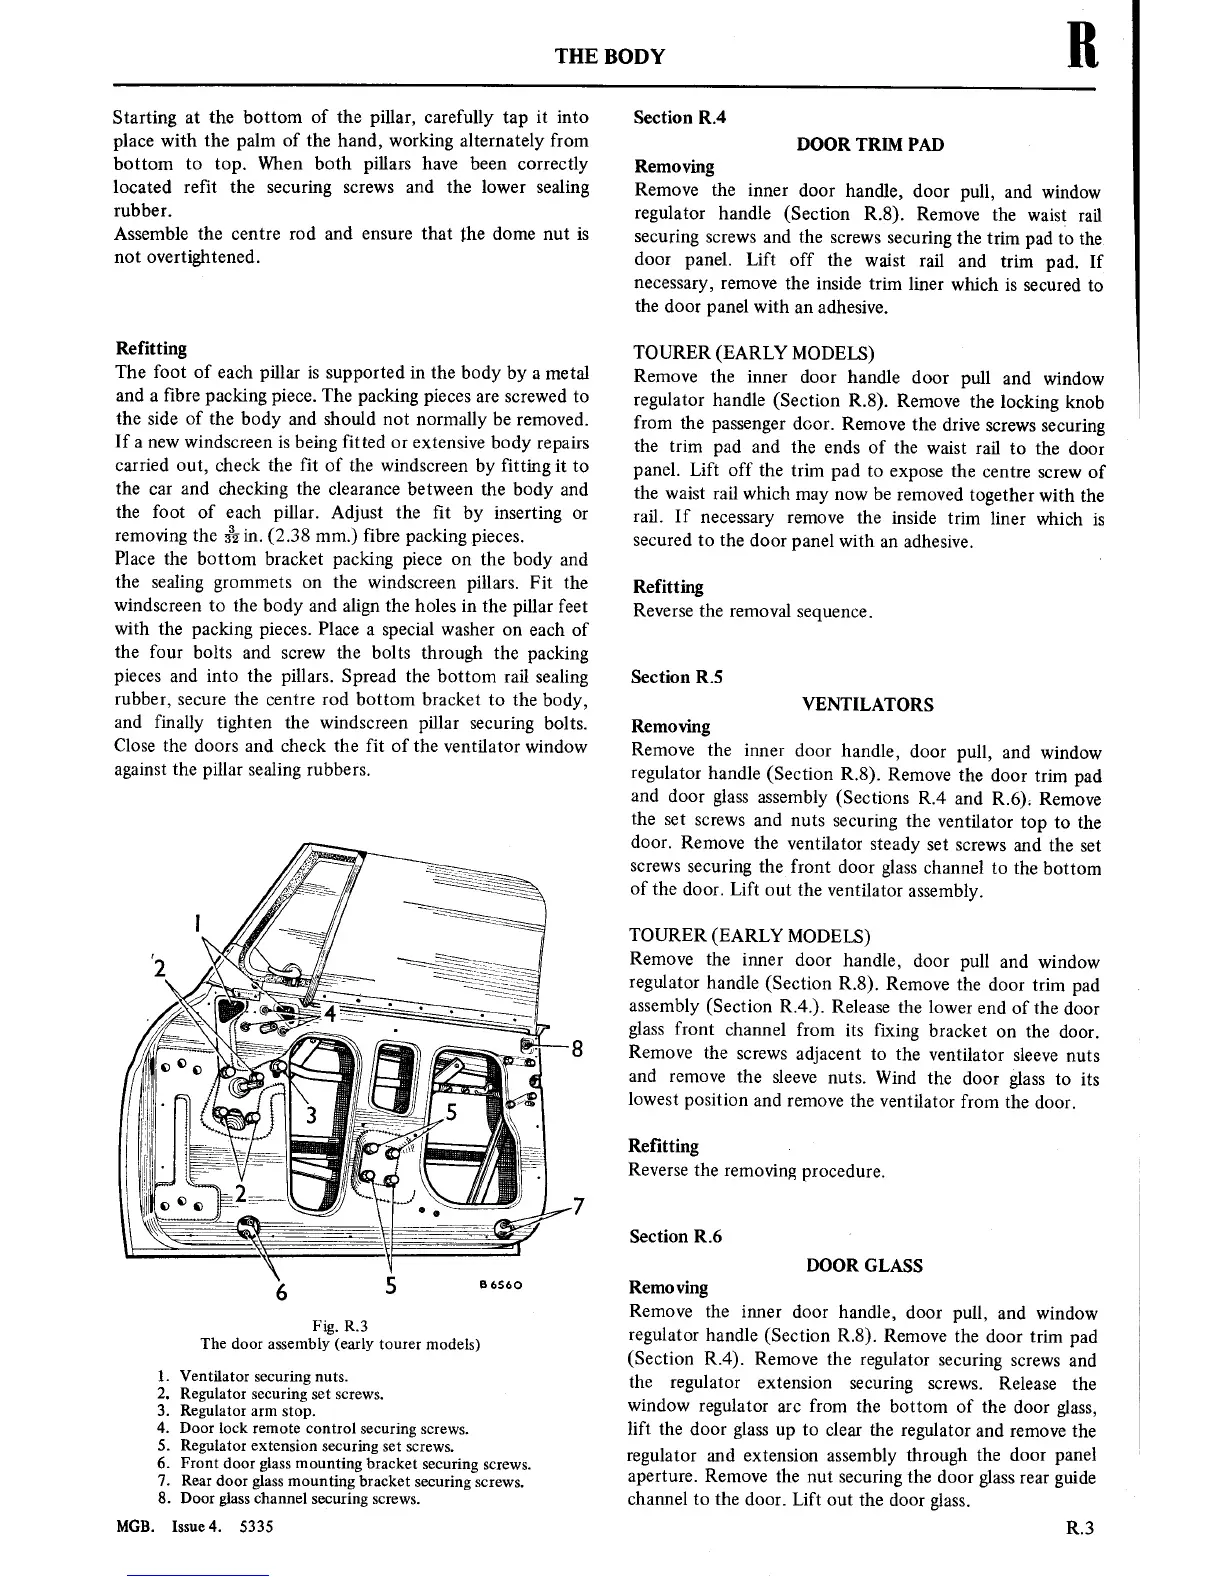
Fig.
R.3
The door assembly
(early
tourer
models)
Ventilator
securing
nuts.
Regulator securing
set
screws.
Regulator
arm
stop.
Door lock
remote
control
securing
screws.
Regulator
extension
securing
set
screws.
Front door glass
mounting bracket
securing
screws.
Reardoor glass
mounting bracket
securing
screws.
.
Door glasschannel
securing
screws.
MGB.
Issue4. 5335
mwmwewvr
Section R.4
DOOR
TRIM PAD
Removing
Remove the
inner
door handle,
door
pull,
and
window
regulator
handle
(Section
R.8).
Remove
the
waist
rail
securing
screws
and the
screws
securing
the
trim
pad
to
the
door
panel. Lift off
the
waist rail
and
trim pad. If
necessary,
remove
the
inside
trim
liner
which
is secured
to
the
door panel
with
an
adhesive.
TOURER (EARLY
MODELS)
Remove
the
inner
door handle
door
pull
and
window
regulator
handle
(Section
R.8).
Remove
the
locking
knob
from
the
passenger
door.
Remove
the
drive
screws
securing
the
trim
pad and
the ends of
the
waist
rail
to
the door
panel. Lift off
the
trim
pad
to
expose
the
centre
screw
of
the
waist
rail which
may now
be
removed
together
with
the
rail. If
necessary
remove
the
inside
trim
liner
which
is
secured
to
the door
panel
with
an
adhesive.
Refitting
Reverse the
removal
sequence.
Section
R.5
VENTILATORS
Removing
Remove
the
inner
door handle,
door
pull,
and
window
regulator handle (Section
R.8).
Remove the
door
trim
pad
and
door
glass
assembly
(Sections
R4 and R6).
Remove
the
set
screws
and
nuts
securing
the
ventilator
top to
the
door.
Remove the
ventilator
steady
set
screws
and the
set
screws
securing
the front
door
glass channel
to
the
bottom
of
the
door. Lift
out
the
ventilator
assembly.
TOURER
(EARLY
MODELS)
Remove
the
inner
door
handle,
door
pull
and
window
regulator
handle (Section
R.8).
Remove
the
door
trim pad
assembly
(Section
R.4.).
Release
the lower
end of the
door
glass front
channel from
its
fixing
bracket
on
the
door.
Remove
the
screws
adjacent
to
the
ventilator sleeve
nuts
and
remove
the
sleeve
nuts.
Wind
the door
glass
to
its
lowest
position
and
remove
the
ventilator
from
the
door.
Re■tting
.
Reverse the
removing procedure.
Section R.6
DOOR
GLASS
Removing
Remove
the
inner
door handle,
door
pull, and
window
regulator
handle (Section R.8).
Remove
the
door
trim
pad
(Section
R.4).
Remove the regulator
securing
screws
and
the regulator
extension
securing
screws.
Release the
window
regulator
are
from
the bottom of
the door
glass,
lift
the door
glass
up
to
clear
the regulator
and
remove
the
regulator and
extension
assembly through the
door panel
aperture.
Remove the
nut
securing
the
door glass
rear
guide
channel
to
the
door. Lift
out
the door
glass.
R.3