EasyManuals Logo

MG MGB User Manual

MG MGB
417 pages
To Next Page IconTo Next Page
To Previous Page IconTo Previous Page
Page #353 background imageLoading...
Page #353 background image
B
THE
BODY
6
I
A.6555
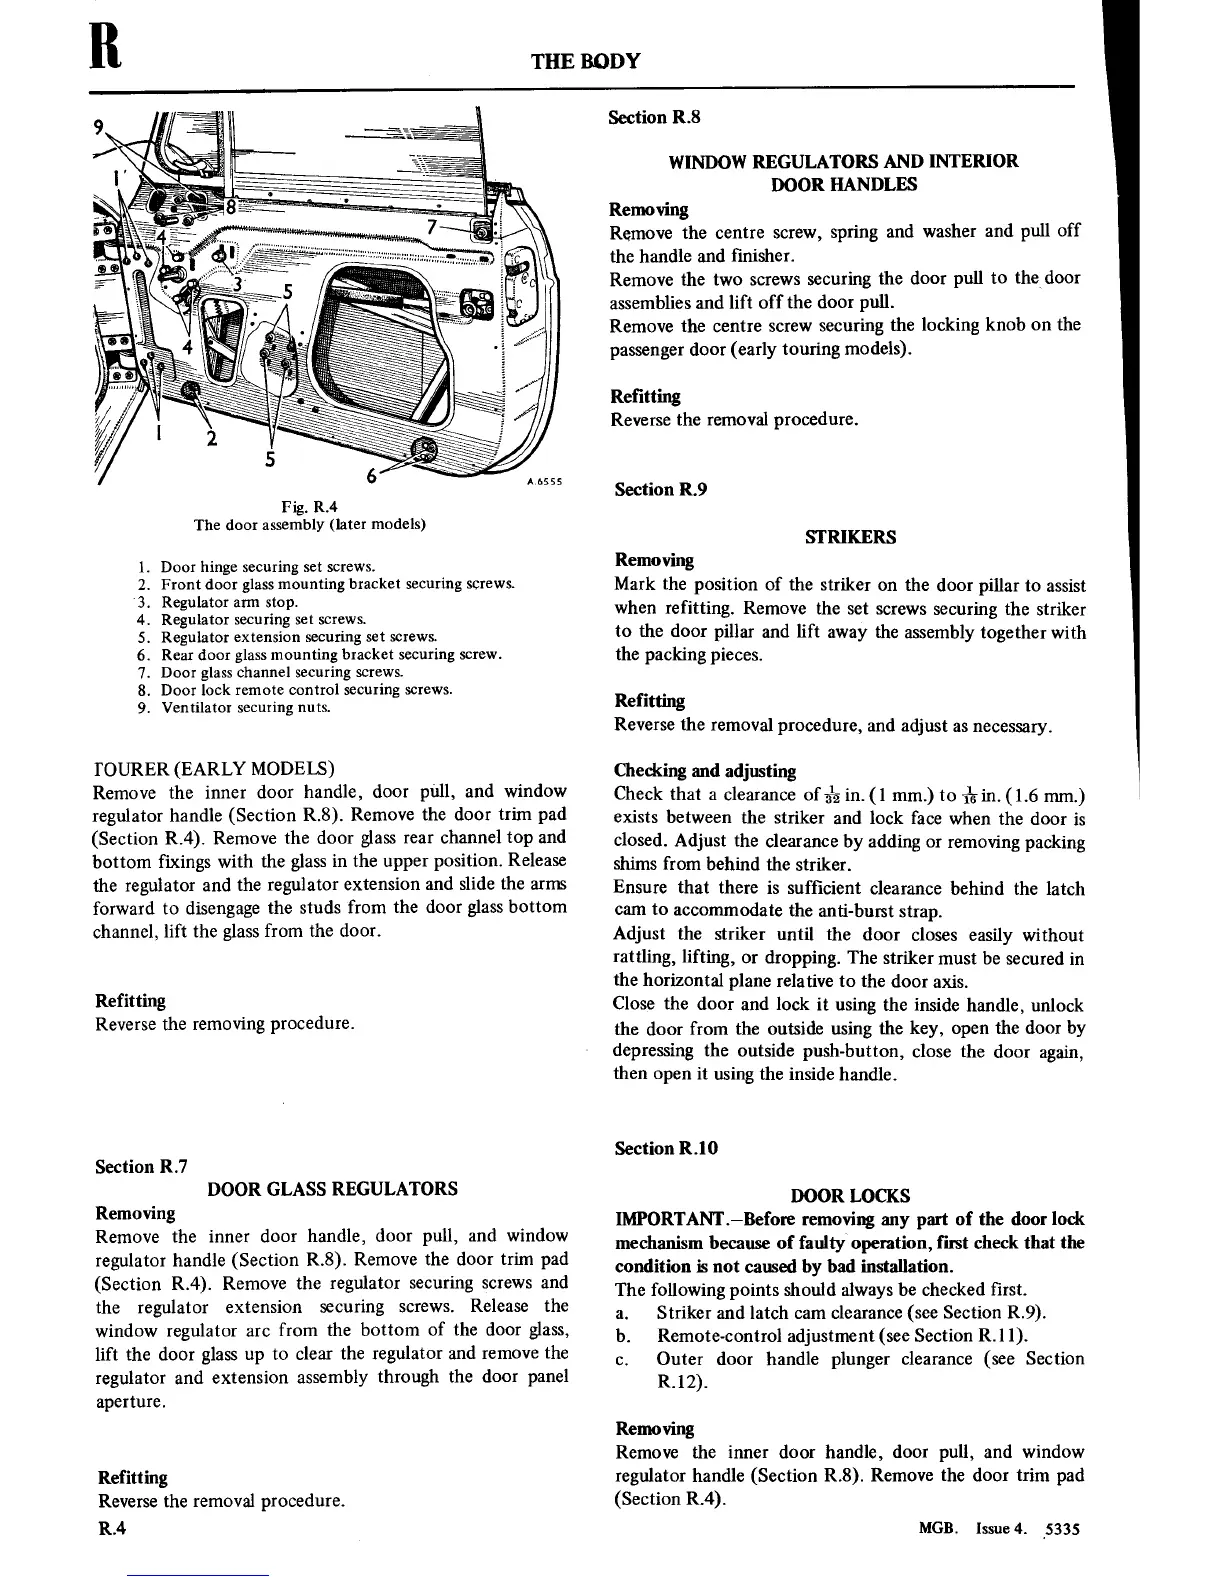
Fig. R.4
The
door
assembly(later
models)
Door
hinge securing
set
screws.
Front
door glass
mounting
bracket securing
screws.
Regulator
arm
stop.
Regulator
securing
set
screws.
Regulator extension
securing
set
screws.
Rear door glass
mounting
bracket securing
screw.
Door
glasschannel
securing
screws.
.
Door
lock
remote
control
securing
screws.
Ventilator
securing
nuts.
woodman-haw»—
TOURER
(EARLY
MODELS)
Remove
the
inner
door
handle, door
mill, and window
regulator
handle
(Section
R.8).
Remove
the door
trim
pad
(Section
R.4).
Remove
the door glass
rear
channel
top
and
bottom
fixings
with the glass
in
the
upper
position.
Release
the
regulator and
the regulator
extension
and slide the
arms
forward
to
disengage
the
studs
from the door glass bottom
channel,
lift
the
glass
from the door.
Refitting
Reverse
the
removing
procedure.
Section
R.7
DOOR
GLASS
REGULATORS
Removing
Remove
the
inner
door handle,
door pull, and
window
regulator
handle
(Section
R.8).
Remove
the door
trim
pad
(Section R.4).
Remove
the
regulator
securing
screws
and
the
regrlator
extension
securing
screws.
Release the
window regulator
are
from
the bottom
of
the door
glass,
lift the
door glass
up
to
clear
the regulator
and
remove
the
regulator and extension
assembly
through the door
panel
aperture.
Refitting
Reverse the
removal procedure.
R.4
Section
R.8
WINDOW
REGULATORS AND
INTERIOR
DOOR
HANDLES
Removing
Remove
the
centre
screw,
spring
and
washer
and pull
off
the
handle and
nisher.
Remove
the
two
screws
securing
the
door pull
to
the door
assemblies and
lift
off
the door
pull.
Remove
the
centre
screw
securing
the locking knob
on
the
passenger
door
(early
touring
models).
Refitting
Reverse
the
removal
procedure.
Section R.9
STRIKERS
Removing
Mark the
position
of
the striker
on
the
door pillar
to
assist
when refitting.
Remove the
set
screws
securing
the
striker
to
the door
pillar and lift
away
the
assembly together
with
the
packing
pieces.
Refitting
Reverse the
removal procedure, and
adjust
as necessary.
Checking
and adjusting
Check
that
a
clearance
Of’glg
in.
(1
mm.)
to
in.
(1.6
mm.)
exists
between
the
striker and lock face
when
the door
is
closed.
Adjust the
clearance
by adding
or
removing
packing
shims from
behind the
striker.
Ensure that there
is
sufcient
clearance
behind
the latch
cam
to
accommodate
the
anti-burst
strap.
Adjust the
striker
until
the door closes
easily
without
rattling, lifting,
or
dropping. The
striker
must
be secured
in
the
horizontal
plane
relative
to
the
door
axis.
Close
the
door and lock
it using
the
inside handle,
unlock
the door
from the
outside
using
the key,
open
the
door by
depressing
the outside
push-button,
close
the door
again,
then
open
it using
the
inside
handle.
Section
R.10
DOOR LOCKS
IMPORTANT—Before
removing
any
part
of the door lock
mechanism because of faulty
operation,
first check that the
condition
is
not
caused by
bad
installation.
The following
points
should
always be
checked rst.
a.
Striker and latch
cam
clearance
(see
Section
R.9).
b. Remote-control adjustment
(see
Section R]
1).
c.
Outer
door
handle
plunger
clearance
(see
Section
R.12).
Removing
Remove the
inner
door handle, door
pull,
and
window
regulator handle
(Section R.8).
Remove the door
trim
pad
(Section R.4).
MGB.
Issue4.
.5335

Table of Contents

Questions and Answers:

Question and Answer IconNeed help?

Do you have a question about the MG MGB and is the answer not in the manual?

MG MGB Specifications

General IconGeneral
BrandMG
ModelMGB
CategoryAutomobile
LanguageEnglish

Related product manuals