EasyManuals Logo

MG MGB User Manual

MG MGB
417 pages
To Next Page IconTo Next Page
To Previous Page IconTo Previous Page
Page #374 background imageLoading...
Page #374 background image
THE
BODY
B
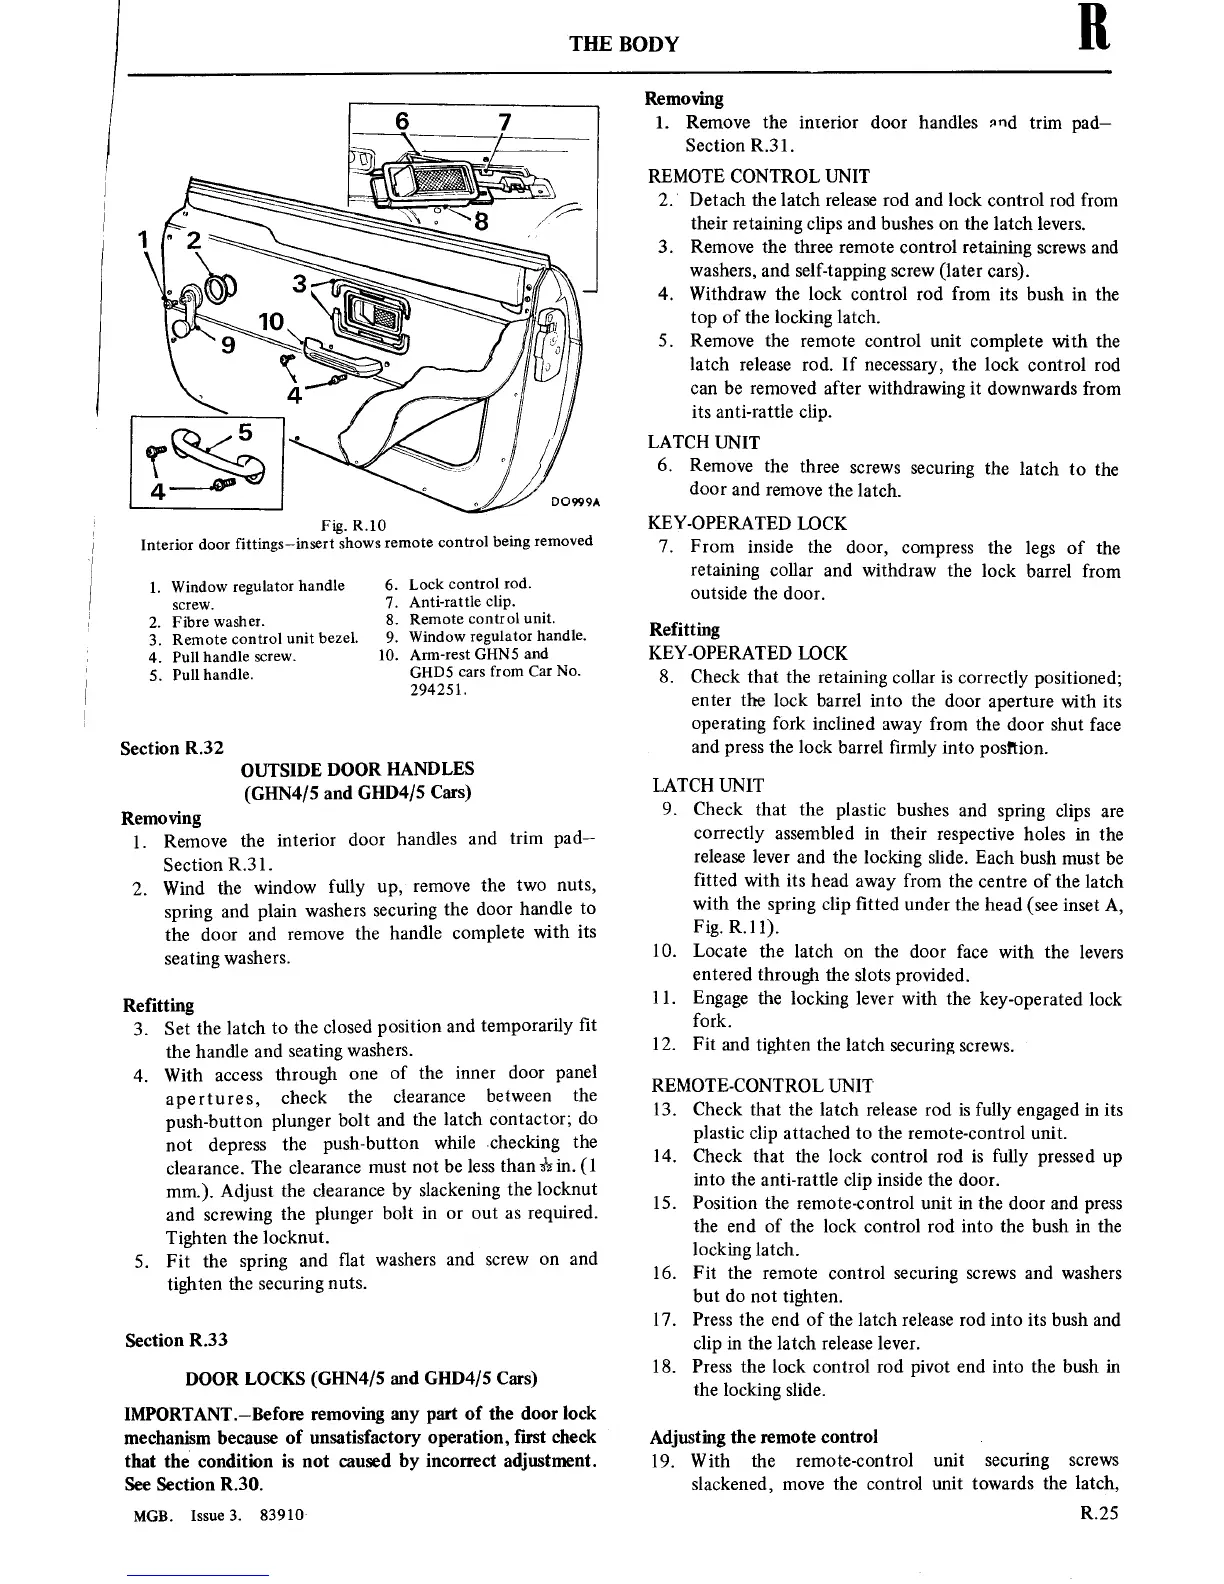
Fig.
R.10
Interior
door
fittings—insert
shows
remote
control
being
removed
1.
Window
regulator
handle
6.
Lock
control rod.
screw.
7.
Anti-rattle
clip.
2.
Fibre
washer.
8.
Remote
control
unit.
3. Remote
control unit
bezel.
9.
Window
regulator
handle.
4.
Pull
handle
screw.
10. Ann-rest
GHNS
and
5.
Pull
handle.
GHDS
cars
from Car
No.
294251.
Section
R.32
OUTSIDE
DOOR
HANDLES
(GHN4/5 and
GHD4/5
Cars)
Removing
1.
Remove
the interior
door
handles
and trim
pade
Section R31.
2.
Wind
the
window
fully
up,
remove
the
two
nuts,
spring
and plain
washers securing
the
door
handle
to
the door
and
remove
the
handle
complete
with
its
seating
washers.
Refitting
3.
Set
the
latch
tO
the
closed
position
and
temporarily
t
the
handle and
seating
washers.
4.
With
access
through
one
of
the
inner
door
panel
apertures,
check
the
clearance
between
the
push-button
plunger
bolt and
the
latch
contactor;
do
not
depress
the
push-button
while checking
the
clearance.
The clearance
must not
be
less
thanslrin.
(1
mm).
Adjust
the clearance
by
slackening
the
locknut
and
screwing
the plunger
bolt
in
or
out
as
required.
Tighten
the locknut.
5.
Fit
the
spring
and
at
washers
and
screw on
and
tighten the
securing
nuts.
Section
R.33
DOOR
LOCKS
(GHN4/5
and
GHD4/5
Cars)
IMPORTANT.—Before removing
any
part
of
the door
lock
mechanism
because
of unsatisfactory
operation,
first check
that
the
condition
is
not
caused by
incorrect
adjustment.
See Section
R.30.
MGB.
Issue3.
83910-
Removing
1.
Remove
the
interior
door handles and
trim
pad—
Section
R.31.
REMOTE CONTROL UNIT
2.‘
Detach the latch release rod and lock control
rod from
their
retaining
clips and bushes
on
the latch levers.
3. Remove the three
remote
control
retaining
screws
and
washers,
and
self-tapping
screw
(later cars).
4.
Withdraw the
lock control rod
from
its
bush
in
the
tOp
of the locking latch.
5. Remove
the
remote
control
unit
complete with the
latch
release rod.
If
necessary,
the lock control
rod
can
be removed after withdrawing
it
downwards from
its
anti-rattle clip.
LATCH
UNIT
6.
Remove
the
three
screws
securing
the
latch
to
the
door
and
remove
the
latch.
KEY-OPERATED
LOCK
7.
From
inside the
door,
compress
the
legs of
the
retaining
collar and withdraw
the
lock barrel from
outside
the
door.
Refitting
KEY-OPERATED
LOCK
8. Check that the
retaining
collar
is
correctly
positioned;
enter
the
lock barrel
into
the
door
aperture
with
its
Operating
fork inclined
away
from the
door shut face
and
press
the lock
barrel
rmly
into
posl'tion.
LATCH UNIT
9. Check
that the plastic
bushes
and
spring
clips
are
correctly assembled
in
their
respective
holes
in
the
release lever
and the
locking slide. Each
bush
must
be
tted
with
its
head
away
from the
centre
of the
latch
with
the
spring
clip tted
under the head
(see
inset A,
Fig.
RH).
10. Locate the latch
on
the door face
with the levers
entered through the
slots
provided.
11.
Engage the
locking lever with
the key-operated
lock
fork.
12.
Fit
and tighten the
latch
securing
screws.
REMOTE-CONTROL
UNIT
13.
Check
that the latch release rod
is
fully engaged
in its
plastic
clip
attached
to
the remote-control
unit.
14.
Check that the lock
control rod
is
fully
pressed
up
into
the anti-rattle
clip
inside the
door.
15.
Position the remote-control
unit in
the
door
and
press
the
end
of
the lock control rod
into
the
bush
in
the
locking latch.
16. Fit the
remote
control
securing
screws
and washers
but do
not
tighten.
17.
Press the
end
of the latch
release
rod
into its
bush and
clip
in
the latch
release lever.
18. Press the lock control rod
pivot
end
into
the bush
in
the
locking slide.
Adjusting the
remote
control
.
19.
With
the
remote-control
unit
securing
screws
slackened,
move
the control
unit
towards the
latch,
R.25

Table of Contents

Questions and Answers:

Question and Answer IconNeed help?

Do you have a question about the MG MGB and is the answer not in the manual?

MG MGB Specifications

General IconGeneral
BrandMG
ModelMGB
CategoryAutomobile
LanguageEnglish

Related product manuals