B
THE IGNITION SYSTEM
Section 3.5
REMOVING
AND
REPLACING
THE
DISTRIBUTOR
To
remove
the distributor
from the
engine
disconnect the
suction
advance
pipe union
from the distributor, the H.T.
leads
from the sparking
plugs, and the LT. lead
from the
distributor. Remove
the
two
screws
securing
the split
housing
plate
to
the
engine
and
lift the distributor
from
its
housing.
Replacement
is
a
reversal of these
instructions,
after which
the
ignition
timing
must
be
set
or
re-checked
as
described
in
Section
B.9.
If
it
is
desired
to
remove
and replace the
distributor
without
disturbing
the
timing
proceed
as
follows:
1.
Rotate
the
crankshaft until the
rotor
arm
is
pointing
\
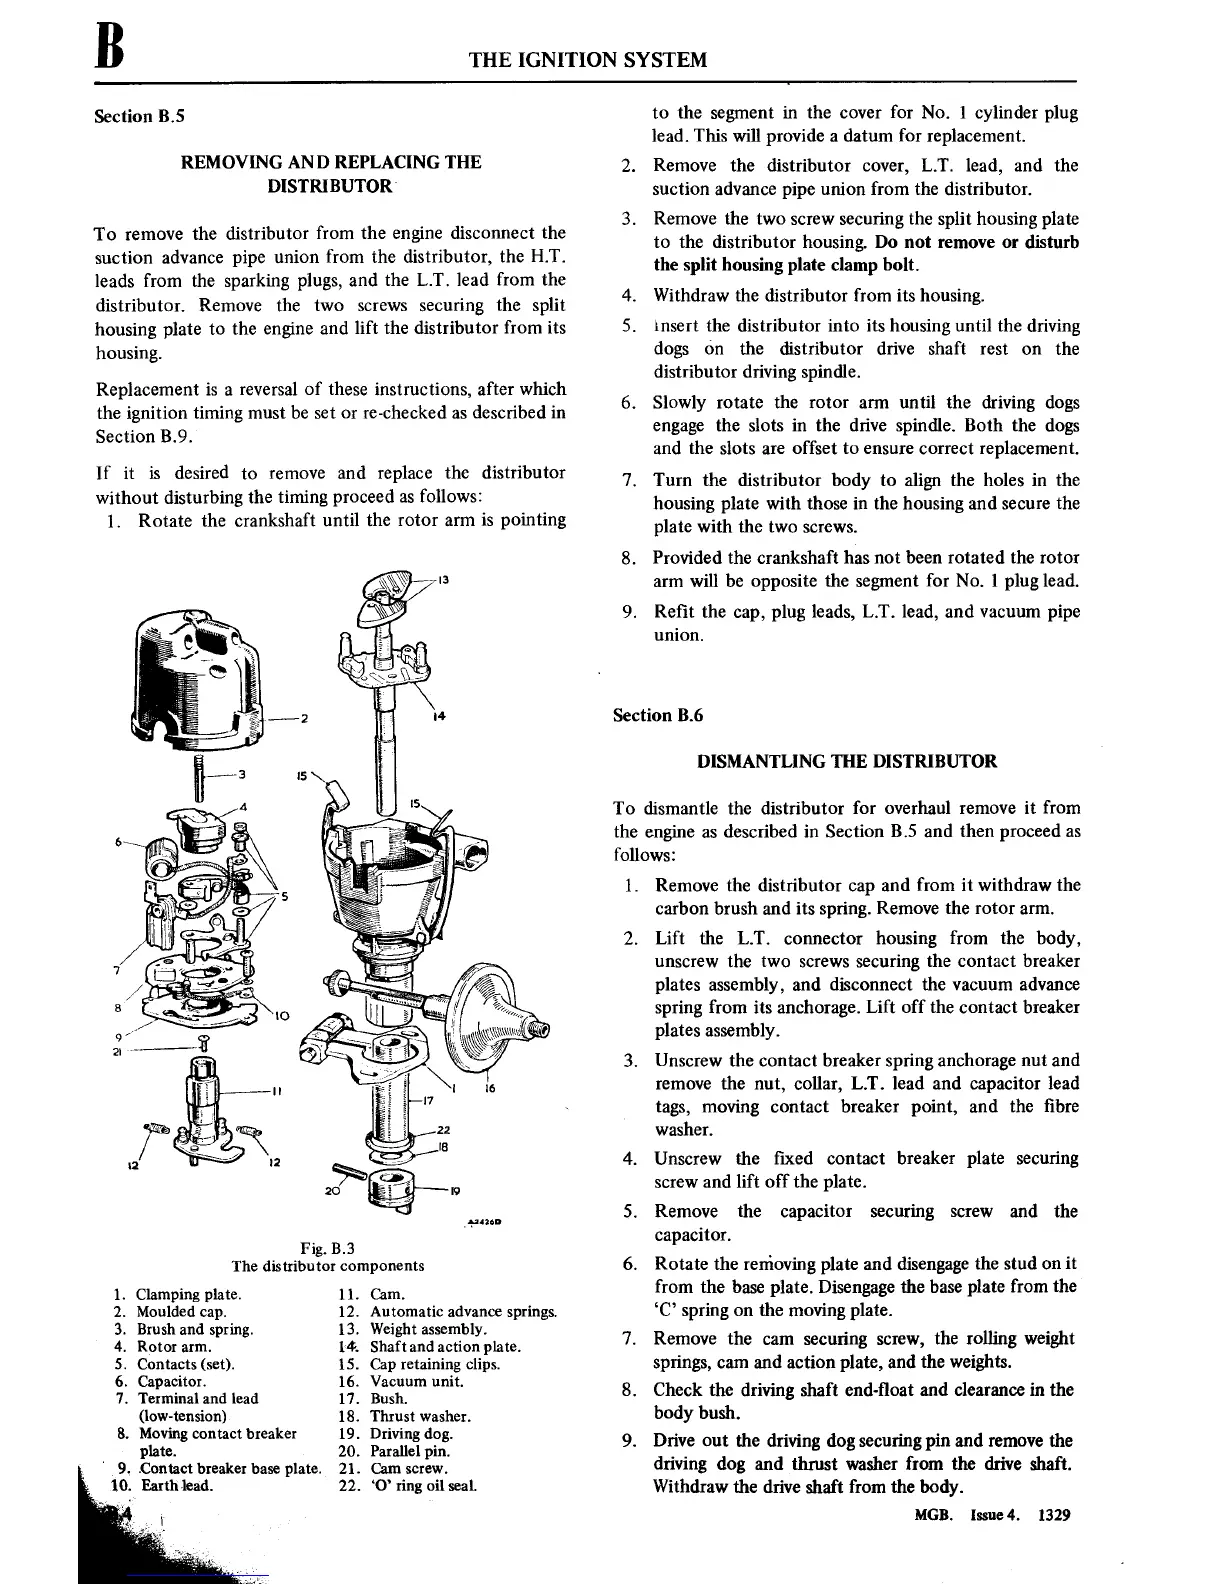
Fig. B.3
The distributor
components
1.
Clamping plate.
11.
Cam.
2.
Moulded
cap.
12. Automatic advancesprings.
3.
Brush and spring.
13. Weight
assembly.
4. Rotor
arm.
14. Shaft and action plate.
5. Contacts (set). 15. Cap retaining clips.
6. Capacitor. 16. Vacuum unit.
7. Terminal and lead 17. Bush.
(low-tension)
18. Thrust washer.
8.
Moving
contact
breaker 19. Driving dog.
plate.
20, Parallel pin.
'
9.
Contact breaker
base
plate. 21.
Cam
screw.
.
Earth lead.
22.
‘0’
ring oil seal.
i,
to
the
segment
in
the
cover
for
No.
1
cylinder plug
lead. This will provide
a
datum
for
replacement.
2.
Remove the distributor
cover,
L.T. lead, and the
suction
advance
pipe union
from
the distributor.
3.
Remove
the
two
screw
securing
the split housing plate
to
the distributor housing.
Do
not
remove or
disturb
the split
housing
plate clamp bolt.
4.
Withdraw the distributor from
its
housing.
5.
insert
the distributor
into its
housing until the
driving
dogs
on
the distributor drive shaft
rest
on
the
distributor driving spindle.
6. Slowly
rotate
the
rotor
arm
until
the
driving dogs
engage
the slots
in
the drive
spindle. Both the dogs
and the slots
are
offset
to
ensure
correct
replacement.
7.
Turn
the
distributor body
to
align the holes
in
the
housing
plate
with those
in
the
housing
and
secure
the
plate with the
two
screws.
8.
Provided
the crankshaft has
not
been rotated the
rotor
arm
will be
opposite
the
segment
for
No.
l
plug
lead.
9.
Re■t the
cap,
plug leads,
L.T.
lead, and
vacuum
pipe
union.
Section B.6
DISMANTLING THE
DISTRIBUTOR
To
dismantle the distributor
for overhaul
remove
it
from
the
engine
as
described
in
Section 3.5
and
then
proceed
as
follows:
1.
Remove
the distributor
cap
and
from
it
withdraw the
carbon brush and
its
spring.
Remove
the
rotor
arm.
2.
Lift
the
LT.
connector
housing from the body,
unscrew
the
two
screws
securing
the
contact
breaker
plates assembly, and disconnect
the
vacuum
advance
spring
from
its
anchorage. Lift
off
the
contact
breaker
plates assembly.
3.
Unscrew
the
contact
breaker
spring
anchorage
nut
and
remove
the
nut,
collar, L.T.
lead
and
capacitor
lead
tags,
moving
contact
breaker
point,
and
the ■bre
washer.
4. Unscrew
the ■xed
contact
breaker plate
securing
screw
and
lift off the
plate.
5. Remove
the
capacitor securing
screw
and the
capacitor.
6. Rotate the
removing
plate and disengage
the
stud
on
it
from
the base plate.
Disengage
the
base
plate
from the
‘C’
spring
on
the
moving
plate.
7. Remove
the
cam
securing
screw,
the
rolling
weight
springs,
cam
and
action
plate,
and the
weights.
8. Check the driving shaft
end-■oat and clearance
in
the
body bush.
9.
Drive
out
the driving dog
securing pin
and
remove
the
driving dog
and
thrust washer
from
the drive shaft.
Withdraw
the
drive
shaft from the body.
MGB. lssue4.
1329