EasyManuals Logo

MG MGB User Manual

MG MGB
417 pages
To Next Page IconTo Next Page
To Previous Page IconTo Previous Page
Page #293 background imageLoading...
Page #293 background image
N
THE ELECTRICAL
SYSTEM
®
Inll—nu»
A67I4
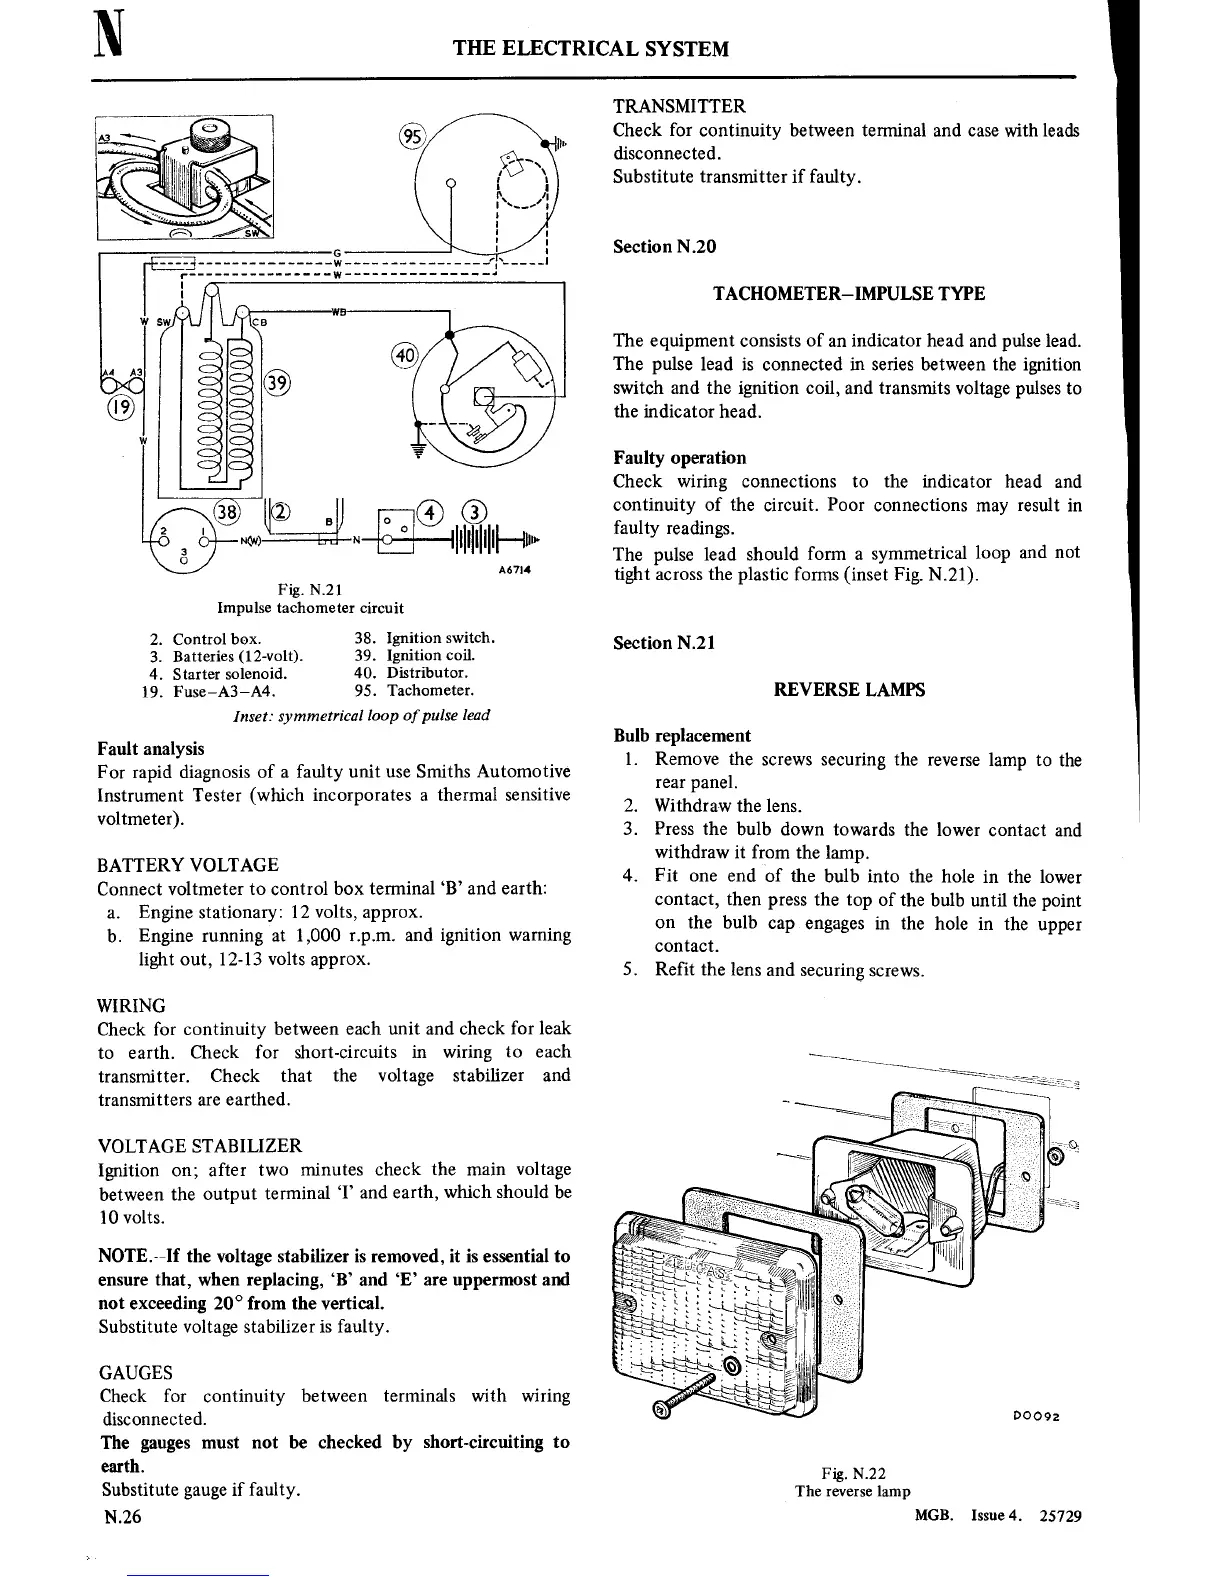
Fig.
N.21
Impulse tachometer
circuit
2.
Control box.
3.
Batteries
(12-Volt).
4. Starter
solenoid.
9.
Fuse—A3—A4.
Inset:
symmetrical loop of
pulse lead
38.
Ignition
switch.
39.
Ignition coil.
40. Distributor.
95.
Tachometer.
Fault analysis
For rapid diagnosis
of
a
faulty
unit
use
Smiths
Automotive
Instrument
Tester
(which
incorporates
a
thermal
sensitive
voltmeter).
BATTERY VOLTAGE
Connect
voltmeter
to
control
box terminal ‘B’ and
earth:
a.
Engine
stationary:
12
volts,
approx.
b. Engine
running
at
1,000
r.p.m.
and
ignition warning
light
out,
12-13
volts
approx.
WIRING
Check
for
continuity
between
each
unit
and
check for leak
to
earth. Check
for short-circuits
in wiring
to
each
transmitter.
Check that
the voltage stabilizer
and
transmitters
are
earthed.
VOLTAGE
STABILIZER
Ignition
on;
after
two
minutes
check the
main
voltage
between
the
output
terminal
‘I’ and
earth, which should be
10
volts.
NOTE.”If the
voltage stabilizer is removed, it is
essential
to
ensure
that, when
replacing,
‘B’ and ‘E’
are
uppermost
and
not
exceeding
20°
from
the
vertical.
Substitute voltage
stabilizer
is
faulty.
GAUGES
Check for
continuity
between
terminals with
wiring
disconnected.
The
gauges
must not
be
checked by short—circuiting
to
earth.
Substitute
gauge
if faulty.
N.26
TRANSMITTER
Check for
continuity
between
terminal
and
case
with leads
disconnected.
Substitute
transmitter
if faulty.
Section N.20
TACHOMETER—IMPULSE
TYPE
The
equipment consists
of
an
indicator head
and
pulse lead.
The
pulse lead
is
connected
in
series between
the
ignition
switch
and
the
ignition
coil, and
transmits
voltage pulses
to
the indicator head.
Faulty
operation
Check
wiring connections
to
the indicator head and
continuity
of the
circuit.
Poor
connections
may
result
in
faulty
readings.
The pulse lead
should
form
a
symmetrical
loop
and
not
tight
across
the plastic forms
(inset
Fig.
N.2l).
Section
N.2l
REVERSE LAMPS
Bulb
replacement
1.
Remove the
screws
securing
the
reverse
lamp
to
the
rear
panel.
2.
Withdraw
the lens.
3.
Press
the bulb
down
towards
the
lower
contact
and
withdraw
it
from
the
lamp.
4.
Fit
one
end
‘of
the
bulb
into
the
hole
in
the
lower
contact,
then
press
the
top
of
the bulb
until the
point
on
the bulb
cap engages
in
the hole
in
the
upper
contact.
5. Refit the
lens and
securing
screws.
Fig. N.22
The
reverse
lamp
MGB.
Issue4.
25729

Table of Contents

Questions and Answers:

Question and Answer IconNeed help?

Do you have a question about the MG MGB and is the answer not in the manual?

MG MGB Specifications

General IconGeneral
BrandMG
ModelMGB
CategoryAutomobile
LanguageEnglish

Related product manuals