THE ENGINE
A
Completely
unscrew
the eight rocker shaft bracket
nuts
and
remove
the rocker assembly, complete with brackets
and
rockers. Withdraw
the eight
push-rods,
storing
them
carefully
so
that they
may
be replaced
in
the
same
positions.
To
dismantle the
rocker
shaft
assembly, first
remove
the
grub
screw
which locates
the
rocker shaft
in
the
rear
rocker
mounting
bracket and
remove
the split
pins,
flat
washers, and
spring
washers from each
end
of
the shaft.
Slide
the
rockers, brackets, and
springs
from the
shaft.
Unscrew the- plug from the front
end
of
the shaft
and clean
out
the oilways.
Reassembly and replacement
is
a
reversal
of
the
above
procedure replacing the rockers and
springs in
their
original
positions
on
the
shaft.
Remember
to
replace the rocker
shaft locating
screw
lock plate.
Replace the
rocker
cover
with the
vent
pipe
to
the front. Check that the
two
cap
nut
rubber
bushes and the rocker
cover
cork gasket
are
undamaged; if they
are
found
to
be
faulty, ■t
new ones or
oil
leaks
may
result.
Refitting rocker bushes
To
remove
and replace
worn
rocker bushes
the
use
of
Service
tool 18G
226
is
recommended; the bushes
and the
rockers
can
be
Very
easily damaged by
using improvised
drifts. Place the rocker
on
the anvil
and drive
out
the
worn
bush.
Place
a
new
bush
on
the driver and
position
the bush
with
the butt
joint
at
the
top
of the
rocker bore and
the
oil
groove
in
the bush
at
the bottom
of the rocker
bore,
as
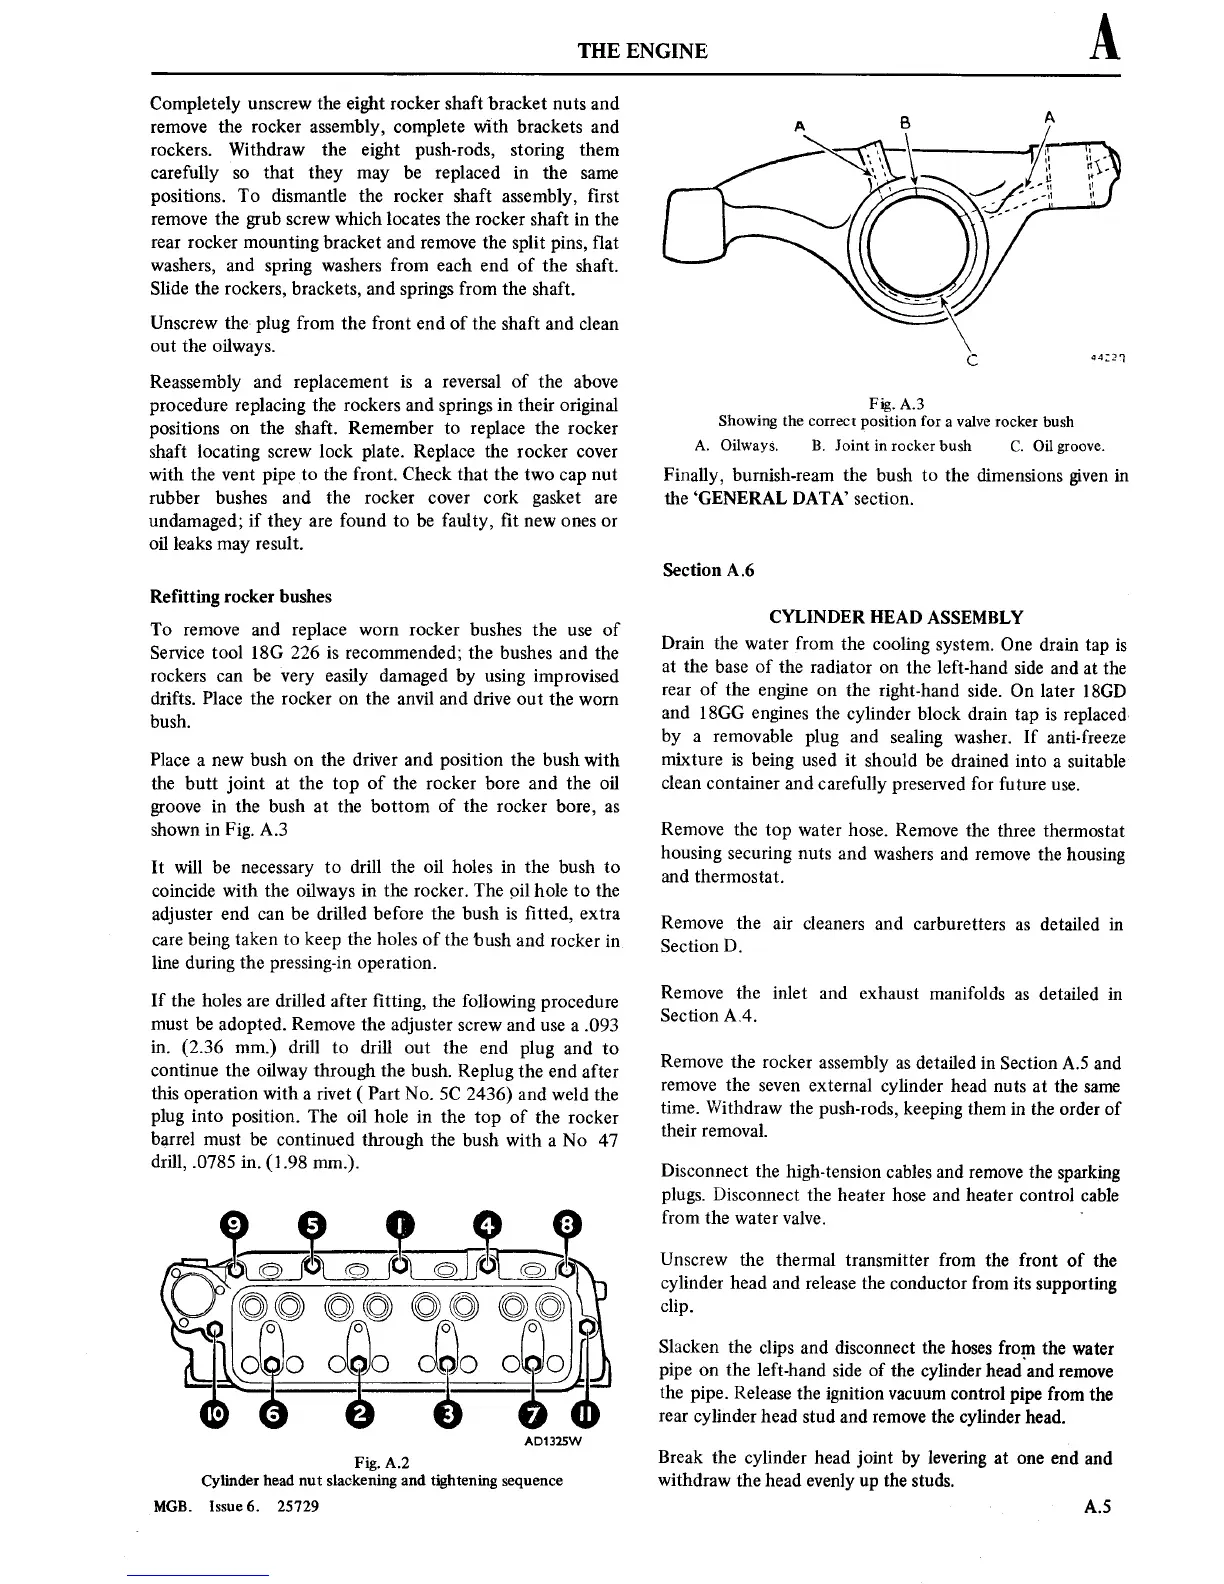
shown
in
Fig.
A.3
It
will be
necessary
to
drill the oil
holes
in
the bush
to
coincide
with the
oilways
in
the rocker. The
oil
hole
to
the
adjuster
end
can
be
drilled before the bush
is
■tted,
extra
care
being
taken
to
keep the holes
of the
bush
and
rocker
in
line
during the
pressing-in operation.
If the holes
are
drilled after ■tting, the
following
procedure
must
be adopted.
Remove the adjuster
screw
and
use a
.093
in.
(2.36 mm.)
drill
to
drill
out
the
end plug
and
to
continue
the oilway through the
bush. Replug the
end after
this
operation
with
a
rivet
(
Part No.
SC 2436)
and weld the
plug
into position.
The oil hole
in
the
top
of
the rocker
barrel
must
be continued through
the bush
with
a
N0
47
drill,
.0785
in.
(1.98
mm.).
eaag
‘
s©m©n@m@
O O
Q
o
0
100.0
one
080
OQOJ
«t9
-
é
AD1325W
Fig.A.2
Cylinder head
nut
slackening
and tightening
sequence
MGB.
Issue
6. 25729
Fig.
A.3
Showing
the
correct
position for
a
valve rocker
bush
C.
Oil
groove.
A.
Oilways.
B. Joint in rocker bush
Finally, burnish-ream the bush
to
the
dimensions
given in
the
‘GENERAL
DATA’
section.
Section
A.6
CYLINDER
HEAD
ASSEMBLY
Drain the
water
from
the cooling
system.
One
drain
tap
is
at
the
base
of the radiator
on
the left-hand
side
and
at
the
rear
of the
engine
on
the right-hand
side. On later 180D
and l8GG
engines
the
cylinder
block drain
tap
is
replaced
by
a
removable
plug and
sealing washer. If anti-freeze
mixture
is
being
used
it
should
be
drained
into
a
suitable
clean
container
and carefully
preserved
for
future
use.
Remove the
top water
hose.
Remove the
three thermostat
housing
securing
nuts
and washers
and
remove
the
housing
and thermostat.
Remove the
air
cleaners
and carburetters
as
detailed
in
Section
D.
Remove the
inlet
and exhaust manifolds
as
detailed
in
Section A.4.
Remove
the rocker
assembly
as
detailed
in Section A5 and
remove
the
seven
external
cylinder head
nuts at
the
same
time.
Withdraw
the push-rods,
keeping them
in
the order
of
their
removal.
Disconnect
the high-tension
cables and
remove
the sparking
plugs. Disconnect
the heater
hose
and
heater
control cable
from the
water
valve.
‘
Unscrew
the
thermal
transmitter
from the front of
the
cylinder head
and release the conductor from
its
supporting
clip.
Slacken
the
clips and disconnect the hoses from
the
water
pipe
on
the left-hand
side
of the
cylinder
head
and
remove
the
pipe.
Release the
ignition
vacuum
control
pipe
from
the
rear
cylinder head
stud and
remove
the
cylinder
head.
Break the
cylinder
head
joint
by levering
at
one
end
and
withdraw
the
head
evenly
up
the studs.
A.5