91
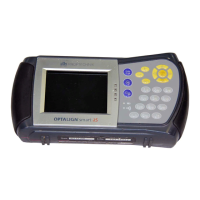
Rotate the shaft supporting one of the measuring heads (say sensor) to the next
position, then rotate the shaft supporting the other measuring head (say laser) until
the needle rests in the central blue sector of the on-screen needle indicator. When the
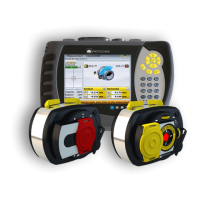
needle is in the blue sector, and value stabilization time has been attained, the ‘Take
point’ button appears on the display. At this point, the laser beam strikes the sensor
detector at the same arc position as the initial point and the beam coordinates are
stable.
With the ‘Take point’ button highlighted, press
e to take second measurement
point.
Rotate either head to the next measurement position; repeat the procedure to take
measurements through at least three positions over at least 60° of rotation, but more
measurements over a wider angle is recommended.
After finishing measurement, press
RES
to view results.
From this point onwards,
the ‘Take point’ button
only appears on the display
when the needle is in the
central blue sector of the
on-screen needle indicator,
and the value stabilization
time is attained.
Measurement modes
 Loading...