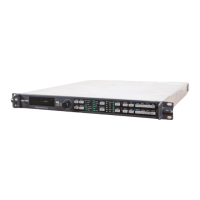
156 X75HD/X75SD Installation and Operation Manual
Chapter 9: Audio Configuration
Audio LED and Buttons Map
When you press the Audio In or Ctrl + A Proc button on a local or
remote control panel, or if you make audio input selections via your
Web browser software or other control application, certain parameters
and audio proc amp buttons get mapped, and various Channel LEDs
and Audio I/P LEDs will light according to the selected input
configuration. The following tables describe the LEDs and buttons that
are assigned to selected input sources.
Tables 10-1 through 10-6 in “Chapter 10: Special Function Buttons”
describe the various channels, LEDS, gain controls, and control panel
buttons that are affected/activated by the selection of certain analog,
AES, SD-SDI, and/or HD-SDI demuxed audio inputs. Use the Ctrl + A
Proc buttons to switch between the audio input types.
Selecting an Audio Input
Directly press Audio In to select any one input group to be sent out to
all audio outputs. Alternatively, open the Audio Setup menu and
navigate to the Routing submenu. From here you can select and
configure your audio inputs.
After configuring your audio inputs, the following LEDs will light (see
Figure 9-2 on page 157 for their locations):
•The Audio Mode LEDs on the far right side of the front panel (top)
indicate the current mode of operation.
•The Audio Proc LED on the far right side of the front panel
indicates the current processing audio group.
•The Audio Input LEDs to the top, right of the button indicate
which input group is currently selected.
•The Audio Channel LEDs immediately to the right of the button
indicate which audio channels are mapped and internally routed to
the SRC channels.
See “Audio Proc Amp” on page 167 for information on LED and
channel mappings on a frame-mounted local control panel or
X75-RCP remote control panel.
Note
For audio input configuration,
an optional X75OPT-AS-8/16
module must be installed.
 Loading...