1 - 2 MC92N0-G User Guide
Unpacking
Carefully remove all protective material from around the MC92N0-G and save the shipping container for later
storage and shipping.
Verify that you received all equipment listed below:
•
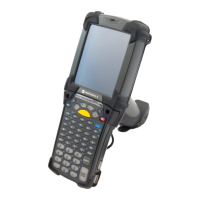
mobile computer
•
lithium-ion battery
•
strap, attached to the MC92N0-G
•
stylus, in the stylus silo
•
Regulatory Guide.
Inspect the equipment for damage. If you are missing any equipment or if you find any damaged equipment,
contact the Zebra Support Center immediately. See page xvii for contact information.
Getting Started
In order to start using the MC92N0-G for the first time:
•
install the main battery
•
charge the main battery and backup battery
•
start the MC92N0-G
•
configure the MC92N0-G.
The main battery can be charged before or after it is installed. Use one of the spare battery chargers to charge the
main battery (out of the MC92N0-G), or one of the cradles to charge the main battery installed in the MC92N0-G.
Installing the Main Battery
Before using the MC92N0-G, install a lithium-ion battery by sliding the battery into the MC92N0-G as shown in
Figure 1-2.
When a battery is fully inserted in a MC92N0-G for the first time, upon first power up, the device boots and powers
on automatically.
NOTE Ensure the battery is fully inserted. Two audible clicks can be heard as the battery is fully inserted. A partially
inserted battery may result in unintentional data loss.
 Loading...