ENTRON Controls, LLC. • 700120S • Page 103
To interrupt a REPEAT sequence or stop at the end of a weld , find
PP
PP
P
.O..O.
.O..O.
.O. in EXTENDED
FUNCTIONS and program a value of
PP
PP
P
.O..O.
.O..O.
.O.=
1414
1414
14. While in CONSTANT CURRENT mode,
control will measure the value of current maintained during the weld and show this value
on DATA displays at the end of the sequence. If limit window is being monitored for HI/LO
range, the value shown on the display will be the CURRENT maintained by control if it can
maintain this value. If the control cannot maintain the set CURRENT value, the control
will display
L.o.L.o.
L.o.L.o.
L.o. or
H.i.H.i.
H.i.H.i.
H.i. permanently. In addition, the control will stop a REPEAT sequence
if in REPEAT mode or stop the control from any further initiations. In order to re-
enable initiations, it is necessary to simply press any Front Panel push button to clear
H.i.H.i.
H.i.H.i.
H.i./
L.o.L.o.
L.o.L.o.
L.o. ERROR.
To obtain a Weld Current Readout without monitoring HI/LO limit window, program
EXTENDED FUNCTION parameter
PP
PP
P
.O..O.
.O..O.
.O.=
1212
1212
12. Program a value in WELD CURRENT
parameters
HiHi
HiHi
Hi=
00.9900.99
00.9900.99
00.99 or
HiHi
HiHi
Hi=[xx.xx], where xx.xx is close to the maximum available current.
Program a value in WELD CURRENT parameter
LoLo
LoLo
Lo=
00.1000.10
00.1000.10
00.10. Do not leave these values at
zero. If they are left at zero, control uses default limit window of CURRENT value+10%
for
HiHi
HiHi
Hi and CURRENT value-10% for
LoLo
LoLo
Lo, and monitors default limit window as described above.
If any other NON-CONSTANT CURRENT PROCESS OUTPUT must be used, simply use
the SELECT push button to indicate PERCENT CURRENT before weld initiation, as
explained in previous section.
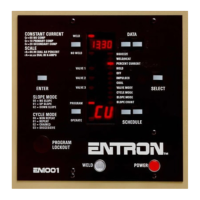
8.3.2 SETTING LIMIT WINDOW FOR CONSTANT CURRENT
The default (factory setting) current limit window for
PP
PP
P
.O..O.
.O..O.
.O.=
1212
1212
12-
1414
1414
14 and
2222
2222
22-
2727
2727
27 is set at +10% of
PERCENT CURRENT. If specific HIGH or LOW limits different from default are needed,
follow these steps:
1. Put the control in PROGRAM mode.
2. Select desired schedule.
3. Press SELECT push button until FUNCTION indicator LED is at PERCENT CURRENT.
4. Click the right SCHEDULE push button once and SCHEDULE display will show
L.o.L.o.
L.o.L.o.
L.o.
to indicate LOW limit.
5. Use the DATA push buttons to enter desired LOW limit and push ENTER to save setting.
6. Click the right SCHEDULE push button once and and SCHEDULE display will show
H.i.H.i.
H.i.H.i.
H.i. to indicate HIGH limit.
7. Use DATA push buttons to enter desired HIGH limit and push ENTER to save setting.
8. Press the PROGRAM/OPERATE push button to return control to OPERATE mode.
8.4 LEARNING-TYPE SETUP PROCESS FOR AUTO-RANGE
WORKING MODE
The learning-type setup process is needed when the maximum current range is not available.
By this setup process, the control will make several weld cycles and record the signal values
from the Current Sensor, then set the gain for the embedded amplifier.
Follow the steps outlined in either of the next two sections (8.4.1 or 8.4.2) depending on which
matches your control’s specifications.
8.3.1 USING CONSTANT CURRENT PROCESS OUTPUTS (cont.)
 Loading...