Page 12 • 700120S • ENTRON Controls, LLC.
2.0 PROGRAMMABLE FUNCTIONS
SCHEDULES – The EN1000/EN1001 can store up to 50 schedules, numbered from 00 to 49.
A weld sequence may include more than one schedule. A chain of schedules, for example, may
be used to add a forge operation during a weld sequence, or add a quench and temper sequence
to a schedule. In the simplest form, a weld schedule may include SQUEEZE, WELD, and
HOLD only. In a more complex form, a schedule may include: SQUEEZE and PRESSURE or
FORCE for the electrode, WELD time and STEPPER count, CURRENT in [%] or [kA] and
HI/ LO CURRENT limits when using CONSTANT CURRENT mode, HOLD, etc. All of these
features may be accessed by means of Front Panel parameters.
EXTENDED FUNCTIONS – The EXTENDED FUNCTIONS are used instead of Jumper or
Dip-switch settings. They are accessible from the Front Panel by simply clicking the SELECT
push button until FUNCTION indicator LED reaches SLOPE COUNT, then click once more.
At this point, the top display (DATA) will show
EFEF
EFEF
EF. By clicking the SCHEDULE push buttons,
the EXTENDED FUNCTIONS are visible in the bottom display (SCHEDULE). For most
features, such as CHAINED schedules or SUCCESSIVE initiations, it is not necessary to enable
functions. For some others such as STEPPER (
S.t.S.t.
S.t.S.t.
S.t.), it is necessary to just enable a Front-Panel
accessible EXTENDED FUNCTION. For others, it is necessary to add optional hardware to
the base control, such as the Integrated Pressure Sense Control System or Constant Current
operation.
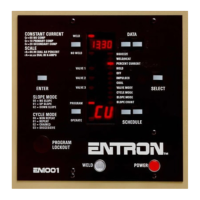
2.1 CONTROL FUNCTIONS – See Figure 1-2. Control Panel layout
WELD/NO WELD PUSH BUTTON (1) – This push button is active at all times. It puts the
control in the WELD mode (enables the weld firing pulse) or NO WELD mode (disables firing).
This function is accessible while in OPERATE mode or while welding with few exceptions
(generally during error conditions).
WELD (3)/NO WELD (2) INDICATOR LEDs – These lights indicate the firing status of the
control. The LEDs toggle whenever the WELD/NO WELD push button is pressed.
DATA PUSH BUTTONS (5) & (6) – The right button increments DATA display (4) by one,
and the left button increments by ten. When either digit reaches the maximum, it resets to zero.
For parameters which allow programming of all four digits, the right button affects the two
right-hand digits – click to increment by one; press and hold to increment by ten. The left
button affects the two left-hand digits – click to increment by 100; press and hold to increment
by 1000. Only active in the PROGRAM mode.
FUNCTION INDICATOR LEDs (7-10 & 12-18) – The indicator LEDs light up to indicate
the active SCHEDULE parameter. They correspond to the programmable functions listed on
the Control Panel as the operator presses SELECT to view function values.
SELECT PUSH BUTTON (11) – Use the SELECT push button to choose any SCHEDULE
parameter. As the button is pressed, the corresponding LED will light up to indicate the parameter
data in the DATA display. Holding the SELECT push button momentarily will reverse the
direction of the LED movement when the button is released.
 Loading...