© Stäubli 2009 – D28070504A CS8C90 / 248
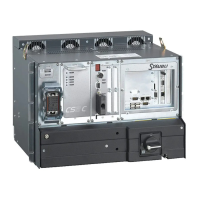
Installation of the BIO option (figures 5.18 and 5.19):
• Remove the 4 fastening screws (1) from the RSI board and take it out of the controller.
Installing the first board:
• Insert the J601 and J602 connectors on the BIO board through the holes cut in the front panel of the RSI (2)
board and then plug the BIO board into the J603 (3) connector.
• Secure the BIO board using the locks on the J601 and J602 connectors and the 2 fastening screws (4).
Installing the second board:
• The second board is installed in accordance with the same principle, using the accessories supplied with the kit
(spacers, connector).
• Replace the RSI board.
• The presence of the BIO board is detected automatically by the CS8C cabinet on start-up. The "Control panel"
application enables you to see that the board is in place and check the status of its Inputs/Outputs.
Note:
To display the status of the Inputs/Outputs or to programme them, select the "I/O" branch in the
control panel accessible via the main menu.
CAUTION:
Before removing or inserting a board, disconnect the installation from the power supply,
following the procedure.
Furthermore, electronic boards must only be handled after an antistatic work area has been
created. To do this, the After Sales Support technician (or the customer) must use an anti-
static mat connected to the earth and to the cabinet, as well as wearing the anti-static bracelet
supplied with the controller.