6.5 Limiting the FAIL Hold Cancellation (FAIL mode)
90
See "Appendix2 List of Optional Functions" (p. A5)
FAIL mode is a function enabling users to cancel the FAIL hold status only with
the STOP key on the main instrument.
6.
Press the STOP key while holding down the SHIFT key to complete the
setting value.
The instrument reverts to the READY state.
To continue to the setting for the next item, press the key.
SHIFT
STOP
+
When carrying out continuous test mode setting, the maximum current detected
and the timer will be displayed at the end of the test. Sometimes a current higher
than the maximum current displayed during testing may be displayed because
the display may not capture the fluctuations in current quick enough.
6.5 Limiting the FAIL Hold Cancellation (FAIL mode)
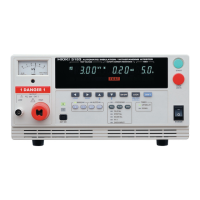
1.
( is lit)
Make sure the lamp is lit on the screen.
* will not be displayed during the Double Action setting.
2.
Press the STOP key while holding down the SHIFT key to display the
optional screen (page 1).
3.
Press the key to move the flashing cursor to the position of FAIL
mode.
4.
Press the / keys to select the mode.
0: FAIL mode is OFF
(
Cancellation of FAIL hold status is possible with all STOP functions) (Ini-
tial setting)
1: FAIL mode is ON (Cancellation of FAIL hold status is only possible with
STOP key on the main instrument.)
5.
Press the STOP key while holding down the SHIFT key to complete the
setting value.
The instrument reverts to the READY state.
To continue to the setting for the next item, press the key.
SHIFT
STOP
+
or
<Ex.> FAIL mode is set to ON.
SHIFT
STOP
+