Kinco FD5P AC series servo
5. S(Storable) : Objects can be stored in the Flash-ROM area and are not lost when powered off.
10.3.1 CANopen bus communication hardware description
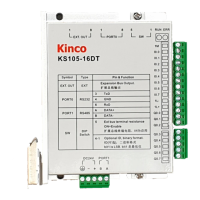
Table 10-6 Pin name and function
CAN_H bus
(
high dominant )
CAN_L bus cable(low dominant )
The CAN communication protocol mainly describes the information transfer method between
devices. The definition of the CAN layer is consistent with the open system interconnection model
(OSI). Each layer communicates with the same layer on another device, the actual communication
takes place on two adjacent layers on each device and the devices are interconnected only through
the physical medium of the model physical layer, The specification of CAN defines the bottom two
layers of the model, the data link layer and the physical layer. The physical layer of the CAN bus is
not strictly regulated, and can use a variety of physical media such as twisted pair optical fibers, etc.
The most commonly used is twisted pair signals, using differential voltage transmission (commonly
used bus transceivers). The two signal lines are called CAN_H and CAN_L, and they are both
about 2.5V in static state. At this time, the state is expressed as logic 1, which can also be called
recessive bit. CAN_H is higher than CAN_L to represent logic 0, which is called display bit. At this
time, the usual voltage value is CAN_H=3.5V
and
CAN_L=1.5V , Epiphany first in conflict. The
names and functions of the CAN communication interface pins are shown in Table 10-6.
Figure 10-3 CAN Signal Identification
Note:
1
、The CAN_L and CAN_H pins of all slave stations can be directly connected to each other, and
the connection is made in series, not star connection;
2
、The communication ID can be modified through the SW1 DIP switch on the panel, and the
detailed DIP instructions can be found in Chapter 3.8.
3
、The master terminal and the last slave terminal need to be connected to a 120 ohm terminal resistor,
as shown in Figure 10-6 below. FD5P driver comes with terminal resistance dial SW2, dial it to ON to turn
on the terminal resistance. Please restart the driver after changing the DIP status of the terminal

 Loading...