LABORIE Goby Owner’s Manual GOBY-UM02 21
3.3.2 Fluid-Filled Pressure Transducer Connections – Priming
Do not plug in or unplug any transducers when a procedure is running. Always stop the procedure before plugging in or
unplugging transducers. Follow the instructions provided to prime the transducer, pressure measurement tubing, and
catheter:
1. Attach a 3-way stopcock with pressure measurement tubing to the bottom (male) connector of the pressure
cartridge. Attach the opposite end of the pressure measurement tubing to the catheter.
2. Attach a syringe filled with water or saline to the stopcock.
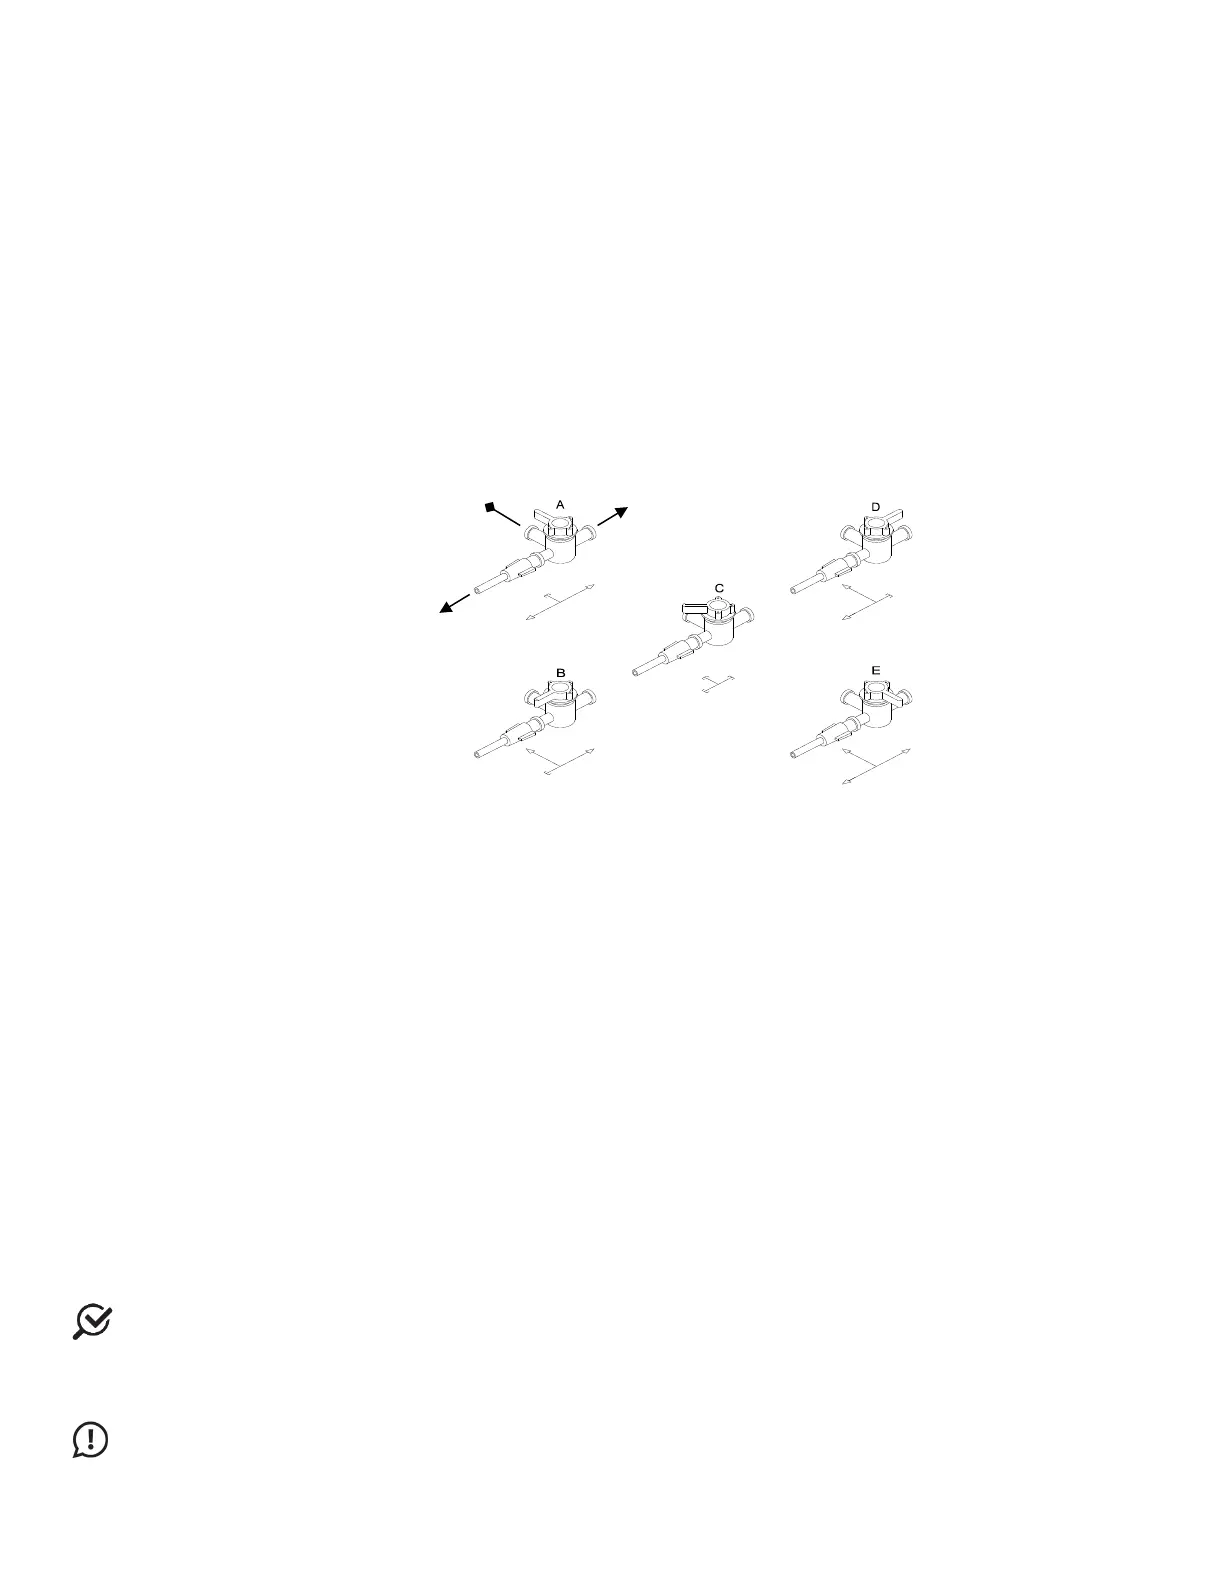
3. Turn the stopcock “OFF” to the catheter (See Figure 14
, Option B).
4. Remove the Luer lock plug from the top (female) connector of the pressure cartridge. Fill the pressure cartridge
with water. Reattach the Luer lock plug.
5. Turn the stopcock “OFF” towards the Luer lock plug (See Figure 14
, Option D).
6. Prime the pressure measurement tubing and the catheter.
7. Turn the stopcock “OFF” towards the syringe for pressure recording (See Figure 14
, Option A).
Each option in Figure 14 indicates a stopcock position; arrows indicate lumens open to flow based on stopcock position
while squared off arrows indicate off position.
Figure 14: Stopcock Flow Directions
3.3.3 T-DOC Air-Charged Catheter and Transducer Setup
Follow the instructions provided to setup T-DOC Air-Charged Catheters and Transducers:
1. Ensure Transducer Cables are connected to the machine. Check that the charger is in the OPEN position.
2. Remove the protective cap from the pressure line and connect it to the matching Transducer Cable. Repeat for
all pressure lines. Secure each connection by twisting the luer lock another ¼ turn.
3. Zero all catheters using the Set Zeros button in the software.
4. For each pressure transducer verify charging pressure by completing the following:
a. Squeeze the associated balloon through the packaging to reduce the volume of residual air (use
fingertips – not nails).
b. Move the associated transducer slider to the charge position while still applying pressure.
c. Remove fingertips and check reading. If pressure is ≤5 cm H2O, return the transducer slider to OPEN. If
the pressure is >5 cm H2O, move the slider to OPEN and repeat.
5. Remove the catheter from the packaging by holding the catheter just below the Y-junction.
6. Coat the distal end of the catheter with a sterile, water-based lubricant and insert into the patient.
7. Tape the catheters as close to the insertion site as possible.
8. Ask the patient to cough to remove residual air from the balloon.
9. Slide the transducer to the CHARGE position. Remove tape and position urethral sensor at the desired point in
the urethra, often at the highest-pressure area.
10. Connect the vesical catheter to the pump tubing.
NOTE: Ensure bladder and rectal pressures are within normal values. Have the patient cough and ensure the detrusor
pressure (Pdet) is equal to zero and that both Pabd and Pves pressures are reacting appropriately. If Pabd is higher than
Pves, reposition the Pabd catheter. Click the Equalize button on the UDS120 control panel.
11. Continue with the testing procedure when ready.
IMPORTANT: Do not plug in or unplug any transducers when a procedure is running. Always stop the procedure
before plugging in or unplugging transducers.
 Loading...