5-2 (E)
LH71A / LH72
5-1-3. Description of Detailed Settings
This sets the polarity, display resolution, compensation values, and other settings for the actual operating
conditions.
When the power is turned on for the first time after factory shipping, the “detailed settings” cannot be made
unless the “basic settings” have been completed.
If the “basic settings” are set or changed, all of the “detailed settings” will revert to the
factory default settings.
∗ If you have already entered the “detailed settings”, make a note of the setting values before resetting or
changing the “basic settings”.
5. Settings
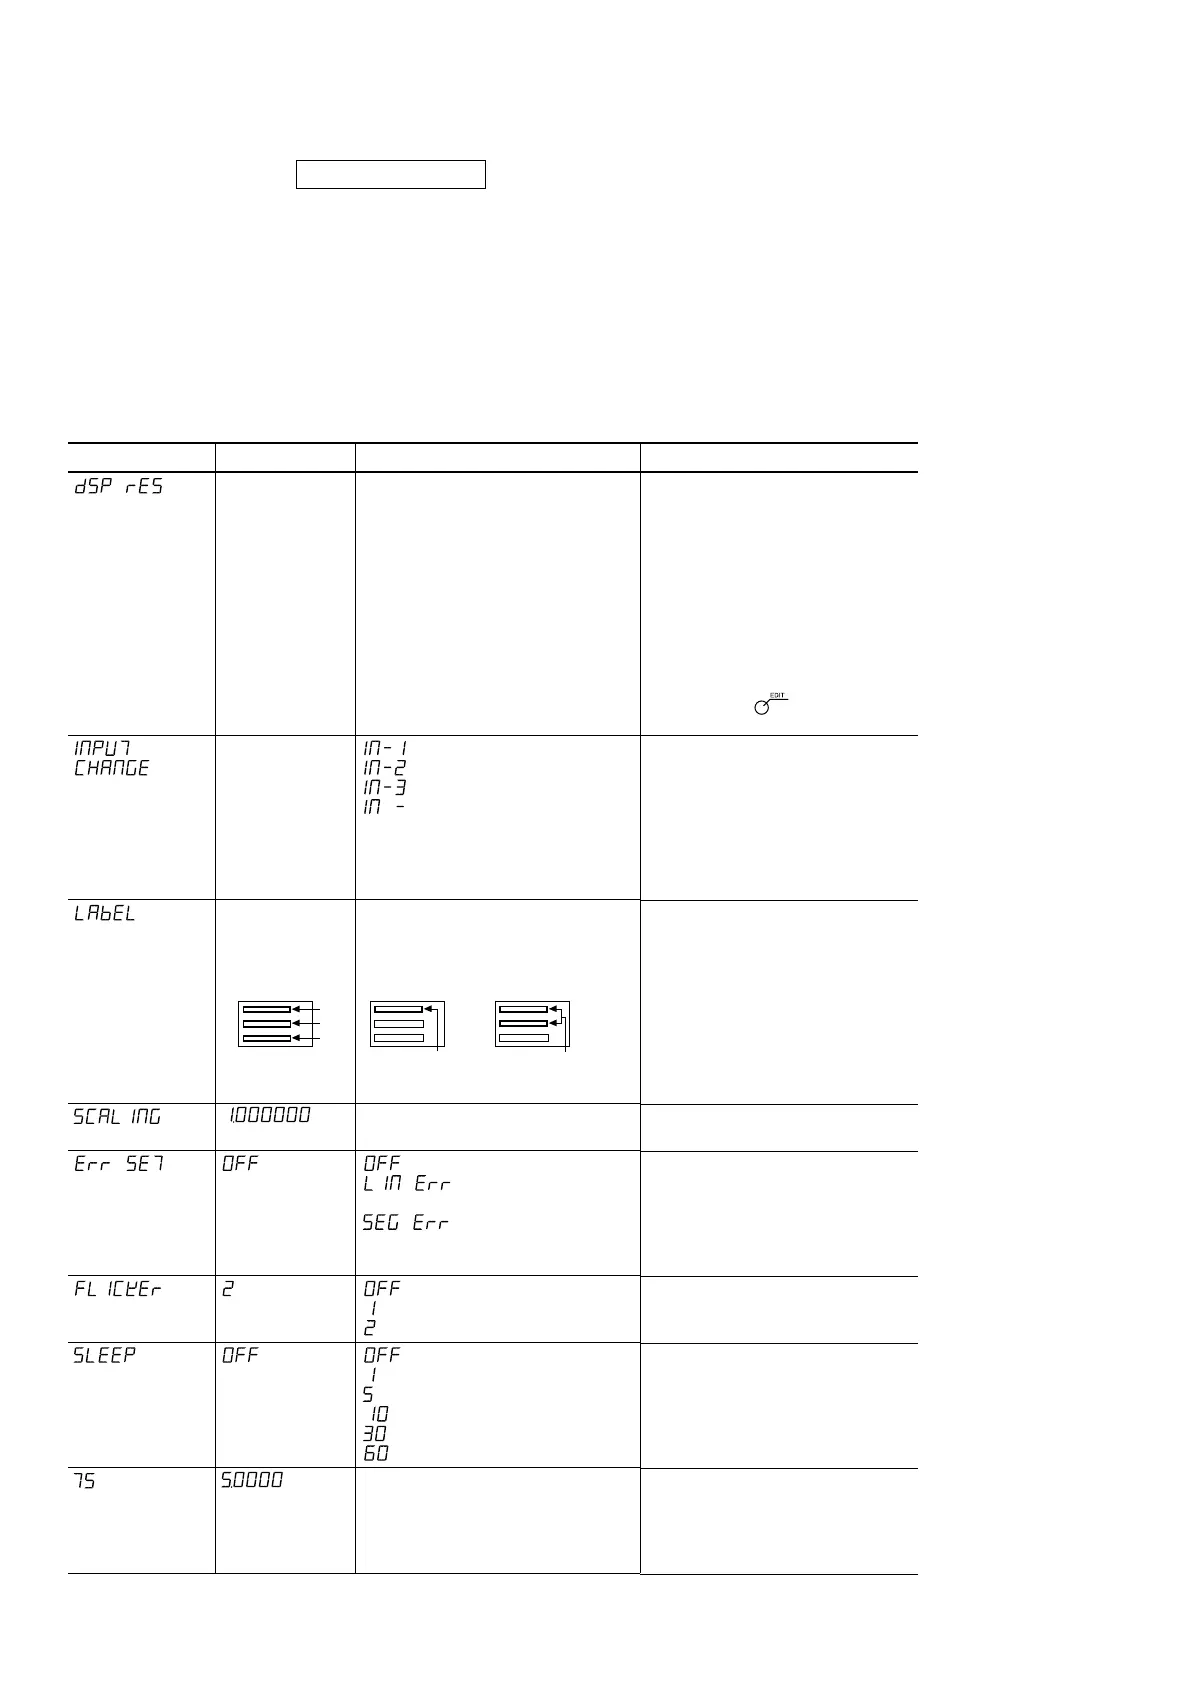
Setting item
Display resolution
Display switching
(LH71A-2 and
LH71A-3 with
general-purpose/
milling machine
function only)
Axis label
switching
(LH71A-1 and
LH71-2 with
general-purpose/
milling machine
function only)
Scaling
Compensation
value
Flicker control
Sleep
Touch sensor
radius (LH71A
only)
Factory setting
Automatic setting
for measuring unit
resolution values
Measuring
unit
input Display
1 –––––––––– 1
2 –––––––––– 2
3 –––––––––– 3
Display Axis label
1 –––––––––– X
2 –––––––––– Y
3 –––––––––– Z
Available options
Measuring unit resolution and higher
Diameter display (except for angle
display)
Polarity (+/–)
: Measuring unit input 1
: Measuring unit input 2
: Measuring unit input 3
: Nothing displayed
Display 1...X/Z
Display 2...Y/Z
Display 3...Z
0.100000 - 9.999999
(Enter the scaling magnification.)
: No setting
: (Enter the linear
compensation value)
: (Enter the segmented
error compensation
value)
: No setting
: Weak
: Strong
: No setting
: 1 minute
: 5 minutes
: 10 minutes
: 30 minutes
: 60 minutes
1.0000 - 20.0000
(Enter the touch sensor radius.)
Remarks
This sets the resolution that is displayed.
The setting may vary depending on the
setting for the measuring unit resolution
in the “basic settings”.
For the lathe function, the diameter
display can be used to display twice the
amount of the cut of a cutting tool. Set
the polarity so that the value of the
cutting direction (X-axis) decreases.
During diameter display, φ will light up in
lamp display mode.
∗ Pressing the key enables you
to add the type of display resolution.
This is the measuring unit input and
display 1/2/3 combination. The count
display location (display 1/2/3) can be
changed without reconnecting the
measuring unit input. The respective
settings are linked to the selected
option.
This is the display 1/2/3 and axis
label combination.
∗ See Part 5-6, “Scaling”.
∗ See Part 5-5, “Compensation”.
Reducing display flicker.
OFF status shows the most accurate
status.
The display is turned off if no
operations are performed for a preset
time.
This sets the touch sensor radius.
The display value changes based on
the setting of the measuring unit
resolution. The setting is entered for
the first axis only.
X
Y
Z
1-axis model
X or Z
2-axis model
X
or
X
or
Z
YZY